
Owners Manual
Page 26
... TV can receive video and audio signals simultaneously when using a HDMI cable. G If the DVD does not support Auto HDMI, you must set the output resolution appropriately. HDMI/DVI IN 1 24 EXTERNAL EQUIPMENT SETUP EXTERNAL EQIPMENT SETUP Connecting with a S-Video cable (Except for operating instructions. ! HDMI IN 3 2 Connect the audio outputs...
... TV can receive video and audio signals simultaneously when using a HDMI cable. G If the DVD does not support Auto HDMI, you must set the output resolution appropriately. HDMI/DVI IN 1 24 EXTERNAL EQUIPMENT SETUP EXTERNAL EQIPMENT SETUP Connecting with a S-Video cable (Except for operating instructions. ! HDMI IN 3 2 Connect the audio outputs...

Owners Manual
Page 31
... from the monitor output port of the PC to the RGB (PC) port of the TV or the signal cable from the PC to another resolution or change the refresh rate to the Audio input on the TV. (Audio cables are separate. The TV provides EDID data to the HDMI IN... analogue and digital RGB simultaneously, switch the TV to either RGB or HDMI IN (or HDMI/DVI IN) to DVI cable. G Connect the PC to resolution, vertical pattern, contrast or brightness in PC mode. G If you use a screen saver when possible. G There may be interference on the screen; G This TV uses...
... from the monitor output port of the PC to the RGB (PC) port of the TV or the signal cable from the PC to another resolution or change the refresh rate to the Audio input on the TV. (Audio cables are separate. The TV provides EDID data to the HDMI IN... analogue and digital RGB simultaneously, switch the TV to either RGB or HDMI IN (or HDMI/DVI IN) to DVI cable. G Connect the PC to resolution, vertical pattern, contrast or brightness in PC mode. G If you use a screen saver when possible. G There may be interference on the screen; G This TV uses...

Owners Manual
Page 33
.../42LG20**, 32/37/42/47/52LG5***) RGB[PC], HDMI[PC] mode HDMI[DTV] mode Resolution 720x400 640x480 800x600 832x624 1024x768 1280x768 1360x768 1366x768 1440x900 1400x1050 1680x1050 1280x1024 1920x1080 Horizontal Vertical Frequency(kHz...00 70.00 75.029 59.87 59.8 59.6 59.90 59.948 59.94 60.0 59.988 Resolution 720x480 720x576 1280x720 1920x1080 Horizontal Vertical Frequency(kHz) Frequency(Hz) 31.469 / 31.5 31.25 37....72 66.647 70.08 59.94 60.31 60.00 59.87 59.80 59.988 Resolution 640x480 720x480 720x576 1280x720 1920x1080 Horizontal Vertical Frequency(kHz) Frequency(Hz) 31.469 31.469 ...
.../42LG20**, 32/37/42/47/52LG5***) RGB[PC], HDMI[PC] mode HDMI[DTV] mode Resolution 720x400 640x480 800x600 832x624 1024x768 1280x768 1360x768 1366x768 1440x900 1400x1050 1680x1050 1280x1024 1920x1080 Horizontal Vertical Frequency(kHz...00 70.00 75.029 59.87 59.8 59.6 59.90 59.948 59.94 60.0 59.988 Resolution 720x480 720x576 1280x720 1920x1080 Horizontal Vertical Frequency(kHz) Frequency(Hz) 31.469 / 31.5 31.25 37....72 66.647 70.08 59.94 60.31 60.00 59.87 59.80 59.988 Resolution 640x480 720x480 720x576 1280x720 1920x1080 Horizontal Vertical Frequency(kHz) Frequency(Hz) 31.469 31.469 ...
Owners Manual
Page 34
Select Yes. 5 OK Run Reset. SCREEN Resolution Move RETURN Prev. Auto Config. PICTURE Move OK D • Contrast : 70 • Brightness : 50 • Sharpness : 50 • Colour : 50 • Tint : 0 • Advanced Control &#...
Select Yes. 5 OK Run Reset. SCREEN Resolution Move RETURN Prev. Auto Config. PICTURE Move OK D • Contrast : 70 • Brightness : 50 • Sharpness : 50 • Colour : 50 • Tint : 0 • Advanced Control &#...
Owners Manual
Page 35
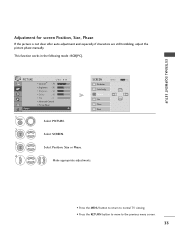
... OK D • Contrast : 70 • Brightness : 50 • Sharpness : 50 • Colour : 50 • Tint : 0 • Advanced Control • Picture Reset Screen 1MENU Select PICTURE. Resolution Auto Config. SCREEN Move RETURN Prev. Position G Size D F G E Phase Reset 2 OK Select SCREEN. 3 OK Select Position, Size or Phase. 4 Make appropriate adjustments. • Press the...
... OK D • Contrast : 70 • Brightness : 50 • Sharpness : 50 • Colour : 50 • Tint : 0 • Advanced Control • Picture Reset Screen 1MENU Select PICTURE. Resolution Auto Config. SCREEN Move RETURN Prev. Position G Size D F G E Phase Reset 2 OK Select SCREEN. 3 OK Select Position, Size or Phase. 4 Make appropriate adjustments. • Press the...
Owners Manual
Page 36
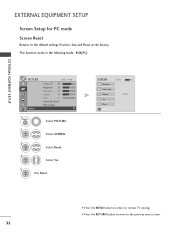
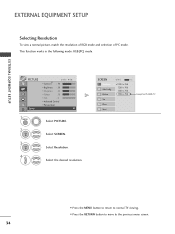
... : 50 • Tint : 0 • Advanced Control • Picture Reset Screen 1MENU Select PICTURE. 2 OK Select SCREEN. 3 OK 4 Select Resolution. EXTERNAL EQIPMENT SETUP EXTERNAL EQUIPMENT SETUP Selecting Resolution To view a normal picture, match the resolution of RGB mode and selection of PC mode. SCREEN Move RETURN Prev. Position 1024 x 768 1280 x 768 1360 x 768...
... : 50 • Tint : 0 • Advanced Control • Picture Reset Screen 1MENU Select PICTURE. 2 OK Select SCREEN. 3 OK 4 Select Resolution. EXTERNAL EQIPMENT SETUP EXTERNAL EQUIPMENT SETUP Selecting Resolution To view a normal picture, match the resolution of RGB mode and selection of PC mode. SCREEN Move RETURN Prev. Position 1024 x 768 1280 x 768 1360 x 768...
Owners Manual
Page 37
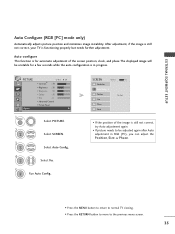
... the RETURN button to move to be unstable for a few seconds while the auto configuration is functioning properly but needs further adjustment. Auto Config. SCREEN Resolution Move RETURN Prev. G Position Size To Set Phase Reset • If the position of the screen position, clock, and phase The displayed image will be...
... the RETURN button to move to be unstable for a few seconds while the auto configuration is functioning properly but needs further adjustment. Auto Config. SCREEN Resolution Move RETURN Prev. G Position Size To Set Phase Reset • If the position of the screen position, clock, and phase The displayed image will be...
Owners Manual
Page 66
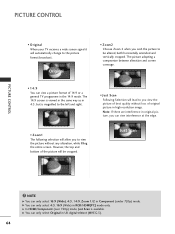
... edge. The 14:9 screen is viewed in the same way as in RGB/HDMI[PC] mode only. NOTE G You can only select Original in high resolution image. Original • Zoom2 Choose Zoom 2 when you wish the picture to be cropped. • Just Scan Following Selection will automatically change to the picture...
... edge. The 14:9 screen is viewed in the same way as in RGB/HDMI[PC] mode only. NOTE G You can only select Original in high resolution image. Original • Zoom2 Choose Zoom 2 when you wish the picture to be cropped. • Just Scan Following Selection will automatically change to the picture...
Owners Manual
Page 102
... function does not work. A Check the input source. Picture OK & No sound A Press the VOLUME button. Unusual sound from one of range (Invalid format) A Adjust resolution, horizontal frequency or vertical frequency. APPENDIX 100 The problem may result in an unusual noise when the TV is unstable A Check the signal cable. There...
... function does not work. A Check the input source. Picture OK & No sound A Press the VOLUME button. Unusual sound from one of range (Invalid format) A Adjust resolution, horizontal frequency or vertical frequency. APPENDIX 100 The problem may result in an unusual noise when the TV is unstable A Check the signal cable. There...

