
User Manual
Page 1
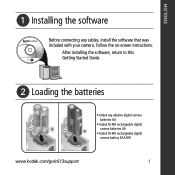
After installing the software, return to this Getting Started Guide. ᕢ Loading the batteries • Kodak oxy-alkaline digital camera batteries AA • Kodak Ni-MH rechargeable digital camera batteries AA • Kodak Ni-MH rechargeable digital camera battery KAA2HR www.kodak.com/go/c613support 1 ENGLISH ᕡ Installing the software Before connecting any cables, install the software that was included with your camera. Follow the on-screen instructions.
After installing the software, return to this Getting Started Guide. ᕢ Loading the batteries • Kodak oxy-alkaline digital camera batteries AA • Kodak Ni-MH rechargeable digital camera batteries AA • Kodak Ni-MH rechargeable digital camera battery KAA2HR www.kodak.com/go/c613support 1 ENGLISH ᕡ Installing the software Before connecting any cables, install the software that was included with your camera. Follow the on-screen instructions.

User Manual
Page 10
... or is "backlit" (when the light is taken. Doing more with your camera Using the flash button Use the flash when you take pictures at night, indoors, or outdoors in the LCD screen. Flash Fill Every time you take a picture, regardless of the lighting conditions....) @ ISO 200 Telephoto: 0.6-2.0 m (2-6.6 ft) @ ISO 200 Flash modes Flash fires Auto When the lighting conditions require it. In low light, hold the camera steady or use a tripod. Off Never. 10 www.kodak.com/go/easysharecenter Press the button repeatedly to scroll through flash modes (see Flash modes below).
... or is "backlit" (when the light is taken. Doing more with your camera Using the flash button Use the flash when you take pictures at night, indoors, or outdoors in the LCD screen. Flash Fill Every time you take a picture, regardless of the lighting conditions....) @ ISO 200 Telephoto: 0.6-2.0 m (2-6.6 ft) @ ISO 200 Flash modes Flash fires Auto When the lighting conditions require it. In low light, hold the camera steady or use a tripod. Off Never. 10 www.kodak.com/go/easysharecenter Press the button repeatedly to scroll through flash modes (see Flash modes below).

User Manual
Page 16
Deleting pictures and videos 1 Press the Review button. 2 View previous/next. 3 Press the Delete button. 4 Follow the screen prompts. 16 www.kodak.com/go/easysharecenter 2 Working with pictures/videos Magnifying a picture 1 Press the Review button. 2 Press W/T to magnify 2X-8X. 3 Press to view other parts of the picture. 4 Press OK to return to 1X.
Deleting pictures and videos 1 Press the Review button. 2 View previous/next. 3 Press the Delete button. 4 Follow the screen prompts. 16 www.kodak.com/go/easysharecenter 2 Working with pictures/videos Magnifying a picture 1 Press the Review button. 2 Press W/T to magnify 2X-8X. 3 Press to view other parts of the picture. 4 Press OK to return to 1X.

User Manual
Page 17
..., then press OK. 3 Press to save the enhanced picture as a new one. www.kodak.com/go/c613support 17 The enhancement is previewed in a split screen. Follow the screen prompts to replace the original picture or to highlight Perfect Touch tech., then press OK. Working... with pictures/videos Using Kodak Perfect Touch technology Kodak Perfect Touch technology helps ensure better, brighter pictures. ...
..., then press OK. 3 Press to save the enhanced picture as a new one. www.kodak.com/go/c613support 17 The enhancement is previewed in a split screen. Follow the screen prompts to replace the original picture or to highlight Perfect Touch tech., then press OK. Working... with pictures/videos Using Kodak Perfect Touch technology Kodak Perfect Touch technology helps ensure better, brighter pictures. ...

User Manual
Page 18
...to highlight 3 Press to highlight Crop, then press OK. 4 Press Telephoto (T) to zoom in, or to exit the menu. 18 www.kodak.com/go/easysharecenter Press Picture Cropped picture Edit Picture, then press OK. The picture is saved. (Cropped pictures cannot be cropped again.) &#...9632; Press the Menu button to move the crop box. Press OK. 5 Follow the screen prompts. The original is cropped. Working with pictures/videos Cropping pictures You can crop a picture so that only the desired portion of the picture remains...
...to highlight 3 Press to highlight Crop, then press OK. 4 Press Telephoto (T) to zoom in, or to exit the menu. 18 www.kodak.com/go/easysharecenter Press Picture Cropped picture Edit Picture, then press OK. The picture is saved. (Cropped pictures cannot be cropped again.) &#...9632; Press the Menu button to move the crop box. Press OK. 5 Follow the screen prompts. The original is cropped. Working with pictures/videos Cropping pictures You can crop a picture so that only the desired portion of the picture remains...

User Manual
Page 19
www.kodak.com/go/c613support 19 Press Edit Video, then press OK. A picture is created. (The original video is saved.) ■ Press the Menu button to save the picture. to highlight Video Picture 3 Press to highlight Make Picture, then press OK. 4 Press OK to select a video frame. 5 Follow the screen prompts to exit the menu. Working with pictures/videos Editing videos Making a picture from a video You can choose a single frame from a video, then make a picture suitable for printing. 1 Press the Review button, then to find a video. 2 Press the Menu button.
www.kodak.com/go/c613support 19 Press Edit Video, then press OK. A picture is created. (The original video is saved.) ■ Press the Menu button to save the picture. to highlight Video Picture 3 Press to highlight Make Picture, then press OK. 4 Press OK to select a video frame. 5 Follow the screen prompts to exit the menu. Working with pictures/videos Editing videos Making a picture from a video You can choose a single frame from a video, then make a picture suitable for printing. 1 Press the Review button, then to find a video. 2 Press the Menu button.


