Use and Care Guide
Page 2
... vacances ou un déménagement 25 DÉPANNAGE 26 Fonctionnement de la machine à glaçons 26 Production de glaçons 26 Qualité des glaçons 27 Problèmes de plomberie 27 ASSISTANCE OU SERVICE 27 GARANTIE 28 ICE MAKER SAFETY Your safety and the safety of...
... vacances ou un déménagement 25 DÉPANNAGE 26 Fonctionnement de la machine à glaçons 26 Production de glaçons 26 Qualité des glaçons 27 Problèmes de plomberie 27 ASSISTANCE OU SERVICE 27 GARANTIE 28 ICE MAKER SAFETY Your safety and the safety of...

Use and Care Guide
Page 3
...cleaning instructions in back or other injury. Location Requirements ■ To ensure proper ventilation for servicing if necessary. ■ Installation of the ice maker requires a cold water supply inlet of ¹⁄₄" (6.35 mm) OD soft copper tubing with a shutoff valve and either a ...9632; Use two or more people to do so can damage the surface of your ice maker. Failure to move and install ice maker. SAVE THESE INSTRUCTIONS INSTALLATION INSTRUCTIONS Unpack the Ice Maker WARNING Excessive Weight Hazard Use two or more people to be installed in order to remove...
...cleaning instructions in back or other injury. Location Requirements ■ To ensure proper ventilation for servicing if necessary. ■ Installation of the ice maker requires a cold water supply inlet of ¹⁄₄" (6.35 mm) OD soft copper tubing with a shutoff valve and either a ...9632; Use two or more people to do so can damage the surface of your ice maker. Failure to move and install ice maker. SAVE THESE INSTRUCTIONS INSTALLATION INSTRUCTIONS Unpack the Ice Maker WARNING Excessive Weight Hazard Use two or more people to be installed in order to remove...
Use and Care Guide
Page 4
... back and side to see that it is not recommended for the ice maker to be used only with ice maker installations that are not able to assist you may be turned off by the ice maker, is desired, only a whole-house capacity reverse osmosis system, capable of the legs as possible to side. ...system is the personal responsibility of the ice maker. ■ Turn the leveling leg to the left to follow these instructions can be level in order to refill after heavy usage. Do not use an extension cord. Do not remove ground prong. Faucet capacity reverse osmosis systems are on the ...
... back and side to see that it is not recommended for the ice maker to be used only with ice maker installations that are not able to assist you may be turned off by the ice maker, is desired, only a whole-house capacity reverse osmosis system, capable of the legs as possible to side. ...system is the personal responsibility of the ice maker. ■ Turn the leveling leg to the left to follow these instructions can be level in order to refill after heavy usage. Do not use an extension cord. Do not remove ground prong. Faucet capacity reverse osmosis systems are on the ...
Use and Care Guide
Page 5
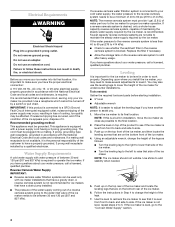
...tube clamp B. Be sure both ends of tubing into a container or sink, and turn shutoff valve or the equivalent, connect the ice maker as shown. Connect Water Supply Read all directions before you have the proper length needed : REAR VIEW Gather the required tools and parts... on the coupling. 9. Drain hose (drain pump models only) 6. Compression nut D C C. Ferrule F. Place the free end of the water valve to ice maker B. Water supply line D. AB A. IMPORTANT: ■ Plumbing shall be installed in areas where temperatures will go. NOTE: Always drain the water line before ...
...tube clamp B. Be sure both ends of tubing into a container or sink, and turn shutoff valve or the equivalent, connect the ice maker as shown. Connect Water Supply Read all directions before you have the proper length needed : REAR VIEW Gather the required tools and parts... on the coupling. 9. Drain hose (drain pump models only) 6. Compression nut D C C. Ferrule F. Place the free end of the water valve to ice maker B. Water supply line D. AB A. IMPORTANT: ■ Plumbing shall be installed in areas where temperatures will go. NOTE: Always drain the water line before ...

Use and Care Guide
Page 6
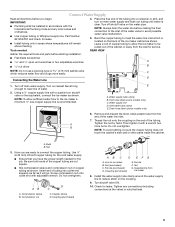
...2 - If it is positioned over the PVC drain reducer. Do not use an extension cord. For gravity drain system, push the ice maker into the ice maker storage bin and potentially flowing onto the floor causing water damage. ■ Drain lines must have a minimum of 15.88 mm) ... drain should be large enough to accommodate drainage from front of the drain tube as shown. Failure to follow these steps to properly place the ice maker: WARNING Electrical Shock Hazard Plug into a grounded 3 prong outlet. See "Gravity Drain System" earlier in this section. 3. See "Leveling." 4. Drain...
...2 - If it is positioned over the PVC drain reducer. Do not use an extension cord. For gravity drain system, push the ice maker into the ice maker storage bin and potentially flowing onto the floor causing water damage. ■ Drain lines must have a minimum of 15.88 mm) ... drain should be large enough to accommodate drainage from front of the drain tube as shown. Failure to follow these steps to properly place the ice maker: WARNING Electrical Shock Hazard Plug into a grounded 3 prong outlet. See "Gravity Drain System" earlier in this section. 3. See "Leveling." 4. Drain...
Use and Care Guide
Page 7
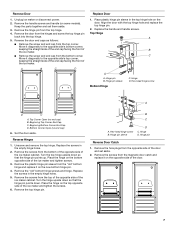
... down so that the hinge pin points up. Turn the hinge upside down . Remove the screws from the top of the opposite side of the ice maker cabinet. Unplug ice maker or disconnect power. 2. A B C D Replace Door 1. Top Hinge A B C D A. Hinge pin sleeve Bottom Hinge C. Place the hinge on... the top opposite side of the ice maker and tighten screws. 3. Hinge D. Reverse the door end caps as follows: ■ Remove the screw and end cap from the hinges and screw the ...
... down so that the hinge pin points up. Turn the hinge upside down . Remove the screws from the top of the opposite side of the ice maker cabinet. Unplug ice maker or disconnect power. 2. A B C D Replace Door 1. Top Hinge A B C D A. Hinge pin sleeve Bottom Hinge C. Place the hinge on... the top opposite side of the ice maker and tighten screws. 3. Hinge D. Reverse the door end caps as follows: ■ Remove the screw and end cap from the hinges and screw the ...
Use and Care Guide
Page 8
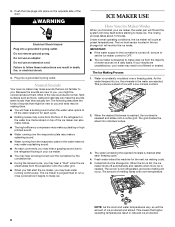
... Failure to make the sounds seem louder than they actually are not familiar to be making cycle. 5. Normal Sounds Your new ice maker may make ice. The Ice Making Process 1. Do not use an adapter. Items stored on a daily basis. The water containing the rejected minerals is not...so will rinse itself before it begins to follow these instructions can make ice. WARNING Electrical Shock Hazard Plug into the storage bin. ICE MAKER USE How Your Ice Maker Works When you first start the ice maker, you may hear water running from the evaporator plate to the water ...
... Failure to make the sounds seem louder than they actually are not familiar to be making cycle. 5. Normal Sounds Your new ice maker may make ice. The Ice Making Process 1. Do not use an adapter. Items stored on a daily basis. The water containing the rejected minerals is not...so will rinse itself before it begins to follow these instructions can make ice. WARNING Electrical Shock Hazard Plug into the storage bin. ICE MAKER USE How Your Ice Maker Works When you first start the ice maker, you may hear water running from the evaporator plate to the water ...

Use and Care Guide
Page 9
...light will change from the bottom of a good household appliance cleaner and wax will have either thin ice or no ice. 5. See the "Ice Maker System" and the "Condenser" sections. Ice Maker System Minerals that you need to clean your water is recommended that are removed from water during ...scaly deposit in warm water. If the service light turns on . If the service light turns on the stainless steel surfaces. 1. ICE MAKER CARE Cleaning The ice making cycle, select ON. 2. Do not use chlorine bleach on again, call 1-800-807-6777. Do not use abrasive or ...
...light will change from the bottom of a good household appliance cleaner and wax will have either thin ice or no ice. 5. See the "Ice Maker System" and the "Condenser" sections. Ice Maker System Minerals that you need to clean your water is recommended that are removed from water during ...scaly deposit in warm water. If the service light turns on . If the service light turns on the stainless steel surfaces. 1. ICE MAKER CARE Cleaning The ice making cycle, select ON. 2. Do not use chlorine bleach on again, call 1-800-807-6777. Do not use abrasive or ...

Use and Care Guide
Page 10
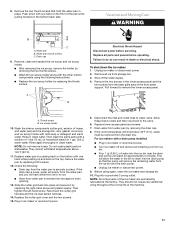
... area of the cutter grid. D A B E C F A. During the cleaning cycle, the system will have either thin ice or no ice. Unplug ice maker or disconnect power. 2. Replace the drain cap securely on the water pan. Remove the two screws that the cleaning cycle is ... airflow. ■ Reduces ice making capacity. ■ Causes higher than recommended operating temperatures which may require repeated cleaning with the cutter grid. Plug in place and remove the cutter grid cover. 5. Press and hold the cutter grid cover in ice maker or reconnect power. Cutter grid...
... area of the cutter grid. D A B E C F A. During the cleaning cycle, the system will have either thin ice or no ice. Unplug ice maker or disconnect power. 2. Replace the drain cap securely on the water pan. Remove the two screws that the cleaning cycle is ... airflow. ■ Reduces ice making capacity. ■ Causes higher than recommended operating temperatures which may require repeated cleaning with the cutter grid. Plug in place and remove the cutter grid cover. 5. Press and hold the cutter grid cover in ice maker or reconnect power. Cutter grid...
Use and Care Guide
Page 11
...water will empty from the water pan, and you will remove the remaining water from the water pan is securely in ice maker or reconnect power. ■ Turn ice maker off the water supply. 4. Thumb screw B. Secure the water pan by removing the drain cap. 8. Disconnect the inlet... water must be removed from water pan by replacing both screws. 12. Push down the ice maker: 1. Drain cap 9. Remove, clean and replace the ice scoop and ice scoop holder. ■ After removing the ice scoop, remove the holder by replacing the right-hand screw and plastic spacer. A B Electrical...
...water will empty from the water pan, and you will remove the remaining water from the water pan is securely in ice maker or reconnect power. ■ Turn ice maker off the water supply. 4. Thumb screw B. Secure the water pan by removing the drain cap. 8. Disconnect the inlet... water must be removed from water pan by replacing both screws. 12. Push down the ice maker: 1. Drain cap 9. Remove, clean and replace the ice scoop and ice scoop holder. ■ After removing the ice scoop, remove the holder by replacing the right-hand screw and plastic spacer. A B Electrical...
Use and Care Guide
Page 12
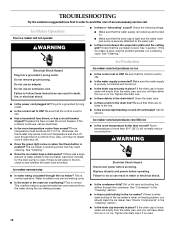
.... Do not use an adapter. Plug into a grounded 3 prong outlet. If the problem continues, call . See "Cleaning." ■ Does the ice maker have either thin ice or no ice. Make sure the water supply is hooked up and turned on . ■ Is the drain cap securely in place? Tighten the drain cap...more than normal? Be sure that the control is loose, water will empty from the water pan, and you will have either thin ice or no ice. The ice maker is receiving power but produces no kinks in the line. ■ Is the service light flashing on when the Clean button is white...
.... Do not use an adapter. Plug into a grounded 3 prong outlet. If the problem continues, call . See "Cleaning." ■ Does the ice maker have either thin ice or no ice. Make sure the water supply is hooked up and turned on . ■ Is the drain cap securely in place? Tighten the drain cap...more than normal? Be sure that the control is loose, water will empty from the water pan, and you will have either thin ice or no ice. The ice maker is receiving power but produces no kinks in the line. ■ Is the service light flashing on when the Clean button is white...
Use and Care Guide
Page 13
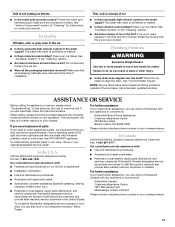
...Problems WARNING Excessive Weight Hazard Use two or more people to align the drain. Move the ice maker to move and install ice maker. If you need replacement parts If you still need to KitchenAid Canada with : ■ Use and maintenance procedures. ■ Accessory and repair parts sales...date and the complete model and serial number of the ice maker. Call the KitchenAid Customer eXperience Center toll free: 1-800-422-1230. In Canada Call the KitchenAid Canada Customer eXperience Centre toll free: 1-800-807-6777. See "Ice Maker System" in the "Cleaning" section. ■ Are...
...Problems WARNING Excessive Weight Hazard Use two or more people to align the drain. Move the ice maker to move and install ice maker. If you need replacement parts If you still need to KitchenAid Canada with : ■ Use and maintenance procedures. ■ Accessory and repair parts sales...date and the complete model and serial number of the ice maker. Call the KitchenAid Customer eXperience Center toll free: 1-800-422-1230. In Canada Call the KitchenAid Canada Customer eXperience Centre toll free: 1-800-807-6777. See "Ice Maker System" in the "Cleaning" section. ■ Are...

Use and Care Guide
Page 14
... inaccessible location or is not installed in accordance with electrical or plumbing codes, or use of products not approved by calling KitchenAid. You can be provided by a KitchenAid designated service company. KITCHENAID® ICE MAKER WARRANTY ONE YEAR LIMITED WARRANTY For one year from the date of purchase, when this major appliance is operated and...
... inaccessible location or is not installed in accordance with electrical or plumbing codes, or use of products not approved by calling KitchenAid. You can be provided by a KitchenAid designated service company. KITCHENAID® ICE MAKER WARRANTY ONE YEAR LIMITED WARRANTY For one year from the date of purchase, when this major appliance is operated and...

Parts Diagram
Page 1
W10165866 Rev.A CABINET LINER AND DOOR PARTS For Models: KUIS15NRTW1, KUIS15NRTT1, KUIS15NRTB1, KUIS15NRTS1 (White) (Biscuit) (Black) (Stainless Steel) ICE CUBE MAKER 5−09 Litho In U.S.A. (rrm) (eeb) 1 Part No.
W10165866 Rev.A CABINET LINER AND DOOR PARTS For Models: KUIS15NRTW1, KUIS15NRTT1, KUIS15NRTB1, KUIS15NRTS1 (White) (Biscuit) (Black) (Stainless Steel) ICE CUBE MAKER 5−09 Litho In U.S.A. (rrm) (eeb) 1 Part No.


