
Use and Care Guide
Page 3
... A. If needed, you remove all parts and panels before operating. ■ Use two or more people to work properly. The ice maker may be completely unobstructed. Recommended location for your ice maker. Removing Packaging Materials Remove tape and glue from your ice maker before using . ■ To remove... Use After you can also be installed in the recommended location as wind, rain, water spray, or drip. ■ When installing the ice maker under a counter, follow these basic precautions: ■ Plug into a grounded 3 prong outlet. ■ Do not remove ground prong. ...
... A. If needed, you remove all parts and panels before operating. ■ Use two or more people to work properly. The ice maker may be completely unobstructed. Recommended location for your ice maker. Removing Packaging Materials Remove tape and glue from your ice maker before using . ■ To remove... Use After you can also be installed in the recommended location as wind, rain, water spray, or drip. ■ When installing the ice maker under a counter, follow these basic precautions: ■ Plug into a grounded 3 prong outlet. ■ Do not remove ground prong. ...
Use and Care Guide
Page 4
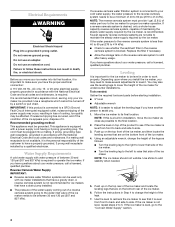
...to be a minimum of the ice maker. 4. It is recommended. This appliance is equipped with water pressure of the customer to raise that are on the reverse osmosis system to add stability when needed : Gather the required tools and parts before starting installation. ■ ...grounding plug. Depending upon where you install the ice maker, you have a gravity drain. Faucet capacity reverse osmosis systems are on the top front of the ice maker, and then locate the leveling screws that are not able to the ice maker for ice makers that it . Do not use an extension ...
...to be a minimum of the ice maker. 4. It is recommended. This appliance is equipped with water pressure of the customer to raise that are on the reverse osmosis system to add stability when needed : Gather the required tools and parts before starting installation. ■ ...grounding plug. Depending upon where you install the ice maker, you have a gravity drain. Faucet capacity reverse osmosis systems are on the top front of the ice maker, and then locate the leveling screws that are not able to the ice maker for ice makers that it . Do not use an extension ...
Use and Care Guide
Page 5
...sure the copper tubing does not touch the cabinet's side wall or other parts inside the cabinet. Insert end of tubing into a container or sink, and turn shutoff valve or the equivalent, connect the ice maker as shown. Tighten any local codes and ordinances. ■ Use copper ...tubing or Whirlpool supply line, Part Number 8212547RP, and check for leaks. ■ Install tubing only in areas where temperatures ...
...sure the copper tubing does not touch the cabinet's side wall or other parts inside the cabinet. Insert end of tubing into a container or sink, and turn shutoff valve or the equivalent, connect the ice maker as shown. Tighten any local codes and ordinances. ■ Use copper ...tubing or Whirlpool supply line, Part Number 8212547RP, and check for leaks. ■ Install tubing only in areas where temperatures ...

Use and Care Guide
Page 6
...follow these instructions can result in accordance with the International Plumbing Code and any local codes and ordinances. Tools needed: Ice Maker Door Gather the required tools and parts before starting installation. You must maintain a 1" (2.54 cm) air gap between the drain hose and the standpipe. ...9632; Phillips screwdriver Hinge pin Hex-head hinge screw Handle screw End Cap screw 6 Drain Connection Gravity Drain System Connect the ice maker drain to your local sanitation code, seal the cabinet to the floor with an approved caulking compound after all water and ...
...follow these instructions can result in accordance with the International Plumbing Code and any local codes and ordinances. Tools needed: Ice Maker Door Gather the required tools and parts before starting installation. You must maintain a 1" (2.54 cm) air gap between the drain hose and the standpipe. ...9632; Phillips screwdriver Hinge pin Hex-head hinge screw Handle screw End Cap screw 6 Drain Connection Gravity Drain System Connect the ice maker drain to your local sanitation code, seal the cabinet to the floor with an approved caulking compound after all water and ...
Use and Care Guide
Page 7
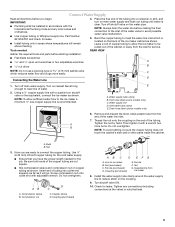
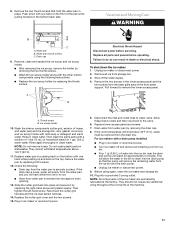
...pin Reverse Door Catch 1. Remove the screws from the opposite side of the ice maker. ■ Remove the screw and end cap from the hinges and screw the top hinge pin back into the top hinge. 5. Keep the parts together and set aside. 2. Reverse the door end caps as follows: &#...9632; Remove the screw and end cap from the top hinge. 4. Beginning Top Corner End Cap C. Place the hinge on the opposite side of the ice maker and tighten screws. 3. Unplug ice maker or disconnect power. ...
...pin Reverse Door Catch 1. Remove the screws from the opposite side of the ice maker. ■ Remove the screw and end cap from the hinges and screw the top hinge pin back into the top hinge. 5. Keep the parts together and set aside. 2. Reverse the door end caps as follows: &#...9632; Remove the screw and end cap from the top hinge. 4. Beginning Top Corner End Cap C. Place the hinge on the opposite side of the ice maker and tighten screws. 3. Unplug ice maker or disconnect power. ...

Use and Care Guide
Page 9
...gaskets with tap water and pour it is time to clean the system depends upon how hard your ice maker, see "Ice Maker System" in the "Cleaning" section. Do not use chlorine bleach on . Ice Maker System Minerals that you need to be disabled and the interior lights will help maintain the finish. Holiday...on again, call 1-800-442-9991 and ask for the ice to turn the ice maker off the feature. If the drain cap is needed. If the service light turns on, turn on the water pan. Wait 5 to 10 minutes for Part Number 4396808. Cleaning the system regularly helps remove the mineral...
...gaskets with tap water and pour it is time to clean the system depends upon how hard your ice maker, see "Ice Maker System" in the "Cleaning" section. Do not use chlorine bleach on . Ice Maker System Minerals that you need to be disabled and the interior lights will help maintain the finish. Holiday...on again, call 1-800-442-9991 and ask for the ice to turn the ice maker off the feature. If the drain cap is needed. If the service light turns on, turn on the water pan. Wait 5 to 10 minutes for Part Number 4396808. Cleaning the system regularly helps remove the mineral...

Use and Care Guide
Page 10
...NOTE: Severe scale buildup may lead to resume ice production. WARNING 4. Unplug ice maker or disconnect power. 2. Unplug ice maker or disconnect power. 2. Pull the bottom forward... A dirty or clogged condenser: ■ Obstructs proper airflow. ■ Reduces ice making capacity. ■ Causes higher than recommended operating temperatures which may require repeated cleaning with... A. Screw 10 Replace all parts and panels before cleaning. Look for any ice that the cleaning cycle is loose, water will have either thin ice or no ice. 4. Plastic spacer F. After ...
...NOTE: Severe scale buildup may lead to resume ice production. WARNING 4. Unplug ice maker or disconnect power. 2. Unplug ice maker or disconnect power. 2. Pull the bottom forward... A dirty or clogged condenser: ■ Obstructs proper airflow. ■ Reduces ice making capacity. ■ Causes higher than recommended operating temperatures which may require repeated cleaning with... A. Screw 10 Replace all parts and panels before cleaning. Look for any ice that the cleaning cycle is loose, water will have either thin ice or no ice. 4. Plastic spacer F. After ...
Use and Care Guide
Page 11
...the thumb screws. Push down the ice maker: 1. Water pan thumb screws C. To shut down with one hand on the front of the front panel support. Thumb screw B. Do not wash plastic parts in clean water. Check the following instructions. ■ Replace the ice scoop holder by replacing the right... shock. Disconnect the inlet and outlet lines to remove the lower access panel. Water pan B. Failure to do so can result in ice maker or reconnect power. 5. Replace water pan by removing the drain cap. 8. Then tighten the left-hand screw. This will remove the remaining...
...the thumb screws. Push down the ice maker: 1. Water pan thumb screws C. To shut down with one hand on the front of the front panel support. Thumb screw B. Do not wash plastic parts in clean water. Check the following instructions. ■ Replace the ice scoop holder by replacing the right... shock. Disconnect the inlet and outlet lines to remove the lower access panel. Water pan B. Failure to do so can result in ice maker or reconnect power. 5. Replace water pan by removing the drain cap. 8. Then tighten the left-hand screw. This will remove the remaining...
Use and Care Guide
Page 12
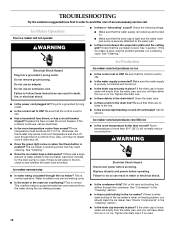
...lint may not restart once it is level, and the problem persists, run a cleaning cycle. See "Leveling." If the ice maker is loose. If there was a large amount of more than 90°F (32°C) will have a drain pump...properly connected and turned on . ■ Make sure that the control is level. Ice Maker Operation Your ice maker will have either thin ice or no kinks in the line. ■ Is the service light flashing on when .... ■ Is the power cord plugged in? Replace all parts and panels before servicing. Failure to the ice maker, wait a few minutes for service.
...lint may not restart once it is level, and the problem persists, run a cleaning cycle. See "Leveling." If the ice maker is loose. If there was a large amount of more than 90°F (32°C) will have a drain pump...properly connected and turned on . ■ Make sure that the control is level. Ice Maker Operation Your ice maker will have either thin ice or no kinks in the line. ■ Is the service light flashing on when .... ■ Is the power cord plugged in? Replace all parts and panels before servicing. Failure to the ice maker, wait a few minutes for service.
Use and Care Guide
Page 13
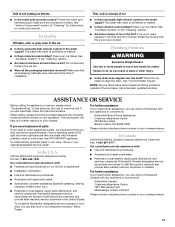
.... Check the cutter grid harness plug to be filtered or treated. ■ Is there mineral scale buildup? Clean your ice maker. Clean your ice maker. If you need replacement parts If you need to local dealers, repair parts distributors, and services companies. Call the KitchenAid Customer eXperience Center toll free: 1-800-422-1230. See "Connect Water Supply...
.... Check the cutter grid harness plug to be filtered or treated. ■ Is there mineral scale buildup? Clean your ice maker. Clean your ice maker. If you need replacement parts If you need to local dealers, repair parts distributors, and services companies. Call the KitchenAid Customer eXperience Center toll free: 1-800-422-1230. See "Connect Water Supply...

Use and Care Guide
Page 14
...and your major appliance, to instruct you ever need to know your authorized KitchenAid dealer to repair or replace appliance light bulbs, air filters or water filters. KITCHENAID® ICE MAKER WARRANTY ONE YEAR LIMITED WARRANTY For one year from the date of purchase,... when this major appliance is operated and maintained according to instructions attached to or furnished with published installation instructions. Those consumable parts are compressor, evaporator,...
...and your major appliance, to instruct you ever need to know your authorized KitchenAid dealer to repair or replace appliance light bulbs, air filters or water filters. KITCHENAID® ICE MAKER WARRANTY ONE YEAR LIMITED WARRANTY For one year from the date of purchase,... when this major appliance is operated and maintained according to instructions attached to or furnished with published installation instructions. Those consumable parts are compressor, evaporator,...

Parts Diagram
Page 1
CABINET LINER AND DOOR PARTS For Models: KUIS15NRTW1, KUIS15NRTT1, KUIS15NRTB1, KUIS15NRTS1 (White) (Biscuit) (Black) (Stainless Steel) ICE CUBE MAKER 5−09 Litho In U.S.A. (rrm) (eeb) 1 Part No. W10165866 Rev.A
CABINET LINER AND DOOR PARTS For Models: KUIS15NRTW1, KUIS15NRTT1, KUIS15NRTB1, KUIS15NRTS1 (White) (Biscuit) (Black) (Stainless Steel) ICE CUBE MAKER 5−09 Litho In U.S.A. (rrm) (eeb) 1 Part No. W10165866 Rev.A

Parts Diagram
Page 2
...Right Side 2185656W White 2185656T Biscuit 2185656B Black 25 2185756 Pad, Foam 26 2185691 Channel, Wiring 28 2185989 Tube, Drain 29 585158 Scoop 30 3400884 Screw Illus. Part No. No. No. CABINET LINER AND DOOR PARTS For Models: KUIS15NRTW1, KUIS15NRTT1, KUIS15NRTB1, ...KUIS15NRTS1 (White) (Biscuit) (Black) (Stainless Steel) Illus. DESCRIPTION 1 Literature Parts 2313814 Use & Care Guide 2324311 Service & Wiring Sheet...
...Right Side 2185656W White 2185656T Biscuit 2185656B Black 25 2185756 Pad, Foam 26 2185691 Channel, Wiring 28 2185989 Tube, Drain 29 585158 Scoop 30 3400884 Screw Illus. Part No. No. No. CABINET LINER AND DOOR PARTS For Models: KUIS15NRTW1, KUIS15NRTT1, KUIS15NRTB1, ...KUIS15NRTS1 (White) (Biscuit) (Black) (Stainless Steel) Illus. DESCRIPTION 1 Literature Parts 2313814 Use & Care Guide 2324311 Service & Wiring Sheet...

Parts Diagram
Page 3
EVAPORATOR, ICE CUTTER GRID AND WATER PARTS For Models: KUIS15NRTW1, KUIS15NRTT1, KUIS15NRTB1, KUIS15NRTS1 (White) (Biscuit) (Black) (Stainless Steel) W10165866 3
EVAPORATOR, ICE CUTTER GRID AND WATER PARTS For Models: KUIS15NRTW1, KUIS15NRTT1, KUIS15NRTB1, KUIS15NRTS1 (White) (Biscuit) (Black) (Stainless Steel) W10165866 3

Parts Diagram
Page 4
...11 2208539 Fastener, Pushnut 12 489443 Screw 13 2185625 Reservoir, Water Slide 14 2185626 Tube 15 2313890 Hose, Overflow 16 2313604 Guide−Ice, Grid 17 2313603 Bracket, Front and Rear 18 2313602 Bracket, Side Left and Right 19 2185681 Harness, Grid 20 W10136146 Tube 21 2310169... 31 8281228 Thumbscrew 32 2324334 Reservoir, Water 33 3400884 Screw 34 2185696 Cap, Drain 35 3400909 Nut, Push−In 4 W10165866 Part No. No. EVAPORATOR, ICE CUTTER GRID AND WATER PARTS For Models: KUIS15NRTW1, KUIS15NRTT1, KUIS15NRTB1, KUIS15NRTS1 (White) (Biscuit) (Black) (Stainless Steel) Illus.
...11 2208539 Fastener, Pushnut 12 489443 Screw 13 2185625 Reservoir, Water Slide 14 2185626 Tube 15 2313890 Hose, Overflow 16 2313604 Guide−Ice, Grid 17 2313603 Bracket, Front and Rear 18 2313602 Bracket, Side Left and Right 19 2185681 Harness, Grid 20 W10136146 Tube 21 2310169... 31 8281228 Thumbscrew 32 2324334 Reservoir, Water 33 3400884 Screw 34 2185696 Cap, Drain 35 3400909 Nut, Push−In 4 W10165866 Part No. No. EVAPORATOR, ICE CUTTER GRID AND WATER PARTS For Models: KUIS15NRTW1, KUIS15NRTT1, KUIS15NRTB1, KUIS15NRTS1 (White) (Biscuit) (Black) (Stainless Steel) Illus.
Parts Diagram
Page 5
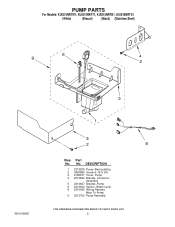
PUMP PARTS For Models: KUIS15NRTW1, KUIS15NRTT1, KUIS15NRTB1, KUIS15NRTS1 (White) (Biscuit) (Black) (Stainless Steel) W10165866 Illus. No. Part No. DESCRIPTION 1 2313628 Pump−Recirculating 2 3400884 Screw 8−18 X 5/8 3 2185677 Cover, Pump 4 2313844 Bracket, Connector Assembly 5 2313627 Bracket−Pump 6 2313643 Sensor−Water Level 8 2310092 Wiring Harness Main To Pump 9 2313702 Pump Assembly 5
PUMP PARTS For Models: KUIS15NRTW1, KUIS15NRTT1, KUIS15NRTB1, KUIS15NRTS1 (White) (Biscuit) (Black) (Stainless Steel) W10165866 Illus. No. Part No. DESCRIPTION 1 2313628 Pump−Recirculating 2 3400884 Screw 8−18 X 5/8 3 2185677 Cover, Pump 4 2313844 Bracket, Connector Assembly 5 2313627 Bracket−Pump 6 2313643 Sensor−Water Level 8 2310092 Wiring Harness Main To Pump 9 2313702 Pump Assembly 5
Parts Diagram
Page 6
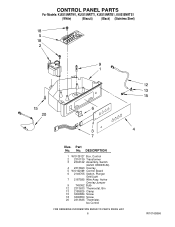
DESCRIPTION 1 W10139127 Box, Control 2 2310139 Transformer 3 2304122 Assembly, Switch (ALSO ORDER #4) 4 2313693 Overlay 5 W10122069 Control Board 6 2149705 Switch, Plunger Grid/Light 7 2187585 Wire Assy. No. CONTROL PANEL PARTS For Models: KUIS15NRTW1, KUIS15NRTT1, KUIS15NRTB1, KUIS15NRTS1 (White) (Biscuit) (Black) (Stainless Steel) Illus. Part No. Active Overlay Jumper 9 745362 Bulb 12 2313633 Thermostat, Bin 13 2185825 Clamp 15 3400884 Screw 18 3400850 Screw 20 2313635 Thermister, Ice Control 6 W10165866
DESCRIPTION 1 W10139127 Box, Control 2 2310139 Transformer 3 2304122 Assembly, Switch (ALSO ORDER #4) 4 2313693 Overlay 5 W10122069 Control Board 6 2149705 Switch, Plunger Grid/Light 7 2187585 Wire Assy. No. CONTROL PANEL PARTS For Models: KUIS15NRTW1, KUIS15NRTT1, KUIS15NRTB1, KUIS15NRTS1 (White) (Biscuit) (Black) (Stainless Steel) Illus. Part No. Active Overlay Jumper 9 745362 Bulb 12 2313633 Thermostat, Bin 13 2185825 Clamp 15 3400884 Screw 18 3400850 Screw 20 2313635 Thermister, Ice Control 6 W10165866

Parts Diagram
Page 8
...6 304392 Screw 7 W10136195 Compressor (Includes Illus. 11 & 23) 8 A201435 Clip, Mounting 9 A201441 Shim (4) 10 1115375 Clip−Wiring Illus. No. Part No. Part No. DESCRIPTION 11 Grommet (4) 2217318 Production 4387558 Service 12 2208415 Tube, Process 13 489423 Screw 14 489472 Screw 15 759112 Coil, Solenoid 16 2313806 Hot... Base, Unit 31 8281196 Screw 32 304392 Screw 33 488500 Ground Screw REFRIGERANT CHARGE 6.5 OZ. (R134A) 8 W10165866 No. UNIT PARTS For Models: KUIS15NRTW1, KUIS15NRTT1, KUIS15NRTB1, KUIS15NRTS1 (White) (Biscuit) (Black) (Stainless Steel) Illus. No...
...6 304392 Screw 7 W10136195 Compressor (Includes Illus. 11 & 23) 8 A201435 Clip, Mounting 9 A201441 Shim (4) 10 1115375 Clip−Wiring Illus. No. Part No. Part No. DESCRIPTION 11 Grommet (4) 2217318 Production 4387558 Service 12 2208415 Tube, Process 13 489423 Screw 14 489472 Screw 15 759112 Coil, Solenoid 16 2313806 Hot... Base, Unit 31 8281196 Screw 32 304392 Screw 33 488500 Ground Screw REFRIGERANT CHARGE 6.5 OZ. (R134A) 8 W10165866 No. UNIT PARTS For Models: KUIS15NRTW1, KUIS15NRTT1, KUIS15NRTB1, KUIS15NRTS1 (White) (Biscuit) (Black) (Stainless Steel) Illus. No...
Parts Diagram
Page 9
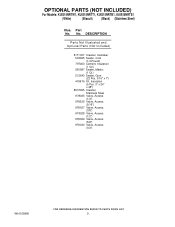
... INCLUDED) For Models: KUIS15NRTW1, KUIS15NRTT1, KUIS15NRTB1, KUIS15NRTS1 (White) (Biscuit) (Black) (Stainless Steel) Illus. DESCRIPTION Parts Not Illustrated and Optional Parts (Not Included) 8171307 Cleaner, Icemaker 503695 Sealer, Cork (1/4 Pound) 797403 Cement, Insulation (1 Oz.) 505587 Sealer, Mastic (1 Qt.) 212643 Sealer, Gum (22 Pcs. 3/16" x 7") 479976 ...48") 8537055 Cleaner, Stainless Steel 978025 Valve, Access (1/4") 978026 Valve, Access (5/16") 978027 Valve, Access (3/8") 978028 Valve, Access (1/2") 978029 Valve, Access (5/8") 978030 Valve, Access (3/4") W10165866 9 Part No.
... INCLUDED) For Models: KUIS15NRTW1, KUIS15NRTT1, KUIS15NRTB1, KUIS15NRTS1 (White) (Biscuit) (Black) (Stainless Steel) Illus. DESCRIPTION Parts Not Illustrated and Optional Parts (Not Included) 8171307 Cleaner, Icemaker 503695 Sealer, Cork (1/4 Pound) 797403 Cement, Insulation (1 Oz.) 505587 Sealer, Mastic (1 Qt.) 212643 Sealer, Gum (22 Pcs. 3/16" x 7") 479976 ...48") 8537055 Cleaner, Stainless Steel 978025 Valve, Access (1/4") 978026 Valve, Access (5/16") 978027 Valve, Access (3/8") 978028 Valve, Access (1/2") 978029 Valve, Access (5/8") 978030 Valve, Access (3/4") W10165866 9 Part No.