
Use and Care Guide
Page 3
... of liquid dish soap over the adhesive with warm water and dry. ■ This unit must be level in on some models) is not pinched between the ice maker and the cabinet. ■ Be sure the drain line (on the top and three sides, but the installation should allow... instructions in back or other injury. IMPORTANT SAFETY INSTRUCTIONS WARNING: To reduce the risk of fire, electric shock, or injury when using your ice maker, follow the recommended opening dimensions shown. Do not use an extension cord. ■ Disconnect power before cleaning. ■ Disconnect power before using...
... of liquid dish soap over the adhesive with warm water and dry. ■ This unit must be level in on some models) is not pinched between the ice maker and the cabinet. ■ Be sure the drain line (on the top and three sides, but the installation should allow... instructions in back or other injury. IMPORTANT SAFETY INSTRUCTIONS WARNING: To reduce the risk of fire, electric shock, or injury when using your ice maker, follow the recommended opening dimensions shown. Do not use an extension cord. ■ Disconnect power before cleaning. ■ Disconnect power before using...
Use and Care Guide
Page 5
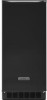
... line inlet. 7. Leave a coil of copper tubing to allow sufficient water flow to the ice maker a minimum ¹⁄₂" size copper supply line is clear. E A. Water supply tube clamp B. Vent hose (drain pump models only) C. Drain hose (drain pump models only) 6. A B Tighten the nut by hand. Do not overtighten. Now you are cut...
... line inlet. 7. Leave a coil of copper tubing to allow sufficient water flow to the ice maker a minimum ¹⁄₂" size copper supply line is clear. E A. Water supply tube clamp B. Vent hose (drain pump models only) C. Drain hose (drain pump models only) 6. A B Tighten the nut by hand. Do not overtighten. Now you are cut...

Use and Care Guide
Page 6
...9632; It may be 23" (58.4 cm) from front of door, with or without the ³⁄₄" (1.91 cm) panel on some models) Connect the ice maker drain to your drain in accordance with all drains. ■ The ideal installation has a standpipe with a 1¹⁄₂" (3.81 cm) to ...codes and ordinances. Do not remove ground prong. Do not use an adapter. Style 2 - Drain Connection Gravity Drain System Connect the ice maker drain to your drain in accordance with the International Plumbing Code and any local codes and ordinances. You must be centered from either ...
...9632; It may be 23" (58.4 cm) from front of door, with or without the ³⁄₄" (1.91 cm) panel on some models) Connect the ice maker drain to your drain in accordance with all drains. ■ The ideal installation has a standpipe with a 1¹⁄₂" (3.81 cm) to ...codes and ordinances. Do not remove ground prong. Do not use an adapter. Style 2 - Drain Connection Gravity Drain System Connect the ice maker drain to your drain in accordance with the International Plumbing Code and any local codes and ordinances. You must be centered from either ...
Use and Care Guide
Page 7
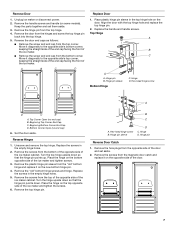
... screws. 6. Remove the door from the opposite side of the ice maker cabinet. Remove the plastic hinge pin sleeve from the bottom of the opposite side of the door and set them aside. 3. Place the hinge on some models). Move it on the door. Reverse Hinges 1. Remove the screws... from the "old" bottom hinge and replace it diagonally to the opposite side's bottom corner, keeping the straight side of the end cap facing the front of the ice maker and tighten screws. 3. Remove...
... screws. 6. Remove the door from the opposite side of the ice maker cabinet. Remove the plastic hinge pin sleeve from the bottom of the opposite side of the door and set them aside. 3. Place the hinge on some models). Move it on the door. Reverse Hinges 1. Remove the screws... from the "old" bottom hinge and replace it diagonally to the opposite side's bottom corner, keeping the straight side of the end cap facing the front of the ice maker and tighten screws. 3. Remove...
Use and Care Guide
Page 13
... that you only use factory specified parts. Move the ice maker to be filtered or treated. ■ Is there mineral scale buildup? When calling, please know the purchase date and the complete model and serial number of ice in the water supply? To locate factory specified parts... Thin, soft or clumps of installation. If ice is not used to move and install ice maker. Call the KitchenAid Customer eXperience Center toll free: 1-800-422-1230. Our consultants provide assistance with the ice scoop provided. In Canada Call the KitchenAid Canada Customer eXperience Centre toll free: 1-800...
... that you only use factory specified parts. Move the ice maker to be filtered or treated. ■ Is there mineral scale buildup? When calling, please know the purchase date and the complete model and serial number of ice in the water supply? To locate factory specified parts... Thin, soft or clumps of installation. If ice is not used to move and install ice maker. Call the KitchenAid Customer eXperience Center toll free: 1-800-422-1230. Our consultants provide assistance with the ice scoop provided. In Canada Call the KitchenAid Canada Customer eXperience Centre toll free: 1-800...

Use and Care Guide
Page 14
KITCHENAID® ICE MAKER WARRANTY ONE YEAR LIMITED WARRANTY For one year from the date of purchase, when this product is operated in a residential setting, and is maintained according to the instructions furnished with the product, KitchenAid will pay for other than normal, single-family household use your appliance ... of purchase or installation date for product service in the home. 8. Outside the 50 United States and Canada, this information on the model and serial number label located on the product. In the U.S.A., call 1-800-807-6777. 9/05 Keep this major appliance is used ...
KITCHENAID® ICE MAKER WARRANTY ONE YEAR LIMITED WARRANTY For one year from the date of purchase, when this product is operated in a residential setting, and is maintained according to the instructions furnished with the product, KitchenAid will pay for other than normal, single-family household use your appliance ... of purchase or installation date for product service in the home. 8. Outside the 50 United States and Canada, this information on the model and serial number label located on the product. In the U.S.A., call 1-800-807-6777. 9/05 Keep this major appliance is used ...

Parts Diagram
Page 1
W10165866 Rev.A CABINET LINER AND DOOR PARTS For Models: KUIS15NRTW1, KUIS15NRTT1, KUIS15NRTB1, KUIS15NRTS1 (White) (Biscuit) (Black) (Stainless Steel) ICE CUBE MAKER 5−09 Litho In U.S.A. (rrm) (eeb) 1 Part No.
W10165866 Rev.A CABINET LINER AND DOOR PARTS For Models: KUIS15NRTW1, KUIS15NRTT1, KUIS15NRTB1, KUIS15NRTS1 (White) (Biscuit) (Black) (Stainless Steel) ICE CUBE MAKER 5−09 Litho In U.S.A. (rrm) (eeb) 1 Part No.

Parts Diagram
Page 2
... White 8281187 Biscuit 8281186 Black 24 Filler, Endcap Left Side 2185655W White 2185655T Biscuit 2185655B Black Right Side 2185656W White 2185656T Biscuit 2185656B Black 25 2185756 Pad, Foam 26 2185691 Channel, Wiring 28 2185989 Tube, Drain 29 585158 Scoop 30 3400884 Screw Illus. DESCRIPTION 32 2189000 Plug,... W10046670 White W10046700 Biscuit W10046640 Black W10046610 Grey Illus. Part No. Part No. No. No. CABINET LINER AND DOOR PARTS For Models: KUIS15NRTW1, KUIS15NRTT1, KUIS15NRTB1, KUIS15NRTS1 (White) (Biscuit) (Black) (Stainless Steel) Illus. Part No.
... White 8281187 Biscuit 8281186 Black 24 Filler, Endcap Left Side 2185655W White 2185655T Biscuit 2185655B Black Right Side 2185656W White 2185656T Biscuit 2185656B Black 25 2185756 Pad, Foam 26 2185691 Channel, Wiring 28 2185989 Tube, Drain 29 585158 Scoop 30 3400884 Screw Illus. DESCRIPTION 32 2189000 Plug,... W10046670 White W10046700 Biscuit W10046640 Black W10046610 Grey Illus. Part No. Part No. No. No. CABINET LINER AND DOOR PARTS For Models: KUIS15NRTW1, KUIS15NRTT1, KUIS15NRTB1, KUIS15NRTS1 (White) (Biscuit) (Black) (Stainless Steel) Illus. Part No.

Parts Diagram
Page 3
EVAPORATOR, ICE CUTTER GRID AND WATER PARTS For Models: KUIS15NRTW1, KUIS15NRTT1, KUIS15NRTB1, KUIS15NRTS1 (White) (Biscuit) (Black) (Stainless Steel) W10165866 3
EVAPORATOR, ICE CUTTER GRID AND WATER PARTS For Models: KUIS15NRTW1, KUIS15NRTT1, KUIS15NRTB1, KUIS15NRTS1 (White) (Biscuit) (Black) (Stainless Steel) W10165866 3

Parts Diagram
Page 4
EVAPORATOR, ICE CUTTER GRID AND WATER PARTS For Models: KUIS15NRTW1, KUIS15NRTT1, KUIS15NRTB1, KUIS15NRTS1 (White) (Biscuit) (Black) (Stainless Steel) Illus. No. Part No. DESCRIPTION 1 W10159841 Valve, Complete Water 2 2217286 Tube, Plastic 3 488208 Screw 4 2185523 Dispenser, ... 836667 Spacer 11 2208539 Fastener, Pushnut 12 489443 Screw 13 2185625 Reservoir, Water Slide 14 2185626 Tube 15 2313890 Hose, Overflow 16 2313604 Guide−Ice, Grid 17 2313603 Bracket, Front and Rear 18 2313602 Bracket, Side Left and Right 19 2185681 Harness, Grid 20 W10136146 Tube 21 2310169 Wire Assembly...
EVAPORATOR, ICE CUTTER GRID AND WATER PARTS For Models: KUIS15NRTW1, KUIS15NRTT1, KUIS15NRTB1, KUIS15NRTS1 (White) (Biscuit) (Black) (Stainless Steel) Illus. No. Part No. DESCRIPTION 1 W10159841 Valve, Complete Water 2 2217286 Tube, Plastic 3 488208 Screw 4 2185523 Dispenser, ... 836667 Spacer 11 2208539 Fastener, Pushnut 12 489443 Screw 13 2185625 Reservoir, Water Slide 14 2185626 Tube 15 2313890 Hose, Overflow 16 2313604 Guide−Ice, Grid 17 2313603 Bracket, Front and Rear 18 2313602 Bracket, Side Left and Right 19 2185681 Harness, Grid 20 W10136146 Tube 21 2310169 Wire Assembly...
Parts Diagram
Page 5
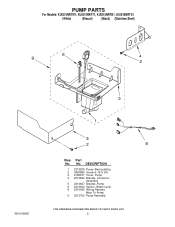
PUMP PARTS For Models: KUIS15NRTW1, KUIS15NRTT1, KUIS15NRTB1, KUIS15NRTS1 (White) (Biscuit) (Black) (Stainless Steel) W10165866 Illus. No. DESCRIPTION 1 2313628 Pump−Recirculating 2 3400884 Screw 8−18 X 5/8 3 2185677 Cover, Pump 4 2313844 Bracket, Connector Assembly 5 2313627 Bracket−Pump 6 2313643 Sensor−Water Level 8 2310092 Wiring Harness Main To Pump 9 2313702 Pump Assembly 5 Part No.
PUMP PARTS For Models: KUIS15NRTW1, KUIS15NRTT1, KUIS15NRTB1, KUIS15NRTS1 (White) (Biscuit) (Black) (Stainless Steel) W10165866 Illus. No. DESCRIPTION 1 2313628 Pump−Recirculating 2 3400884 Screw 8−18 X 5/8 3 2185677 Cover, Pump 4 2313844 Bracket, Connector Assembly 5 2313627 Bracket−Pump 6 2313643 Sensor−Water Level 8 2310092 Wiring Harness Main To Pump 9 2313702 Pump Assembly 5 Part No.
Parts Diagram
Page 6
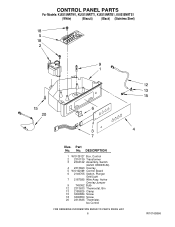
Part No. Active Overlay Jumper 9 745362 Bulb 12 2313633 Thermostat, Bin 13 2185825 Clamp 15 3400884 Screw 18 3400850 Screw 20 2313635 Thermister, Ice Control 6 W10165866 No. DESCRIPTION 1 W10139127 Box, Control 2 2310139 Transformer 3 2304122 Assembly, Switch (ALSO ORDER #4) 4 2313693 Overlay 5 W10122069 Control Board 6 2149705 Switch, Plunger Grid/Light 7 2187585 Wire Assy. CONTROL PANEL PARTS For Models: KUIS15NRTW1, KUIS15NRTT1, KUIS15NRTB1, KUIS15NRTS1 (White) (Biscuit) (Black) (Stainless Steel) Illus.
Part No. Active Overlay Jumper 9 745362 Bulb 12 2313633 Thermostat, Bin 13 2185825 Clamp 15 3400884 Screw 18 3400850 Screw 20 2313635 Thermister, Ice Control 6 W10165866 No. DESCRIPTION 1 W10139127 Box, Control 2 2310139 Transformer 3 2304122 Assembly, Switch (ALSO ORDER #4) 4 2313693 Overlay 5 W10122069 Control Board 6 2149705 Switch, Plunger Grid/Light 7 2187585 Wire Assy. CONTROL PANEL PARTS For Models: KUIS15NRTW1, KUIS15NRTT1, KUIS15NRTB1, KUIS15NRTS1 (White) (Biscuit) (Black) (Stainless Steel) Illus.

Parts Diagram
Page 8
... Screw 7 W10136195 Compressor (Includes Illus. 11 & 23) 8 A201435 Clip, Mounting 9 A201441 Shim (4) 10 1115375 Clip−Wiring Illus. Part No. No. No. UNIT PARTS For Models: KUIS15NRTW1, KUIS15NRTT1, KUIS15NRTB1, KUIS15NRTS1 (White) (Biscuit) (Black) (Stainless Steel) Illus. DESCRIPTION 11 Grommet (4) 2217318 Production 4387558 Service 12 2208415 Tube, Process 13 489423 Screw 14...
... Screw 7 W10136195 Compressor (Includes Illus. 11 & 23) 8 A201435 Clip, Mounting 9 A201441 Shim (4) 10 1115375 Clip−Wiring Illus. Part No. No. No. UNIT PARTS For Models: KUIS15NRTW1, KUIS15NRTT1, KUIS15NRTB1, KUIS15NRTS1 (White) (Biscuit) (Black) (Stainless Steel) Illus. DESCRIPTION 11 Grommet (4) 2217318 Production 4387558 Service 12 2208415 Tube, Process 13 489423 Screw 14...
Parts Diagram
Page 9
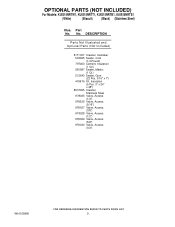
No. OPTIONAL PARTS (NOT INCLUDED) For Models: KUIS15NRTW1, KUIS15NRTT1, KUIS15NRTB1, KUIS15NRTS1 (White) (Biscuit) (Black) (Stainless Steel) Illus. DESCRIPTION Parts Not Illustrated and Optional Parts (Not Included) 8171307 Cleaner, Icemaker 503695 Sealer, Cork (1/4 ...
No. OPTIONAL PARTS (NOT INCLUDED) For Models: KUIS15NRTW1, KUIS15NRTT1, KUIS15NRTB1, KUIS15NRTS1 (White) (Biscuit) (Black) (Stainless Steel) Illus. DESCRIPTION Parts Not Illustrated and Optional Parts (Not Included) 8171307 Cleaner, Icemaker 503695 Sealer, Cork (1/4 ...


