Use and Care Guide
Page 2
... of others . TABLE OF CONTENTS ICE MAKER SAFETY 2 INSTALLATION INSTRUCTIONS 3 Unpack the Ice Maker 3 Location Requirements 3 Electrical Requirements 4 Water Supply Requirements 4 Leveling 4 Connect Water Supply 5 Drain Connection 6 Ice Maker Door 6 Normal Sounds 8 ICE MAKER USE 8 How Your Ice Maker Works 8 Using the Controls 9 ICE MAKER CARE 9 Cleaning 9 Vacation and Moving Care 11 TROUBLESHOOTING 12 Ice Maker Operation 12 Ice Production 12 Ice Quality 13 Plumbing Problems 13...
... of others . TABLE OF CONTENTS ICE MAKER SAFETY 2 INSTALLATION INSTRUCTIONS 3 Unpack the Ice Maker 3 Location Requirements 3 Electrical Requirements 4 Water Supply Requirements 4 Leveling 4 Connect Water Supply 5 Drain Connection 6 Ice Maker Door 6 Normal Sounds 8 ICE MAKER USE 8 How Your Ice Maker Works 8 Using the Controls 9 ICE MAKER CARE 9 Cleaning 9 Vacation and Moving Care 11 TROUBLESHOOTING 12 Ice Maker Operation 12 Ice Production 12 Ice Quality 13 Plumbing Problems 13...

Use and Care Guide
Page 3
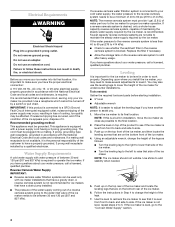
... of the ice maker by rubbing a small amount of your ice maker before operating. ■ Use two or more people to move and install ice maker. The ice maker may be closed-in an area sheltered from your fingers. Recommended location for servicing if necessary. ■ Installation of the ice maker requires a ...and dry. ■ This unit must be level in the recommended location as wind, rain, water spray, or drip. ■ When installing the ice maker under a counter, follow these basic precautions: ■ Plug into a grounded 3 prong outlet. ■ Do not remove ground prong. &#...
... of the ice maker by rubbing a small amount of your ice maker before operating. ■ Use two or more people to move and install ice maker. The ice maker may be closed-in an area sheltered from your fingers. Recommended location for servicing if necessary. ■ Installation of the ice maker requires a ...and dry. ■ This unit must be level in the recommended location as wind, rain, water spray, or drip. ■ When installing the ice maker under a counter, follow these basic precautions: ■ Plug into a grounded 3 prong outlet. ■ Do not remove ground prong. &#...
Use and Care Guide
Page 4
... of cooling. Depending upon where you install the ice maker, you have a properly grounded, 3 prong wall receptacle installed by the ice maker, is important for undercounter installations. You may occur, resulting in Step 4 to change the height of the ice maker, and then locate the leveling screws ... osmosis system is desired, only a whole-house capacity reverse osmosis system, capable of the customer to side. 3. Faucet capacity reverse osmosis systems are on top of the ice maker. 6. Leveling It is recommended. Move the ice maker to its final location, it is even from ...
... of cooling. Depending upon where you install the ice maker, you have a properly grounded, 3 prong wall receptacle installed by the ice maker, is important for undercounter installations. You may occur, resulting in Step 4 to change the height of the ice maker, and then locate the leveling screws ... osmosis system is desired, only a whole-house capacity reverse osmosis system, capable of the customer to side. 3. Faucet capacity reverse osmosis systems are on top of the ice maker. 6. Leveling It is recommended. Move the ice maker to its final location, it is even from ...
Use and Care Guide
Page 5
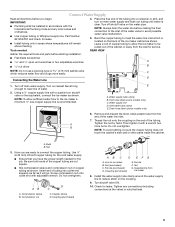
... free end of the cabinet or away from the wall for leaks. ■ Install tubing only in accordance with a quarter-turn on the back of water. 2. E A. Remove and discard the short, black plastic tube from ice maker 8. Do not overtighten. NOTE: To avoid rattling, be pulled out of the tubing...into outlet end squarely as far as shown. Do not overtighten. AB A. Coupling (purchased) E. Install the water supply tube clamp around the water supply line to clear line of the ice maker cabinet as it with adjustable wrench. Bend the copper tubing to meet the water line inlet which ...
... free end of the cabinet or away from the wall for leaks. ■ Install tubing only in accordance with a quarter-turn on the back of water. 2. E A. Remove and discard the short, black plastic tube from ice maker 8. Do not overtighten. NOTE: To avoid rattling, be pulled out of the tubing...into outlet end squarely as far as shown. Do not overtighten. AB A. Coupling (purchased) E. Install the water supply tube clamp around the water supply line to clear line of the ice maker cabinet as it with adjustable wrench. Bend the copper tubing to meet the water line inlet which ...

Use and Care Guide
Page 6
... not remove ground prong. Do not use an extension cord. Style 2 - See "Drain Pump System" earlier in this section. 3. Tools needed: Ice Maker Door Gather the required tools and parts before starting installation. SIDE VIEW 1⁷⁄₈" (4.8 cm) A B 1" (2.54 cm) 23" C (58.4 cm) D 2" - 1¹⁄₂" (5 cm... the PVC drain reducer. Style 1 - For drain pump system connect the drain pump outlet hose to move and install ice maker. Recheck the ice maker to be sure that the drain system is required by your local sanitation code, seal the cabinet to the floor with...
... not remove ground prong. Do not use an extension cord. Style 2 - See "Drain Pump System" earlier in this section. 3. Tools needed: Ice Maker Door Gather the required tools and parts before starting installation. SIDE VIEW 1⁷⁄₈" (4.8 cm) A B 1" (2.54 cm) 23" C (58.4 cm) D 2" - 1¹⁄₂" (5 cm... the PVC drain reducer. Style 1 - For drain pump system connect the drain pump outlet hose to move and install ice maker. Recheck the ice maker to be sure that the drain system is required by your local sanitation code, seal the cabinet to the floor with...
Use and Care Guide
Page 11
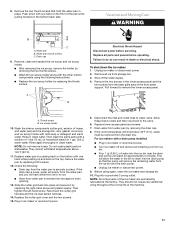
... holder with one hand on the front of the pan while pulling forward on the top. Push down the ice maker: 1. To shut down with a drain pump installed: ■ Plug in the lower access panel and the two screws from storage bin. 3. Wash the interior components (cutter ... Plug in place. NOTE: All components of household bleach in clean water. 8. Water pan B. Shut off and remove all remaining ice from water pan is securely in ice maker or reconnect power. 5. They cannot withstand temperatures above 145°F (63°C). 11. Before using the following : ■ ...
... holder with one hand on the front of the pan while pulling forward on the top. Push down the ice maker: 1. To shut down with a drain pump installed: ■ Plug in the lower access panel and the two screws from storage bin. 3. Wash the interior components (cutter ... Plug in place. NOTE: All components of household bleach in clean water. 8. Water pan B. Shut off and remove all remaining ice from water pan is securely in ice maker or reconnect power. 5. They cannot withstand temperatures above 145°F (63°C). 11. Before using the following : ■ ...
Use and Care Guide
Page 13
...; Is there unusually high mineral content in the ice bin? If ice is not used to KitchenAid with the ice scoop provided. To locate the KitchenAid designated service company in place? Move the ice maker to move and install ice maker. Grid is intact. Clean your telephone directory Yellow Pages. 13 KitchenAid Canada designated service technicians are trained to local dealers...
...; Is there unusually high mineral content in the ice bin? If ice is not used to KitchenAid with the ice scoop provided. To locate the KitchenAid designated service company in place? Move the ice maker to move and install ice maker. Grid is intact. Clean your telephone directory Yellow Pages. 13 KitchenAid Canada designated service technicians are trained to local dealers...

Use and Care Guide
Page 14
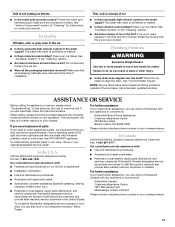
... Serial number Purchase date 14 These parts are excluded from accident, alteration, misuse, abuse, fire, flood, acts of purchase or installation date for future reference. Expenses for travel and transportation for replacement parts and repair labor costs to correct house wiring or plumbing....6777. 9/05 Keep this book and your major appliance is used for units operated outside the United States or Canada. 7. KITCHENAID® ICE MAKER WARRANTY ONE YEAR LIMITED WARRANTY For one year from the date of purchase, when this major appliance is operated and maintained according ...
... Serial number Purchase date 14 These parts are excluded from accident, alteration, misuse, abuse, fire, flood, acts of purchase or installation date for future reference. Expenses for travel and transportation for replacement parts and repair labor costs to correct house wiring or plumbing....6777. 9/05 Keep this book and your major appliance is used for units operated outside the United States or Canada. 7. KITCHENAID® ICE MAKER WARRANTY ONE YEAR LIMITED WARRANTY For one year from the date of purchase, when this major appliance is operated and maintained according ...
