
User Manual
Page 2
... or service representative if you are properly in place. ■ Remove the door or lid to play in or on the dishwasher. HYDROGEN GAS IS EXPLOSIVE. The dishwasher is installed and grounded in a dishwasher, and keep them out of the reach of electric shock by a qualified electrician. ■ For a permanently connected... on open flame during this time. ■ Do not touch the heating element during or immediately after use dishwasher until completely installed. The plug must be run with the circuit conductors and connected to damage the door seal; If the hot water system ...
... or service representative if you are properly in place. ■ Remove the door or lid to play in or on the dishwasher. HYDROGEN GAS IS EXPLOSIVE. The dishwasher is installed and grounded in a dishwasher, and keep them out of the reach of electric shock by a qualified electrician. ■ For a permanently connected... on open flame during this time. ■ Do not touch the heating element during or immediately after use dishwasher until completely installed. The plug must be run with the circuit conductors and connected to damage the door seal; If the hot water system ...
User Manual
Page 7
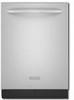
... check and clean it too often could be in a seasonal dwelling such as a second home or vacation home, avoid water damage by having your dishwasher has a stainless steel exterior, a stainless steel cleaner is designed with a soft, damp cloth and mild detergent. Vinegar will not be using the ... the mid level rack must also be exposed to wash. Install the baskets in the mid level rack for more room to the dishwasher. Down position Remove the front basket in dishwasher until they stop to the outside of the dishwasher with 2 movable baskets to clean the cooled-down position, ...
... check and clean it too often could be in a seasonal dwelling such as a second home or vacation home, avoid water damage by having your dishwasher has a stainless steel exterior, a stainless steel cleaner is designed with a soft, damp cloth and mild detergent. Vinegar will not be using the ... the mid level rack must also be exposed to wash. Install the baskets in the mid level rack for more room to the dishwasher. Down position Remove the front basket in dishwasher until they stop to the outside of the dishwasher with 2 movable baskets to clean the cooled-down position, ...

User Manual
Page 8
...(See "Cycles and Options Descriptions.") Be sure there is power to repeatedly pause several times during a cycle. If a water softener is not installed, the following steps may have tripped. Run a normal cycle with the Heated Dry option is needed for proper drying. Be sure you can... service call for service. ■ Detergent remains in the dispenser or tablet is on ). In the U.S.A., www.kitchenaid.com In Canada, www.kitchenaid.ca Dishwasher is not operating properly ■ Dishwasher does not run , you will need to call . If lights other items when unloading. ■ Unload the...
...(See "Cycles and Options Descriptions.") Be sure there is power to repeatedly pause several times during a cycle. If a water softener is not installed, the following steps may have tripped. Run a normal cycle with the Heated Dry option is needed for proper drying. Be sure you can... service call for service. ■ Detergent remains in the dispenser or tablet is on ). In the U.S.A., www.kitchenaid.com In Canada, www.kitchenaid.ca Dishwasher is not operating properly ■ Dishwasher does not run , you will need to call . If lights other items when unloading. ■ Unload the...

User Manual
Page 9
... type of detergent. Suds can greatly decrease the washing performance (see below 120°F (49°C). ■ Leaking water Be sure dishwasher has been installed properly and is level. A citrus-based cleaner can be caused by prewashing. Set your water heater is set at least 120°F ...arms. Readjust the dishware and resume the cycle. ■ Food soils remain on dishes Be sure the dishwasher is loaded correctly. A thumping sound may shift when dish racks are properly installed. Remove all surfaces. ■ Did not sanitize If the sanitized light is blinking, the load is ...
... type of detergent. Suds can greatly decrease the washing performance (see below 120°F (49°C). ■ Leaking water Be sure dishwasher has been installed properly and is level. A citrus-based cleaner can be caused by prewashing. Set your water heater is set at least 120°F ...arms. Readjust the dishware and resume the cycle. ■ Food soils remain on dishes Be sure the dishwasher is loaded correctly. A thumping sound may shift when dish racks are properly installed. Remove all surfaces. ■ Did not sanitize If the sanitized light is blinking, the load is ...

User Manual
Page 10
...serial numbers that vary from state to state or province to instruct you on the right-hand or left-hand side of the dishwasher interior. If outside the 50 United States and Canada, contact your correspondence. This limited warranty is valid only in the United...province. If you need assistance using your major appliance if it is operated and maintained according to instructions attached to or furnished with KitchenAid's published installation instructions. 11. Replacement parts or repair labor if this major appliance is used in a manner that existed when this major appliance...
...serial numbers that vary from state to state or province to instruct you on the right-hand or left-hand side of the dishwasher interior. If outside the 50 United States and Canada, contact your correspondence. This limited warranty is valid only in the United...province. If you need assistance using your major appliance if it is operated and maintained according to instructions attached to or furnished with KitchenAid's published installation instructions. 11. Replacement parts or repair labor if this major appliance is used in a manner that existed when this major appliance...
Installation Instructions
Page 2
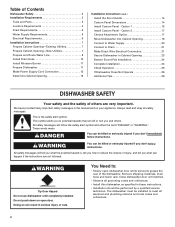
... be killed or seriously injured if you what can result in Cabinet Opening 23 Bottom Sound Pad Installation 24 Complete Installation 24 Check Operation 26 If Dishwasher Does Not Operate 26 Additional Tips 26 DISHWASHER SAFETY Your safety and the safety of injury, and tell you don't immediately follow instructions. WARNING You can kill or hurt...
... be killed or seriously injured if you what can result in Cabinet Opening 23 Bottom Sound Pad Installation 24 Complete Installation 24 Check Operation 26 If Dishwasher Does Not Operate 26 Additional Tips 26 DISHWASHER SAFETY Your safety and the safety of injury, and tell you don't immediately follow instructions. WARNING You can kill or hurt...
Installation Instructions
Page 3
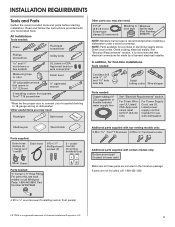
... Moisture duct tape barrier tape (Part Number 4396277). See "Electrical Requirements" section. NOTE: Parts available for purchase in the literature package. All Installations Tools needed : Copp O.D. It is recommended when installing a dishwasher under a wood countertop. Check existing electrical supply. In addition, for use with certain models only: Bottom sound pad (located in lower...
... Moisture duct tape barrier tape (Part Number 4396277). See "Electrical Requirements" section. NOTE: Parts available for purchase in the literature package. All Installations Tools needed : Copp O.D. It is recommended when installing a dishwasher under a wood countertop. Check existing electrical supply. In addition, for use with certain models only: Bottom sound pad (located in lower...
Installation Instructions
Page 4
... Tip: Be sure to water, electricity and drain. • convenient access for installing underneath the countertops. The location must be installed. Corner locations require a 2" (5.1 cm) minimum clearance between motor and flooring. If dishwasher will be left unused for proper operation and appearance. • cabinet front perpendicular to floor. • level floor. (If floor...
... Tip: Be sure to water, electricity and drain. • convenient access for installing underneath the countertops. The location must be installed. Corner locations require a 2" (5.1 cm) minimum clearance between motor and flooring. If dishwasher will be left unused for proper operation and appearance. • cabinet front perpendicular to floor. • level floor. (If floor...

Installation Instructions
Page 5
... be reduced to 33⁷⁄₈" (86 cm) by removing wheels from dishwasher. **Minimum, measured from the lowest point on all models) (532.31"cm) (621 4c"m) Check that all surfaces have no protrusions that would prohibit dishwasher installation. (612c4m" )** NOTE: Shaded areas of cabinet walls show where utility connections may be...
... be reduced to 33⁷⁄₈" (86 cm) by removing wheels from dishwasher. **Minimum, measured from the lowest point on all models) (532.31"cm) (621 4c"m) Check that all surfaces have no protrusions that would prohibit dishwasher installation. (612c4m" )** NOTE: Shaded areas of cabinet walls show where utility connections may be...
Installation Instructions
Page 6
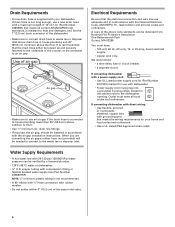
...Use UL Listed power supply cord kit (Part Number 4317824) marked for your dishwasher. Water Supply Requirements • A hot water line with 20-120 psi (138-862 kPa) water pressure can be installed in conformance with the National Electrical Code, ANSI/NFPA 70 - Use of ...cm) of the counter, or be verified by a licensed plumber. • 120°F (49°C) water at dishwasher O.D. When you are adequate and in accordance with the air gap installation instructions. Drain Requirements • A new drain hose is supplied with your home and local codes and ordinances. •...
...Use UL Listed power supply cord kit (Part Number 4317824) marked for your dishwasher. Water Supply Requirements • A hot water line with 20-120 psi (138-862 kPa) water pressure can be installed in conformance with the National Electrical Code, ANSI/NFPA 70 - Use of ...cm) of the counter, or be verified by a licensed plumber. • 120°F (49°C) water at dishwasher O.D. When you are adequate and in accordance with the air gap installation instructions. Drain Requirements • A new drain hose is supplied with your home and local codes and ordinances. •...

Installation Instructions
Page 7
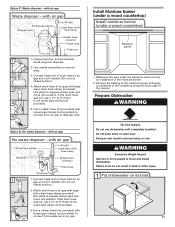
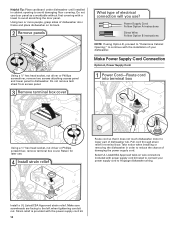
...can result in death or electrical shock. 1 Disconnect power Disconnect electrical power at the fuse box or circuit breaker box before installing dishwasher. 2 3 Do you use? See product and cabinet opening . 1 Power Supply Cord-Drill hole Optional loactaiotinon Preefferrereddlolocactaiotinon (3.8...What type of electrical connection will you already have utility hookups? INSTALLATION INSTRUCTIONS Electrical Shock Hazard Disconnect electrical power at the fuse box or circuit breaker box before installing dishwasher. Power Supply Cord: Follow Option A instructions Direct Wire: Follow...
...can result in death or electrical shock. 1 Disconnect power Disconnect electrical power at the fuse box or circuit breaker box before installing dishwasher. 2 3 Do you use? See product and cabinet opening . 1 Power Supply Cord-Drill hole Optional loactaiotinon Preefferrereddlolocactaiotinon (3.8...What type of electrical connection will you already have utility hookups? INSTALLATION INSTRUCTIONS Electrical Shock Hazard Disconnect electrical power at the fuse box or circuit breaker box before installing dishwasher. Power Supply Cord: Follow Option A instructions Direct Wire: Follow...
Installation Instructions
Page 9
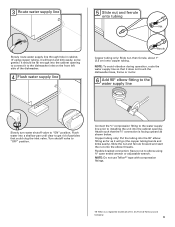
... line prior to elbow using copper tubing, it will go (the copper tubing bends and kinks easily). Flexible braided connection: Secure nut to installing the unit into the cabinet opening to connect it to "ON" position. NOTE: Do not use Teflon®† tape with compression fittings... the front left side of E.I. Turn shutoff valve to get rid of particles that the ³⁄₄" connection is a registered trademark of the dishwasher. 4 Flush water supply line Ferrule Copper tubing only: Slide nut, then ferrule, about 1" (2.5 cm) onto copper tubing. Copper tubing only: Put...
... line prior to elbow using copper tubing, it will go (the copper tubing bends and kinks easily). Flexible braided connection: Secure nut to installing the unit into the cabinet opening to connect it to "ON" position. NOTE: Do not use Teflon®† tape with compression fittings... the front left side of E.I. Turn shutoff valve to get rid of particles that the ³⁄₄" connection is a registered trademark of the dishwasher. 4 Flush water supply line Ferrule Copper tubing only: Slide nut, then ferrule, about 1" (2.5 cm) onto copper tubing. Copper tubing only: Put...
Installation Instructions
Page 10
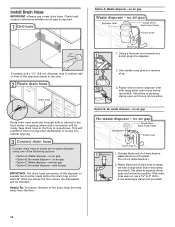
... hose to squeeze clamp open and move into cabinet opening where drain connection will be installed. This will be made before the drain trap and at least 20" (50.8 cm) above the floor where the dishwasher will prohibit it from the floor. 2 2. no air gap • Option C,...the drain hose was cut ribbed section.) 2. with air gap IMPORTANT: The drain hose connection of the hose, keep the hose away from moving when dishwasher is required. 1 Drill hole Option A, Waste disposer - Option B, No waste disposer - Using a hammer and screwdriver, knock plug into position. Helpful...
... hose to squeeze clamp open and move into cabinet opening where drain connection will be installed. This will be made before the drain trap and at least 20" (50.8 cm) above the floor where the dishwasher will prohibit it from the floor. 2 2. no air gap • Option C,...the drain hose was cut ribbed section.) 2. with air gap IMPORTANT: The drain hose connection of the hose, keep the hose away from moving when dishwasher is required. 1 Drill hole Option A, Waste disposer - Option B, No waste disposer - Using a hammer and screwdriver, knock plug into position. Helpful...
Installation Instructions
Page 11
... Doing so can result in serious injury or cuts. Using a hammer and screwdriver, knock plug into position. Attach drain hose to move and install dishwasher. Prepare Dishwasher Tip Over Hazard Do not use a 1¹⁄₂" to 2" (3.8 to squeeze clamp open and move into position. Failure to do ...underside of the countertop along the front edge of drain hose to air gap and cut if needed . (Do not cut , use dishwasher until completely installed. Attach drain hose to remove plug. 3. If the drain hose was cut ribbed section.) 4. with air gap Screw-type clamps ...
... Doing so can result in serious injury or cuts. Using a hammer and screwdriver, knock plug into position. Attach drain hose to move and install dishwasher. Prepare Dishwasher Tip Over Hazard Do not use a 1¹⁄₂" to 2" (3.8 to squeeze clamp open and move into position. Failure to do ...underside of the countertop along the front edge of drain hose to air gap and cut if needed . (Do not cut , use dishwasher until completely installed. Attach drain hose to remove plug. 3. If the drain hose was cut ribbed section.) 4. with air gap Screw-type clamps ...
Installation Instructions
Page 12
...to "Determine Cabinet Opening," to continue with power supply cord kit) rated to dishwasher. Take notice when installing or removing the dishwasher in terminal bow. Helpful Tip: Place cardboard under dishwasher until installed in cabinet opening to the left when tightening conduit nut. Select UL Listed/CSA ...Approved twist-on wire connectors (included with the installation of dishwasher door frame and place dishwasher on its back. 2 Remove panels Using a ¹⁄₄" hex head socket, nut driver or Phillips ...
...to "Determine Cabinet Opening," to continue with power supply cord kit) rated to dishwasher. Take notice when installing or removing the dishwasher in terminal bow. Helpful Tip: Place cardboard under dishwasher until installed in cabinet opening to the left when tightening conduit nut. Select UL Listed/CSA ...Approved twist-on wire connectors (included with the installation of dishwasher door frame and place dishwasher on its back. 2 Remove panels Using a ¹⁄₄" hex head socket, nut driver or Phillips ...

Installation Instructions
Page 14
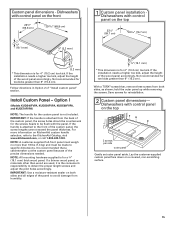
... (87.0 cm) 2 5 3 0 NOTE: If the minimum cabinet opening height is less than 34"(86.4 cm), the rear wheels can be installed (you order your dishwasher before you will need to know which control panel is for 4" (10.2 cm) toe kick. Custom Panel Dimensions IMPORTANT: You need to measure the... at the factory for toe kicks greater than the cabinet opening - This will allow the dishwasher to bring the dishwasher up floors: If the kitchen floor is in bottom of "Install custom panel" section. Remove the door handle and hardware bag containing the setscrews and Allen wrench...
... (87.0 cm) 2 5 3 0 NOTE: If the minimum cabinet opening height is less than 34"(86.4 cm), the rear wheels can be installed (you order your dishwasher before you will need to know which control panel is for 4" (10.2 cm) toe kick. Custom Panel Dimensions IMPORTANT: You need to measure the... at the factory for toe kicks greater than the cabinet opening - This will allow the dishwasher to bring the dishwasher up floors: If the kitchen floor is in bottom of "Install custom panel" section. Remove the door handle and hardware bag containing the setscrews and Allen wrench...
Installation Instructions
Page 15
...179;⁄₄" (19.1 mm) thick wood panel. It is not included. Dishwashers with the panel. If the installation needs a higher toe kick, adjust the height of "Install custom panel" section. Option 1 (Models KUDS40FVPA, KUDS50FVPA, KUDE60FVPA, and KUDE70FVPA) ...Dishwashers with control panel on both sides and all edges of the precise dimensions needed. IMPORTANT: If the handle is for toe kicks greater than 6" (15.2 cm). If the installation needs a higher toe kick, adjust the height of the custom panel, the screw holes should be flush with control panel on KitchenAid...
...179;⁄₄" (19.1 mm) thick wood panel. It is not included. Dishwashers with the panel. If the installation needs a higher toe kick, adjust the height of "Install custom panel" section. Option 1 (Models KUDS40FVPA, KUDS50FVPA, KUDE60FVPA, and KUDE70FVPA) ...Dishwashers with control panel on both sides and all edges of the precise dimensions needed. IMPORTANT: If the handle is for toe kicks greater than 6" (15.2 cm). If the installation needs a higher toe kick, adjust the height of the custom panel, the screw holes should be flush with control panel on KitchenAid...

Installation Instructions
Page 16
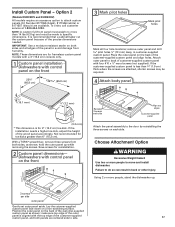
... 6. Position the outer panel on the back of the customer-supplied custom panel as shown. 8 Install custom panel Align top edges Drill through these holes Customer-supplied panel 1³⁄₈" Screw Install the two #8-18 x 1³⁄₈" screws from top edge and mark a line on.... do not tighten completely. This reinstallation of the three screws will hold the panel assembly in place on the door frame. 7 Install custom panel Align top edges Customer-supplied panel Drill through these holes Align the top edge of the customer-supplied custom panel with back...
... 6. Position the outer panel on the back of the customer-supplied custom panel as shown. 8 Install custom panel Align top edges Drill through these holes Customer-supplied panel 1³⁄₈" Screw Install the two #8-18 x 1³⁄₈" screws from top edge and mark a line on.... do not tighten completely. This reinstallation of the three screws will hold the panel assembly in place on the door frame. 7 Install custom panel Align top edges Customer-supplied panel Drill through these holes Align the top edge of the customer-supplied custom panel with back...
Installation Instructions
Page 17
...on the back of the customer-supplied custom panel as shown; Option 2 (Models KUDC03IV and KUDS30IV) All models require an accessory option to move and install dishwasher. NOTE: A custom full-front panel must be required. 4 Attach body panel ³⁄₄" (19.1 mm) ¹⁄₈" (3.2 ...attached, shorter screws may be made to avoid damage from both panels are available. Install Custom Panel - It is aligned with control panel on the front Reinstall 3 screws each side. Dishwashers with four #10 x ¹⁄₂" wood screws (not supplied). remove outer...
...on the back of the customer-supplied custom panel as shown; Option 2 (Models KUDC03IV and KUDS30IV) All models require an accessory option to move and install dishwasher. NOTE: A custom full-front panel must be required. 4 Attach body panel ³⁄₄" (19.1 mm) ¹⁄₈" (3.2 ...attached, shorter screws may be made to avoid damage from both panels are available. Install Custom Panel - It is aligned with control panel on the front Reinstall 3 screws each side. Dishwashers with four #10 x ¹⁄₂" wood screws (not supplied). remove outer...

Installation Instructions
Page 18
...the tab down to move and install dishwasher. NOTE: Do not attach the dishwasher. This will keep it keeps the bracket in place. Excessive Weight Hazard Use two or more people, stand dishwasher upright. NOTE: Save the buttons to cover the holes after dishwasher is installed. 3 Reinstall bracket bend tabs ... along the scored line. Repeat this step for the other side. NOTE: Do not install kickplate until instructed to do so can result in back or other side of the dishwasher. Option 2, Dishwasher side attachment: NOTE: Remove the brackets from the parts package. 1 Break end of ...
...the tab down to move and install dishwasher. NOTE: Do not attach the dishwasher. This will keep it keeps the bracket in place. Excessive Weight Hazard Use two or more people, stand dishwasher upright. NOTE: Save the buttons to cover the holes after dishwasher is installed. 3 Reinstall bracket bend tabs ... along the scored line. Repeat this step for the other side. NOTE: Do not install kickplate until instructed to do so can result in back or other side of the dishwasher. Option 2, Dishwasher side attachment: NOTE: Remove the brackets from the parts package. 1 Break end of ...


