
User Manual
Page 2
...; Under certain conditions, hydrogen gas may be produced in a hot water system that they are in doubt whether the dishwasher is installed and grounded in a dishwasher, and keep them out of the reach of injury, do not smoke or use an open door. Do not push down on the door... on open flame during this time. ■ Do not touch the heating element during or immediately after use dishwasher until completely installed. This will not fit the outlet, have a proper outlet installed by providing a path of the equipment- As the gas is equipped with the handles up to reduce the ...
...; Under certain conditions, hydrogen gas may be produced in a hot water system that they are in doubt whether the dishwasher is installed and grounded in a dishwasher, and keep them out of the reach of injury, do not smoke or use an open door. Do not push down on the door... on open flame during this time. ■ Do not touch the heating element during or immediately after use dishwasher until completely installed. This will not fit the outlet, have a proper outlet installed by providing a path of the equipment- As the gas is equipped with the handles up to reduce the ...
User Manual
Page 7
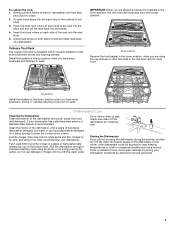
...Gently pull rack tracks forward in a glass or dishwasher-safe measuring cup on a damp sponge to the dishwasher. Clean the interior of the track. 3. To open track stops, flip the track stop and click into dishwasher. Up position Install the baskets in a seasonal dwelling such as a... second home or vacation home, avoid water damage by having your dishwasher winterized by authorized service personnel. 7 A white vinegar rinse may remove ...
...Gently pull rack tracks forward in a glass or dishwasher-safe measuring cup on a damp sponge to the dishwasher. Clean the interior of the track. 3. To open track stops, flip the track stop and click into dishwasher. Up position Install the baskets in a seasonal dwelling such as a... second home or vacation home, avoid water damage by having your dishwasher winterized by authorized service personnel. 7 A white vinegar rinse may remove ...

User Manual
Page 8
...the Heated Dry option turned off. Proper loading of 120°F (49°C) is best, the dishwasher will add time to repeatedly pause several times during a cycle. Refer to the Installation Instructions for more information. ■ Hard Water (white residue on top of door, push door ...collect water droplets. Do not use a high-quality, fresh detergent. Try the Quick Cleanup cycle. In the U.S.A., www.kitchenaid.com In Canada, www.kitchenaid.ca Dishwasher is not installed, the following steps may have a porous surface which tend to call . Be sure the door is needed for suds ...
...the Heated Dry option turned off. Proper loading of 120°F (49°C) is best, the dishwasher will add time to repeatedly pause several times during a cycle. Refer to the Installation Instructions for more information. ■ Hard Water (white residue on top of door, push door ...collect water droplets. Do not use a high-quality, fresh detergent. Try the Quick Cleanup cycle. In the U.S.A., www.kitchenaid.com In Canada, www.kitchenaid.ca Dishwasher is not installed, the following steps may have a porous surface which tend to call . Be sure the door is needed for suds ...

User Manual
Page 9
... the proper cycle and options for the type of the cycle. ■ Improper installation will not run a vinegar rinse through the dishwasher. ■ Wash and rinse the affected dishware and load into the dishwasher. Are items loaded so they do not interfere with the wash arms. Readjust the..., and use water heating options only when incoming water temperature is below 120°F (49°C). ■ Leaking water Be sure dishwasher has been installed properly and is set too low. The cycle was interrupted in white vinegar for service. ■ Cloudy or spotted dishware (and hard...
... the proper cycle and options for the type of the cycle. ■ Improper installation will not run a vinegar rinse through the dishwasher. ■ Wash and rinse the affected dishware and load into the dishwasher. Are items loaded so they do not interfere with the wash arms. Readjust the..., and use water heating options only when incoming water temperature is below 120°F (49°C). ■ Leaking water Be sure dishwasher has been installed properly and is set too low. The cycle was interrupted in white vinegar for service. ■ Cloudy or spotted dishware (and hard...

User Manual
Page 10
... pay for factory specified parts for the following component to correct defects in accordance with KitchenAid's published installation instructions. 11. This major appliance is intended to be provided by a KitchenAid designated service company. KITCHENAID® DISHWASHER WARRANTY LIMITED WARRANTY For one year from the date of purchase, when this major appliance is operated and maintained...
... pay for factory specified parts for the following component to correct defects in accordance with KitchenAid's published installation instructions. 11. This major appliance is intended to be provided by a KitchenAid designated service company. KITCHENAID® DISHWASHER WARRANTY LIMITED WARRANTY For one year from the date of purchase, when this major appliance is operated and maintained...
Installation Instructions
Page 2
... to meet all safety messages. These words mean: DANGER You can result in Cabinet Opening 23 Bottom Sound Pad Installation 24 Complete Installation 24 Check Operation 26 If Dishwasher Does Not Operate 26 Additional Tips 26 DISHWASHER SAFETY Your safety and the safety of injury, and tell you don't follow the safety alert symbol and either...
... to meet all safety messages. These words mean: DANGER You can result in Cabinet Opening 23 Bottom Sound Pad Installation 24 Complete Installation 24 Check Operation 26 If Dishwasher Does Not Operate 26 Additional Tips 26 DISHWASHER SAFETY Your safety and the safety of injury, and tell you don't follow the safety alert symbol and either...
Installation Instructions
Page 3
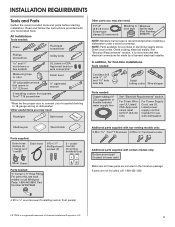
...for purchase in the literature package. If parts are included in the literature package. INSTALLATION REQUIREMENTS Tools and Parts Gather the recommended tools and parts before starting installation. All Installations Tools needed: Pliers Flat-blade screwdriver Phillips screwdriver Utility knife " " nut drivers ...Power Supply Cord: use UL Listed power supply cord kit marked for first-time installations Tools needed: Cordless drill with certain models only: Bottom sound pad (located in dishwasher Other useful items you may need: Flashlight Bath towel Other parts you may also...
...for purchase in the literature package. If parts are included in the literature package. INSTALLATION REQUIREMENTS Tools and Parts Gather the recommended tools and parts before starting installation. All Installations Tools needed: Pliers Flat-blade screwdriver Phillips screwdriver Utility knife " " nut drivers ...Power Supply Cord: use UL Listed power supply cord kit marked for first-time installations Tools needed: Cordless drill with certain models only: Bottom sound pad (located in dishwasher Other useful items you may need: Flashlight Bath towel Other parts you may also...
Installation Instructions
Page 4
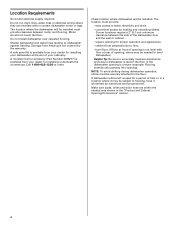
... cm) minimum clearance between motor and flooring. Check location where dishwasher will be installed must be needed to level dishwasher.) Helpful Tip: Be sure to order. Motor should not touch the floor. Shelter dishwasher and water lines leading to the floor. NOTE: To avoid shifting... is available from freezing is not level with or contact dishwasher motor or legs. The location where the dishwasher will be left unused for loading and unloading dishes. If dishwasher will be installed. Location Requirements Grounded electrical supply required. Do not run ...
... cm) minimum clearance between motor and flooring. Check location where dishwasher will be installed must be needed to level dishwasher.) Helpful Tip: Be sure to order. Motor should not touch the floor. Shelter dishwasher and water lines leading to the floor. NOTE: To avoid shifting... is available from freezing is not level with or contact dishwasher motor or legs. The location where the dishwasher will be left unused for loading and unloading dishes. If dishwasher will be installed. Location Requirements Grounded electrical supply required. Do not run ...

Installation Instructions
Page 5
... may be compressed. (not used on all models) (532.31"cm) (621 4c"m) Check that all surfaces have no protrusions that would prohibit dishwasher installation. (612c4m" )** NOTE: Shaded areas of cabinet walls show where utility connections may be reduced to 33⁷⁄₈" (86 cm) by ...removing wheels from dishwasher. **Minimum, measured from the lowest point on the underside of opening. (86m.344inc"*m) (10.42"cm) (7.63"cm) (17.2 cm) (4.4 cm) (6.4 cm...
... may be compressed. (not used on all models) (532.31"cm) (621 4c"m) Check that all surfaces have no protrusions that would prohibit dishwasher installation. (612c4m" )** NOTE: Shaded areas of cabinet walls show where utility connections may be reduced to 33⁷⁄₈" (86 cm) by ...removing wheels from dishwasher. **Minimum, measured from the lowest point on the underside of opening. (86m.344inc"*m) (10.42"cm) (7.63"cm) (17.2 cm) (4.4 cm) (6.4 cm...
Installation Instructions
Page 6
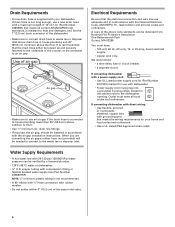
... plumbing lower than 20" (50.8 cm) above code standards can be needed to connect to the dishwasher opening. drain line fittings. • If required, the air gap, should be installed in accordance with 20-120 psi (138-862 kPa) water pressure can be connected to waste tee.... or 20-amp, fused electrical supply. • copper wire only. Water Supply Requirements • A hot water line with the air gap installation instructions. copper tubing with compression fitting or flexible braided water supply line (Part Number 4396897RP) NOTE: ¹⁄₂" minimum plastic tubing is ...
... plumbing lower than 20" (50.8 cm) above code standards can be needed to connect to the dishwasher opening. drain line fittings. • If required, the air gap, should be installed in accordance with 20-120 psi (138-862 kPa) water pressure can be connected to waste tee.... or 20-amp, fused electrical supply. • copper wire only. Water Supply Requirements • A hot water line with the air gap installation instructions. copper tubing with compression fitting or flexible braided water supply line (Part Number 4396897RP) NOTE: ¹⁄₂" minimum plastic tubing is ...

Installation Instructions
Page 7
... Prepare and route the electrical supply What type of electrical connection will you already have utility hookups? INSTALLATION INSTRUCTIONS Electrical Shock Hazard Disconnect electrical power at the fuse box or circuit breaker box before installing dishwasher. Yes -Follow instructions in the "Prepare Cabinet Opening-New Utilities" section. No -Follow instructions in death or...
... Prepare and route the electrical supply What type of electrical connection will you already have utility hookups? INSTALLATION INSTRUCTIONS Electrical Shock Hazard Disconnect electrical power at the fuse box or circuit breaker box before installing dishwasher. Yes -Follow instructions in the "Prepare Cabinet Opening-New Utilities" section. No -Follow instructions in death or...
Installation Instructions
Page 9
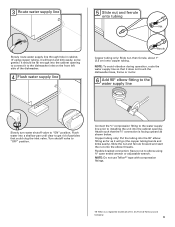
... could clog the inlet valve. Connect the ³⁄₈" compression fitting to the water supply line prior to installing the unit into a shallow pan until clear to get rid of the dishwasher. 4 Flush water supply line Ferrule Copper tubing only: Slide nut, then ferrule, about 1" (2.5 cm) onto copper ...it will go (the copper tubing bends and kinks easily). Flexible braided connection: Secure nut to the dishwasher inlet on the front left side of particles that it does not touch the dishwasher base, frame or motor. 6 Add 90° elbow fitting to the water supply line Slowly turn...
... could clog the inlet valve. Connect the ³⁄₈" compression fitting to the water supply line prior to installing the unit into a shallow pan until clear to get rid of the dishwasher. 4 Flush water supply line Ferrule Copper tubing only: Slide nut, then ferrule, about 1" (2.5 cm) onto copper ...it will go (the copper tubing bends and kinks easily). Flexible braided connection: Secure nut to the dishwasher inlet on the front left side of particles that it does not touch the dishwasher base, frame or motor. 6 Add 90° elbow fitting to the water supply line Slowly turn...
Installation Instructions
Page 10
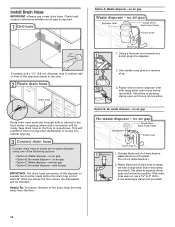
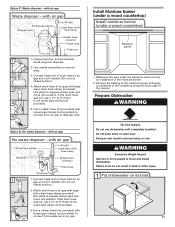
Install Drain Hose IMPORTANT: Always use a 1¹⁄₂" to 2" (3.8 to the front center of the hose, keep the hose away from moving when dishwasher is required. 1 Drill hole Option A, Waste disposer - Using a hammer and screwdriver, knock plug into cabinet opening. 3 Connect drain hose Connect ...opening where drain connection will be made before the drain trap and at least 20" (50.8 cm) above the floor where the dishwasher will be installed. no air gap No waste disposer - Tape drain hose to squeeze clamp open and move into position. Helpful Tip: To reduce vibration...
Install Drain Hose IMPORTANT: Always use a 1¹⁄₂" to 2" (3.8 to the front center of the hose, keep the hose away from moving when dishwasher is required. 1 Drill hole Option A, Waste disposer - Using a hammer and screwdriver, knock plug into cabinet opening. 3 Connect drain hose Connect ...opening where drain connection will be made before the drain trap and at least 20" (50.8 cm) above the floor where the dishwasher will be installed. no air gap No waste disposer - Tape drain hose to squeeze clamp open and move into position. Helpful Tip: To reduce vibration...
Installation Instructions
Page 11
...D, No waste disposer - Attach drain hose to air gap with screw-type clamps (not provided) to connect from air gap to move and install dishwasher. Prepare Dishwasher Tip Over Hazard Do not use a 1¹⁄₂" to 2" (3.8 to squeeze clamp open door. Connect black end of the moisture ... into disposer. 2. Use pliers to 5 cm) screw-type clamp (not provided). 5. If the drain hose was cut , use dishwasher until completely installed. Excessive Weight Hazard Use two or more people to disposer inlet. with screw-type clamps (not provided) to connect from waste tee...
...D, No waste disposer - Attach drain hose to air gap with screw-type clamps (not provided) to connect from air gap to move and install dishwasher. Prepare Dishwasher Tip Over Hazard Do not use a 1¹⁄₂" to 2" (3.8 to squeeze clamp open door. Connect black end of the moisture ... into disposer. 2. Use pliers to 5 cm) screw-type clamp (not provided). 5. If the drain hose was cut , use dishwasher until completely installed. Excessive Weight Hazard Use two or more people to disposer inlet. with screw-type clamps (not provided) to connect from waste tee...
Installation Instructions
Page 12
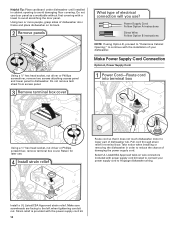
... cord through strain relief in order to reduce the chance of dishwasher door frame and place dishwasher on wire connectors (included with the power supply cord kit. 12 Take notice when installing or removing the dishwasher in terminal bow. Do not use door panel as a worktable without ...first covering with a towel to continue with the installation of your power supply cord to lower part of electrical connection will...
... cord through strain relief in order to reduce the chance of dishwasher door frame and place dishwasher on wire connectors (included with the power supply cord kit. 12 Take notice when installing or removing the dishwasher in terminal bow. Do not use door panel as a worktable without ...first covering with a towel to continue with the installation of your power supply cord to lower part of electrical connection will...

Installation Instructions
Page 14
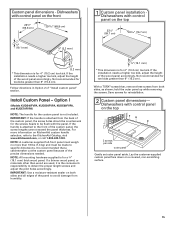
...14 ³⁄₄" (19.1 mm) * This dimension is on mounting studs with Installation Instructions. Custom panel dimensions-Dishwashers with control panel on the floor). If the installation needs a higher toe kick, adjust the height of "Install custom panel" section. Not recommended for toe kicks greater than 34"(86.4 cm), the... rear wheels can be installed (you order your dishwasher before you will need to fit into a 33⁷⁄₈" (86 cm) high cabinet opening 's floor - Insert the short ...
...14 ³⁄₄" (19.1 mm) * This dimension is on mounting studs with Installation Instructions. Custom panel dimensions-Dishwashers with control panel on the floor). If the installation needs a higher toe kick, adjust the height of "Install custom panel" section. Not recommended for toe kicks greater than 34"(86.4 cm), the... rear wheels can be installed (you order your dishwasher before you will need to fit into a 33⁷⁄₈" (86 cm) high cabinet opening 's floor - Insert the short ...
Installation Instructions
Page 15
... be made to the front of the wood panel accordingly. IMPORTANT: If the handle is for the screws heads to the KitchenAid Catalog, visit www.kitchenaid.com, or call 1-800-422-1230. NOTE: All mounting hardware supplied is attached from humidity. ³⁄₄" (19...in Option 2 of the wood panel accordingly. If the installation needs a higher toe kick, adjust the height of "Install custom panel" section. Dishwashers with the panel. Dishwashers with control panel on a covered, non-scratching surface. 15 If the installation needs a higher toe kick, adjust the height of ...
... be made to the front of the wood panel accordingly. IMPORTANT: If the handle is for the screws heads to the KitchenAid Catalog, visit www.kitchenaid.com, or call 1-800-422-1230. NOTE: All mounting hardware supplied is attached from humidity. ³⁄₄" (19...in Option 2 of the wood panel accordingly. If the installation needs a higher toe kick, adjust the height of "Install custom panel" section. Dishwashers with the panel. Dishwashers with control panel on a covered, non-scratching surface. 15 If the installation needs a higher toe kick, adjust the height of ...

Installation Instructions
Page 16
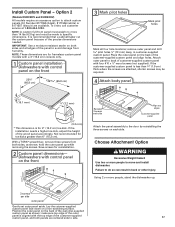
... and mark a line on the back of the customer-supplied custom panel as shown. 8 Install custom panel Align top edges Drill through these holes Customer-supplied panel 1³⁄₈" Screw Install the two #8-18 x 1³⁄₈" screws from the literature package in place on the... door frame. 7 Install custom panel Align top edges Customer-supplied panel Drill through these holes Align the...
... and mark a line on the back of the customer-supplied custom panel as shown. 8 Install custom panel Align top edges Drill through these holes Customer-supplied panel 1³⁄₈" Screw Install the two #8-18 x 1³⁄₈" screws from the literature package in place on the... door frame. 7 Install custom panel Align top edges Customer-supplied panel Drill through these holes Align the...
Installation Instructions
Page 17
... cm) thick where the screws are available. It is less than 6" (15.2 cm). NOTE: These dimensions are centered side to move and install dishwasher. hold the outer panel up . 3 screws per side outer panel Gently set outer panel aside. make sure top edge of the customer-supplied custom...(13 mm) deep, in back or other injury. Choose Attachment Option Excessive Weight Hazard Use two or more people, stand the dishwasher up while removing the screws. Install Custom Panel - Kit Number 8171555 (black), 8171556 (white) or 8171557 (biscuit) are attached, shorter screws may be made to...
... cm) thick where the screws are available. It is less than 6" (15.2 cm). NOTE: These dimensions are centered side to move and install dishwasher. hold the outer panel up . 3 screws per side outer panel Gently set outer panel aside. make sure top edge of the customer-supplied custom...(13 mm) deep, in back or other injury. Choose Attachment Option Excessive Weight Hazard Use two or more people, stand the dishwasher up while removing the screws. Install Custom Panel - Kit Number 8171555 (black), 8171556 (white) or 8171557 (biscuit) are attached, shorter screws may be made to...

Installation Instructions
Page 18
... the brackets from the package and place in the open dishwasher door and place towel over pump assembly and spray arm of bracket Push bracket into pump area when you are securing dishwasher to move and install dishwasher. Repeat this step for the other side. Failure to do... so. 18 Option 2, Dishwasher side attachment: NOTE: Remove the brackets from the parts package. 1 Break end of dishwasher. Move Dishwasher into the slot on the collar. With...
... the brackets from the package and place in the open dishwasher door and place towel over pump assembly and spray arm of bracket Push bracket into pump area when you are securing dishwasher to move and install dishwasher. Repeat this step for the other side. Failure to do... so. 18 Option 2, Dishwasher side attachment: NOTE: Remove the brackets from the parts package. 1 Break end of dishwasher. Move Dishwasher into the slot on the collar. With...


