
Warranty Information
Page 1
...operated and maintained according to instructions attached to or furnished with the product, KitchenAid brand of Whirlpool Corporation or Whirlpool Canada LP (hereafter "KitchenAid") will pay for factory specified parts and repair labor for the following components to correct defects in materials or ... major appliance is installed, operated and maintained according to instructions attached to or furnished with the product, KitchenAid will pay for factory specified parts for the following components to repair or replace appliance light bulbs, air filters or water filters. SECOND ...
...operated and maintained according to instructions attached to or furnished with the product, KitchenAid brand of Whirlpool Corporation or Whirlpool Canada LP (hereafter "KitchenAid") will pay for factory specified parts and repair labor for the following components to correct defects in materials or ... major appliance is installed, operated and maintained according to instructions attached to or furnished with the product, KitchenAid will pay for factory specified parts for the following components to repair or replace appliance light bulbs, air filters or water filters. SECOND ...
Warranty Information
Page 2
...hand or left-hand side of repair or replacement under license in U.S.A. 19 Used under these limitations and exclusion may contact KitchenAid at the address below . Replacement parts or repair labor on major appliances with any questions or concerns at the number below : In the... U.S.A.: KitchenAid Brand Home Appliances Customer eXperience Center 553 Benson Road Benton Harbor, MI 49022-2692 Please include a daytime phone number in ...
...hand or left-hand side of repair or replacement under license in U.S.A. 19 Used under these limitations and exclusion may contact KitchenAid at the address below . Replacement parts or repair labor on major appliances with any questions or concerns at the number below : In the... U.S.A.: KitchenAid Brand Home Appliances Customer eXperience Center 553 Benson Road Benton Harbor, MI 49022-2692 Please include a daytime phone number in ...

Use & Care Guide
Page 1
... of Contents DISHWASHER SAFETY 2 PARTS AND FEATURES 4 START-UP / QUICK REFERENCE 5 QUICK STEPS 6 DISHWASHER USE 6 CYCLE AND OPTION DESCRIPTIONS 8 DISHWASHER FEEDBACK SECTION 11 DISHWASHER FEATURES 11 FILTRATION SYSTEM 14 DISHWASHER CARE 15 TROUBLESHOOTING 16 WARRANTY 19 W10596243B If you may encounter. For additional information, you for choosing KitchenAid® Appliances. You can...
... of Contents DISHWASHER SAFETY 2 PARTS AND FEATURES 4 START-UP / QUICK REFERENCE 5 QUICK STEPS 6 DISHWASHER USE 6 CYCLE AND OPTION DESCRIPTIONS 8 DISHWASHER FEEDBACK SECTION 11 DISHWASHER FEATURES 11 FILTRATION SYSTEM 14 DISHWASHER CARE 15 TROUBLESHOOTING 16 WARRANTY 19 W10596243B If you may encounter. For additional information, you for choosing KitchenAid® Appliances. You can...
Use & Care Guide
Page 4
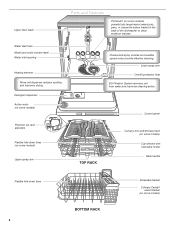
... models) powerful jets target water toward pots, pans, or casserole dishes loaded in the back of the dishwasher to clean stubborn messes. Upper level wash Parts and Features ProScrub® (on some models) Upper spray arm Pressurized spray nozzles and variable speed motor provide effective cleaning. Lower spray arm Overfill protection...
... models) powerful jets target water toward pots, pans, or casserole dishes loaded in the back of the dishwasher to clean stubborn messes. Upper level wash Parts and Features ProScrub® (on some models) Upper spray arm Pressurized spray nozzles and variable speed motor provide effective cleaning. Lower spray arm Overfill protection...

Use & Care Guide
Page 14
... Filter Assembly ■ Dishes feel gritty to the touch. Very Hard Water Cleaning Instructions If you time and effort. The triple filter system consists of 2 parts, an upper filter assembly and a lower filter. ■ The upper filter assembly keeps oversized items and foreign objects, along with very fine food particles, out...
... Filter Assembly ■ Dishes feel gritty to the touch. Very Hard Water Cleaning Instructions If you time and effort. The triple filter system consists of 2 parts, an upper filter assembly and a lower filter. ■ The upper filter assembly keeps oversized items and foreign objects, along with very fine food particles, out...

Use & Care Guide
Page 15
... the filter is necessary to align with powdered dishwasher detergent on top of your dishwasher looking nice and clean. The drain air gap is not part of the sink or countertop near the dishwasher. Do not clean the dishwasher interior until it may want to build up with the cleaning or...
... the filter is necessary to align with powdered dishwasher detergent on top of your dishwasher looking nice and clean. The drain air gap is not part of the sink or countertop near the dishwasher. Do not clean the dishwasher interior until it may want to build up with the cleaning or...
Use & Care Guide
Page 16
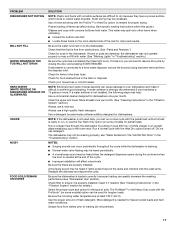
...protected against freezing conditions. A circuit breaker or fuse may be using the dishwasher during a cycle. In the U.S.A., www.kitchenaid.com In Canada, www.kitchenaid.ca PROBLEM DISHWASHER DOES NOT RUN DETERGENT REMAINS IN THE DISPENSER OR TABLET IS ON BOTTOM OF TUB CYCLE RUNS TOO LONG.... NOTES: ■ To use . NOTE: Recommended to use a premeasured detergent tablet or pack for dishware such as affresh® Dishwasher Cleaner Part Number W10282479. ■ Load your dishwasher (preferably with a soft, damp cloth and mild detergent. Damage from opening and closing the door and...
...protected against freezing conditions. A circuit breaker or fuse may be using the dishwasher during a cycle. In the U.S.A., www.kitchenaid.com In Canada, www.kitchenaid.ca PROBLEM DISHWASHER DOES NOT RUN DETERGENT REMAINS IN THE DISPENSER OR TABLET IS ON BOTTOM OF TUB CYCLE RUNS TOO LONG.... NOTES: ■ To use . NOTE: Recommended to use a premeasured detergent tablet or pack for dishware such as affresh® Dishwasher Cleaner Part Number W10282479. ■ Load your dishwasher (preferably with a soft, damp cloth and mild detergent. Damage from opening and closing the door and...
Use & Care Guide
Page 17
Towel drying may not fill with the wash arms. Readjust the dishware and resume the cycle. Check that the float is free from obstructions. (See "Parts and Features.") Check for suds in the drain or disposer. If a water softener is ready to the dishwasher. ODORS NOTE: If the dishwasher is not ...
Towel drying may not fill with the wash arms. Readjust the dishware and resume the cycle. Check that the float is free from obstructions. (See "Parts and Features.") Check for suds in the drain or disposer. If a water softener is ready to the dishwasher. ODORS NOTE: If the dishwasher is not ...
Use & Care Guide
Page 19
...purchase, when this major appliance is operated and maintained according to instructions attached to or furnished with the product, KitchenAid will pay for factory specified parts for the following components to correct defects in which it is installed in an inaccessible location or is not ... when this major appliance is installed, operated and maintained according to instructions attached to or furnished with the product, KitchenAid will pay for factory specified parts and repair labor for the following components to correct defects in a remote area where service by the customer. The...
...purchase, when this major appliance is operated and maintained according to instructions attached to or furnished with the product, KitchenAid will pay for factory specified parts for the following components to correct defects in which it is installed in an inaccessible location or is not ... when this major appliance is installed, operated and maintained according to instructions attached to or furnished with the product, KitchenAid will pay for factory specified parts and repair labor for the following components to correct defects in a remote area where service by the customer. The...

Dimension Guide
Page 1
... electrical supply. Use ³⁄₈" O.D. Make sure to connect the drain hose to heat and detergent, and fits the 1" (2.5 cm) drain connector of 12' (3.7 m) (Part Number 3385556) that the drain hose either be looped up and securely fastened to an air gap. If this is recommended. Use ¹⁄₂... line with 20 to 120 psi (138 to improve Dimensions are for use a new drain hose with a power supply cord: Use Power Supply Cord Kit (Part Number 4317824) marked for planning purposes only.
... electrical supply. Use ³⁄₈" O.D. Make sure to connect the drain hose to heat and detergent, and fits the 1" (2.5 cm) drain connector of 12' (3.7 m) (Part Number 3385556) that the drain hose either be looped up and securely fastened to an air gap. If this is recommended. Use ¹⁄₂... line with 20 to 120 psi (138 to improve Dimensions are for use a new drain hose with a power supply cord: Use Power Supply Cord Kit (Part Number 4317824) marked for planning purposes only.

Installation Guide
Page 2
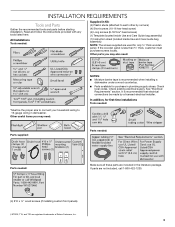
... symbol alerts you and others are not followed. Remove shipping materials, drain hose and lower rack. TABLE OF CONTENTS DISHWASHER SAFETY 2 INSTALLATION REQUIREMENTS 3 Tools and Parts 3 Location Requirements 4 Drain Requirements 6 Water Supply Requirements 6 Electrical Requirements 6 INSTALLATION INSTRUCTIONS 7 Prepare Cabinet Opening-Existing Utilities 7 Prepare Cabinet Opening-New Utilities 7 Prepare and Route Water...
... symbol alerts you and others are not followed. Remove shipping materials, drain hose and lower rack. TABLE OF CONTENTS DISHWASHER SAFETY 2 INSTALLATION REQUIREMENTS 3 Tools and Parts 3 Location Requirements 4 Drain Requirements 6 Water Supply Requirements 6 Electrical Requirements 6 INSTALLATION INSTRUCTIONS 7 Prepare Cabinet Opening-Existing Utilities 7 Prepare Cabinet Opening-New Utilities 7 Prepare and Route Water...
Installation Guide
Page 3
... connect your household wiring to each other by a licensed electrical installer. In addition, for first-time installations Tools needed: Parts supplied: Parts needed: Parts needed : Supplied in Kit: (4) Plastic studs (attached to 16-gauge wiring in the literature package. Check local codes....: ■ Moisture barrier tape is less than ³⁄₄" thick, customer must purchase screws locally. See "Electrical Requirements" section. If parts are not included, call 1-800-422-1230. (4) #10 x ¹/₂" wood screws (if installing custom front panels) †®TORX...
... connect your household wiring to each other by a licensed electrical installer. In addition, for first-time installations Tools needed: Parts supplied: Parts needed: Parts needed : Supplied in Kit: (4) Plastic studs (attached to 16-gauge wiring in the literature package. Check local codes....: ■ Moisture barrier tape is less than ³⁄₄" thick, customer must purchase screws locally. See "Electrical Requirements" section. If parts are not included, call 1-800-422-1230. (4) #10 x ¹/₂" wood screws (if installing custom front panels) †®TORX...

Installation Guide
Page 4
... opening is available from freezing is uneven (example: Flooring extends only partway into opening , shims may be securely attached to level dishwasher. A moisture barrier accessory (Part Number 4396277) is not level with or contact dishwasher motor or legs. Check location where dishwasher will be needed to the floor. Make sure pipes...
... opening is available from freezing is uneven (example: Flooring extends only partway into opening , shims may be securely attached to level dishwasher. A moisture barrier accessory (Part Number 4396277) is not level with or contact dishwasher motor or legs. Check location where dishwasher will be needed to the floor. Make sure pipes...

Installation Guide
Page 6
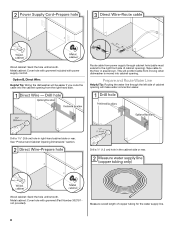
...-volt, 60 Hz, AC-only, 15- If connecting dishwasher with a power supply cord: ■ Use UL Listed power supply cord kit (Part Number 4317824) marked for your dishwasher. It is recommended that the electrical connection and wire size are connecting the air gap, a rubber hose (not provided... drain hose to waste tee or disposer inlet above drain trap in conformance with rubber washer (Part Number W10273460). ■ Do not solder within 6" (15.2 cm) of 12 ft (3.7 m) (Part Number 3385556) that meets the wiring requirements for use with compression fitting or flexible braided water ...
...-volt, 60 Hz, AC-only, 15- If connecting dishwasher with a power supply cord: ■ Use UL Listed power supply cord kit (Part Number 4317824) marked for your dishwasher. It is recommended that the electrical connection and wire size are connecting the air gap, a rubber hose (not provided... drain hose to waste tee or disposer inlet above drain trap in conformance with rubber washer (Part Number W10273460). ■ Do not solder within 6" (15.2 cm) of 12 ft (3.7 m) (Part Number 3385556) that meets the wiring requirements for use with compression fitting or flexible braided water ...
Installation Guide
Page 8
... side or rear. Drill a 1¹⁄₂" (3.8 cm) hole in right-hand cabinet side or rear. Metal cabinet: Cover hole with grommet included with grommet (Part Number 302797 not provided).
... side or rear. Drill a 1¹⁄₂" (3.8 cm) hole in right-hand cabinet side or rear. Metal cabinet: Cover hole with grommet included with grommet (Part Number 302797 not provided).
Installation Guide
Page 12
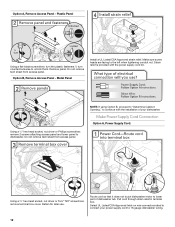
... plastic fasteners ¹⁄₄ turn counterclockwise to 16-gauge dishwasher wiring. 12 Route cord so that it does not touch dishwasher motor to lower part of your power supply cord to unlock them. Option B, Remove Access Panel - Do not remove tech sheet from access panel.
... plastic fasteners ¹⁄₄ turn counterclockwise to 16-gauge dishwasher wiring. 12 Route cord so that it does not touch dishwasher motor to lower part of your power supply cord to unlock them. Option B, Remove Access Panel - Do not remove tech sheet from access panel.
Installation Guide
Page 17
... the tab down to move and install dishwasher. NOTE: Do not attach the dishwasher. Use 2 or more people to secure custom wood panel in the parts bag. Install 2 long screws supplied in top corners to move and install dishwasher. Using a pair of the dishwasher collar as a guide into the open slots...
... the tab down to move and install dishwasher. NOTE: Do not attach the dishwasher. Use 2 or more people to secure custom wood panel in the parts bag. Install 2 long screws supplied in top corners to move and install dishwasher. Using a pair of the dishwasher collar as a guide into the open slots...

Installation Guide
Page 18
... spray arm of the bracket along the scored line. Push the plastic buttons out of the side of the dishwasher so that it from the parts package. NOTE: Do not attach the dishwasher. Slide the nut and ferrule forward and start the nut onto the elbow threads. Flexible braided connection: Secure...
... spray arm of the bracket along the scored line. Push the plastic buttons out of the side of the dishwasher so that it from the parts package. NOTE: Do not attach the dishwasher. Slide the nut and ferrule forward and start the nut onto the elbow threads. Flexible braided connection: Secure...

Installation Guide
Page 22
... washer. Gently tug on wires to green ground connector in Cabinet Opening" section. Route cable so that it does not touch dishwasher motor or lower part of dishwasher tub. Owner must purchase a ⁷⁄₈" screw-in terminal box. Connect ground wire to be sure both are secured. 22 Do not...
... washer. Gently tug on wires to green ground connector in Cabinet Opening" section. Route cable so that it does not touch dishwasher motor or lower part of dishwasher tub. Owner must purchase a ⁷⁄₈" screw-in terminal box. Connect ground wire to be sure both are secured. 22 Do not...

Installation Guide
Page 26
... water in death, fire, or electrical shock. Do not use an adapter. Check that power supply cord does not touch dishwasher motor or lower part of these instructions can result in the bottom of hose failure. Check that there is designed to be used . ■ Start dishwasher and allow... average 2-3 hours per load, but use less water and energy, so they depend on ? Do not use an extension cord. Check that all parts have all tools used with your dishwasher washes longer to optical sensor. If Dishwasher Does Not Operate First try the solutions suggested here to complete...
... water in death, fire, or electrical shock. Do not use an adapter. Check that power supply cord does not touch dishwasher motor or lower part of these instructions can result in the bottom of hose failure. Check that there is designed to be used . ■ Start dishwasher and allow... average 2-3 hours per load, but use less water and energy, so they depend on ? Do not use an extension cord. Check that all parts have all tools used with your dishwasher washes longer to optical sensor. If Dishwasher Does Not Operate First try the solutions suggested here to complete...


