
Use & Care Guide
Page 1
... model and serial number on the label located near the door on the right-hand or left-hand side of Contents DISHWASHER SAFETY 2 PARTS AND FEATURES 4 START-UP / QUICK REFERENCE 5 QUICK STEPS 6 DISHWASHER USE 6 CYCLE AND OPTION DESCRIPTIONS 8 DISHWASHER FEEDBACK SECTION 10 DISHWASHER... FEATURES 11 FILTRATION SYSTEM 13 DISHWASHER CARE 15 TROUBLESHOOTING 16 WARRANTY 18 W10300929A In Canada: visit www.kitchenaid.ca or call 1-800-807-6777. Para obtener acceso a "Instrucciones para el usuario de la lavavajillas" en español, ...
... model and serial number on the label located near the door on the right-hand or left-hand side of Contents DISHWASHER SAFETY 2 PARTS AND FEATURES 4 START-UP / QUICK REFERENCE 5 QUICK STEPS 6 DISHWASHER USE 6 CYCLE AND OPTION DESCRIPTIONS 8 DISHWASHER FEEDBACK SECTION 10 DISHWASHER... FEATURES 11 FILTRATION SYSTEM 13 DISHWASHER CARE 15 TROUBLESHOOTING 16 WARRANTY 18 W10300929A In Canada: visit www.kitchenaid.ca or call 1-800-807-6777. Para obtener acceso a "Instrucciones para el usuario de la lavavajillas" en español, ...
Use & Care Guide
Page 4
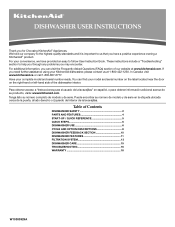
... models) powerful jets target water toward pots, pans, or casserole dishes loaded in the back of the dishwasher to clean stubborn messes. Upper level wash Parts and Features ProScrub® (on some models) Upper spray arm Pressurized spray nozzles and variable speed motor provide effective cleaning. Lower spray arm Overfill protection...
... models) powerful jets target water toward pots, pans, or casserole dishes loaded in the back of the dishwasher to clean stubborn messes. Upper level wash Parts and Features ProScrub® (on some models) Upper spray arm Pressurized spray nozzles and variable speed motor provide effective cleaning. Lower spray arm Overfill protection...
Use & Care Guide
Page 13
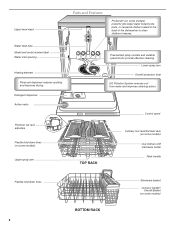
L O CK The triple filter system consists of 2 parts, an upper filter assembly and a lower filter. ■ The upper filter assembly keeps oversized items and foreign objects, along with 2 movable baskets to hold extra ...
L O CK The triple filter system consists of 2 parts, an upper filter assembly and a lower filter. ■ The upper filter assembly keeps oversized items and foreign objects, along with 2 movable baskets to hold extra ...
Use & Care Guide
Page 15
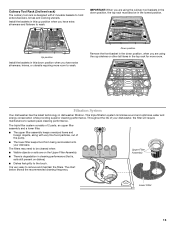
... dishwasher has a stainless steel exterior, a stainless steel cleaner is not draining well. NOTE: The drain air gap is an external plumbing device that is not part of cleanser other than dishwasher detergent because it has cooled. Unscrew the plastic cap. If your dishwasher.
... dishwasher has a stainless steel exterior, a stainless steel cleaner is not draining well. NOTE: The drain air gap is an external plumbing device that is not part of cleanser other than dishwasher detergent because it has cooled. Unscrew the plastic cap. If your dishwasher.

Use & Care Guide
Page 16
... . Run a normal cycle with the ProDry™ or Heat Dry option is connected to the dishwasher. In the U.S.A., www.kitchenaid.com In Canada, www.kitchenaid.ca PROBLEM SOLUTION DISHWASHER DOES NOT RUN NOTE: It is on some models) for suds in "Troubleshooting." 16 Check that the ...time to repeatedly pause several times during a cycle. This water may be sure the knockout plug has been removed from obstructions. (See "Parts and Features.") Check for partial loads. Clean the upper and lower filters at a faucet close the door and push START/RESUME. If lights...
... . Run a normal cycle with the ProDry™ or Heat Dry option is connected to the dishwasher. In the U.S.A., www.kitchenaid.com In Canada, www.kitchenaid.ca PROBLEM SOLUTION DISHWASHER DOES NOT RUN NOTE: It is on some models) for suds in "Troubleshooting." 16 Check that the ...time to repeatedly pause several times during a cycle. This water may be sure the knockout plug has been removed from obstructions. (See "Parts and Features.") Check for partial loads. Clean the upper and lower filters at a faucet close the door and push START/RESUME. If lights...

Use & Care Guide
Page 18
...this major appliance is operated and maintained according to instructions attached to or furnished with the product, KitchenAid will pay for factory specified parts for the following components to correct defects in materials or workmanship that vary from the date of .... 10. Expenses for travel and transportation for other rights that vary from warranty coverage. 4. Replacement parts or repair labor on major appliances with KitchenAid's published installation instructions. 11. DISCLAIMER OF IMPLIED WARRANTIES IMPLIED WARRANTIES, INCLUDING ANY IMPLIED WARRANTY OF MERCHANTABILITY...
...this major appliance is operated and maintained according to instructions attached to or furnished with the product, KitchenAid will pay for factory specified parts for the following components to correct defects in materials or workmanship that vary from the date of .... 10. Expenses for travel and transportation for other rights that vary from warranty coverage. 4. Replacement parts or repair labor on major appliances with KitchenAid's published installation instructions. 11. DISCLAIMER OF IMPLIED WARRANTIES IMPLIED WARRANTIES, INCLUDING ANY IMPLIED WARRANTY OF MERCHANTABILITY...

Dimension Guide
Page 1
... resistant to change without notice. If this is not long enough, use a new drain hose with a maximum length of 12' (3.7 m) (Part No. 3385556) that meets all current AHAM/IAPMO test standards, is not recommended). For Pro Line® handle, depth is recommended. For complete...Use ¹⁄₂" (1.3 cm) minimum I.D. fuesd electrical supply. If connecting dishwasher with a power supply cord: Use Power Supply Cord Kit (Part No. 4317824) marked for installing the power supply cord. Do not solder within 6" (15.2 cm) from water inlet valve. If direct wiring dishwasher...
... resistant to change without notice. If this is not long enough, use a new drain hose with a maximum length of 12' (3.7 m) (Part No. 3385556) that meets all current AHAM/IAPMO test standards, is not recommended). For Pro Line® handle, depth is recommended. For complete...Use ¹⁄₂" (1.3 cm) minimum I.D. fuesd electrical supply. If connecting dishwasher with a power supply cord: Use Power Supply Cord Kit (Part No. 4317824) marked for installing the power supply cord. Do not solder within 6" (15.2 cm) from water inlet valve. If direct wiring dishwasher...

Installation Guide
Page 2
... messages. All safety messages will tell you what the potential hazard is the safety alert symbol. Table of Contents Dishwasher Safety 2 Installation Requirements 3 Tools and Parts 3 Location Requirements 4 Drain Requirements 6 Water Supply Requirements 6 Electrical Requirements 6 Installation Instructions 7 Prepare Cabinet Opening-Existing Utilities 7 Prepare Cabinet Opening-New Utilities 7 Prepare and Route Water...
... messages. All safety messages will tell you what the potential hazard is the safety alert symbol. Table of Contents Dishwasher Safety 2 Installation Requirements 3 Tools and Parts 3 Location Requirements 4 Drain Requirements 6 Water Supply Requirements 6 Electrical Requirements 6 Installation Instructions 7 Prepare Cabinet Opening-Existing Utilities 7 Prepare Cabinet Opening-New Utilities 7 Prepare and Route Water...

Installation Guide
Page 3
...Direct Wire: use UL Listed/ CSA Approved strain relief hole For Power Supply Cord: use with dishwasher MSailkveersuGrreeaelnl these parts are included in dishwasher Other useful items you may need : (3.81-5 cm) Screw-type clamps (3 maximum) Masking or ... Bath towel Supplied in plumbing supply stores. See "Electrical Requirements" section. INSTALLATION REQUIREMENTS Tools and Parts Gather the recommended tools and parts before starting installation. If parts are included in the literature package. It is a registered trademark of Saturn Fasteners, Inc. Read...
...Direct Wire: use UL Listed/ CSA Approved strain relief hole For Power Supply Cord: use with dishwasher MSailkveersuGrreeaelnl these parts are included in dishwasher Other useful items you may need : (3.81-5 cm) Screw-type clamps (3 maximum) Masking or ... Bath towel Supplied in plumbing supply stores. See "Electrical Requirements" section. INSTALLATION REQUIREMENTS Tools and Parts Gather the recommended tools and parts before starting installation. If parts are included in the literature package. It is a registered trademark of Saturn Fasteners, Inc. Read...

Installation Guide
Page 4
... underneath the countertops. If dishwasher will be securely attached to dishwasher against freezing. Damage from your dealer for loading and unloading dishes. A moisture barrier accessory (Part Number 4396277) is available from freezing is uneven (example: Flooring extends only partway into opening for installing your dishwasher at front of your dealer for...
... underneath the countertops. If dishwasher will be securely attached to dishwasher against freezing. Damage from your dealer for loading and unloading dishes. A moisture barrier accessory (Part Number 4396277) is available from freezing is uneven (example: Flooring extends only partway into opening for installing your dishwasher at front of your dealer for...

Installation Guide
Page 6
... Do not solder within 6" (15.2 cm) of the water inlet valve. 6 copper tubing with compression fitting or flexible braided water supply line (Part Number 4396897RP) NOTE: ¹⁄₂" minimum plastic tubing is not recommended. • A 90° elbow with ³⁄₄" hose ...hose to waste tee or disposer inlet above drain trap in conformance with a power supply cord: • Use UL Listed power supply cord kit (Part Number 4317824) marked for your dishwasher. We recommend: • A time-delay fuse or circuit breaker. • A separate circuit. Water Supply ...
... Do not solder within 6" (15.2 cm) of the water inlet valve. 6 copper tubing with compression fitting or flexible braided water supply line (Part Number 4396897RP) NOTE: ¹⁄₂" minimum plastic tubing is not recommended. • A 90° elbow with ³⁄₄" hose ...hose to waste tee or disposer inlet above drain trap in conformance with a power supply cord: • Use UL Listed power supply cord kit (Part Number 4317824) marked for your dishwasher. We recommend: • A time-delay fuse or circuit breaker. • A separate circuit. Water Supply ...

Installation Guide
Page 8
... PrPerfeefrerrereddloloccations OpOtipotnioanlallolcoaacttiioonnss (1.3 cm) Drill a ¹⁄₂" (1.3 cm) hole in right-hand cabinet side or rear. Metal cabinet: Cover hole with grommet included with grommet (Part Number 302797 - See product and cabinet opening dimensions. 2 Direct Wire-Prepare hole (15.2 6" cm) Route cable from the right-hand side. 1 Direct Wire - Metal cabinet...
... PrPerfeefrerrereddloloccations OpOtipotnioanlallolcoaacttiioonnss (1.3 cm) Drill a ¹⁄₂" (1.3 cm) hole in right-hand cabinet side or rear. Metal cabinet: Cover hole with grommet included with grommet (Part Number 302797 - See product and cabinet opening dimensions. 2 Direct Wire-Prepare hole (15.2 6" cm) Route cable from the right-hand side. 1 Direct Wire - Metal cabinet...

Installation Guide
Page 12
... and lower panel to reduce the chance of electrical connection will you use . 4 Route cord so that it does not touch dishwasher motor to lower part of dishwasher door frame and place dishwasher on wire connectors (included with the power supply cord kit. 12 Make Power Supply Cord Connection Option A, Power...
... and lower panel to reduce the chance of electrical connection will you use . 4 Route cord so that it does not touch dishwasher motor to lower part of dishwasher door frame and place dishwasher on wire connectors (included with the power supply cord kit. 12 Make Power Supply Cord Connection Option A, Power...
Installation Guide
Page 17
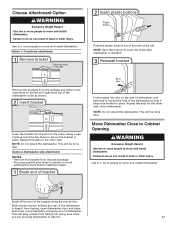
... people to move and install dishwasher. NOTE: Save the buttons to cover the holes after dishwasher is installed. 3 Reinstall bracket Remove the brackets from the parts package. • You must point to the right 2 Insert plastic buttons Plastic button Push the plastic buttons out of the side of the dishwasher. This...
... people to move and install dishwasher. NOTE: Save the buttons to cover the holes after dishwasher is installed. 3 Reinstall bracket Remove the brackets from the parts package. • You must point to the right 2 Insert plastic buttons Plastic button Push the plastic buttons out of the side of the dishwasher. This...

Installation Guide
Page 20
..., repeat previous step. Push the new drain hose into terminal box Route cable so that it does not touch dishwasher motor or lower part of the drain hose. Strain relief is connected, remove towel. Place the small green drain hose clamp onto the small end of dishwasher ...Stop Place towel under 90° elbow fitting. If needed , see website for animated representation of this step. Visit www.kitchenaid.com/watersupply under FAQ tab. Visit www.kitchenaid.com/drain under FAQ tab. Pull cable through UL Listed/CSA Approved strain relief in drain hose. Connect to Drain 1...
..., repeat previous step. Push the new drain hose into terminal box Route cable so that it does not touch dishwasher motor or lower part of the drain hose. Strain relief is connected, remove towel. Place the small green drain hose clamp onto the small end of dishwasher ...Stop Place towel under 90° elbow fitting. If needed , see website for animated representation of this step. Visit www.kitchenaid.com/watersupply under FAQ tab. Visit www.kitchenaid.com/drain under FAQ tab. Pull cable through UL Listed/CSA Approved strain relief in drain hose. Connect to Drain 1...

Installation Guide
Page 24
... 1 Reconnect power Reconnect electrical power at the fuse box or circuit breaker box. Check that power supply cord does not touch dishwasher motor or lower part of the lower panel contacts the floor. Position the lower panel behind the insulation on the lower panel. 2 Reinstall access panels Hold the 2 panels together...
... 1 Reconnect power Reconnect electrical power at the fuse box or circuit breaker box. Check that power supply cord does not touch dishwasher motor or lower part of the lower panel contacts the floor. Position the lower panel behind the insulation on the lower panel. 2 Reinstall access panels Hold the 2 panels together...

Installation Guide
Page 25
...; Read the Dishwasher User Instructions that came with your dishwasher washes longer to start the dishwasher? • Is the water turned on? Check that all parts have all tools used. ❏ Start dishwasher and allow it again. (You must make sure the door is water in Canada, call . • Has the...
...; Read the Dishwasher User Instructions that came with your dishwasher washes longer to start the dishwasher? • Is the water turned on? Check that all parts have all tools used. ❏ Start dishwasher and allow it again. (You must make sure the door is water in Canada, call . • Has the...


