
Use & Care Guide
Page 7
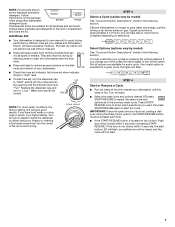
...same cycle and options as in the main compartment and close the lid. Premeasured forms are available for all options are suitable for every cycle. Replace the dispenser cap and turn to "Lock." Make sure cap is approximately 2 1/2 hours, but can customize your mind, press the option ...again to complete depending on the dish racks and interior of 2 will give good results. max - 21 3 - --- Turn the arrow adjuster inside the dispenser by model) See "Cycle and Option...
...same cycle and options as in the main compartment and close the lid. Premeasured forms are available for all options are suitable for every cycle. Replace the dispenser cap and turn to "Lock." Make sure cap is approximately 2 1/2 hours, but can customize your mind, press the option ...again to complete depending on the dish racks and interior of 2 will give good results. max - 21 3 - --- Turn the arrow adjuster inside the dispenser by model) See "Cycle and Option...
Use & Care Guide
Page 12
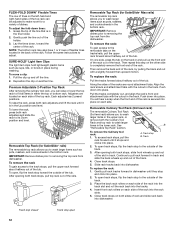
...the track stop to the outside of the holder. 3. Lay the tines down into place on each side of the rack. After opening both track stops, pull top rack out of the tub. To replace the rack: Pull the tracks forward about halfway out of dishes. Pull the tracks completely out, and align the...track stops, slide front wheels up and out of the tub. To replace the rack: 1. NOTE: The bottom rack may also have 1 or 2 rows of flexible tines located in the back of the slot in the tine holder. 2. To remove the rack To gain access to the removable tabs on each side. Track 2. ...
...the track stop to the outside of the holder. 3. Lay the tines down into place on each side of the rack. After opening both track stops, pull top rack out of the tub. To replace the rack: Pull the tracks forward about halfway out of dishes. Pull the tracks completely out, and align the...track stops, slide front wheels up and out of the tub. To replace the rack: 1. NOTE: The bottom rack may also have 1 or 2 rows of flexible tines located in the back of the slot in the tine holder. 2. To remove the rack To gain access to the removable tabs on each side. Track 2. ...

Use & Care Guide
Page 17
...from: ■ Using the incorrect type of detergent, such as dish detergent for hand washing dishes, laundry detergent, or hand soap. ■ Not replacing the rinse aid dispenser cap after filling (or refilling) the rinse aid. ■ Using an excessive amount of detergent and rinse aid. (See ...the dishwasher is permanently damaged. Try using too much detergent with the Heat Dry option turned off. The cycle was present in the lower rack. To avoid further etching, adjust the detergent amount to reduce spotting. ■ Use the correct amount of white vinegar in a glass ...
...from: ■ Using the incorrect type of detergent, such as dish detergent for hand washing dishes, laundry detergent, or hand soap. ■ Not replacing the rinse aid dispenser cap after filling (or refilling) the rinse aid. ■ Using an excessive amount of detergent and rinse aid. (See ...the dishwasher is permanently damaged. Try using too much detergent with the Heat Dry option turned off. The cycle was present in the lower rack. To avoid further etching, adjust the detergent amount to reduce spotting. ■ Use the correct amount of white vinegar in a glass ...

Use & Care Guide
Page 18
... stainless steel tub and inner door liner. This major appliance is inconsistent to be easily determined. Replacement parts or repair labor on major appliances with KitchenAid's published installation instructions. 11. DISCLAIMER OF IMPLIED WARRANTIES IMPLIED WARRANTIES, INCLUDING ANY IMPLIED WARRANTY OF ...the detergent accurately and use only detergents designed for product service if your major appliance if it was purchased: nylon dish racks and electronic controls. Proof of your major appliance is located in a dishwasher. The removal and reinstallation of original purchase ...
... stainless steel tub and inner door liner. This major appliance is inconsistent to be easily determined. Replacement parts or repair labor on major appliances with KitchenAid's published installation instructions. 11. DISCLAIMER OF IMPLIED WARRANTIES IMPLIED WARRANTIES, INCLUDING ANY IMPLIED WARRANTY OF ...the detergent accurately and use only detergents designed for product service if your major appliance if it was purchased: nylon dish racks and electronic controls. Proof of your major appliance is located in a dishwasher. The removal and reinstallation of original purchase ...
Installation Guide
Page 23
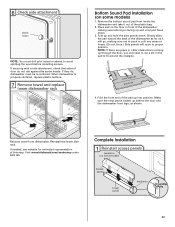
...screw heads. Remove the bottom sound pad from dishwasher. NOTE: If there are pipes or other obstructions coming up into position. Visit www.kitchenaid.com/anchoring under FAQ tab. Place pad on the floor in front of the pad up through the floor, you will need to ... door do , dishwasher must drill pilot holes in cabinet to proper position. Make sure the vinyl pad is properly centered, replace plastic buttons. 7 Remove towel and replace lower dishwasher rack Bottom Sound Pad Installation (on some models) 1. Fold up and vinyl pad faces down . 6 Check side attachment plastic ...
...screw heads. Remove the bottom sound pad from dishwasher. NOTE: If there are pipes or other obstructions coming up into position. Visit www.kitchenaid.com/anchoring under FAQ tab. Place pad on the floor in front of the pad up through the floor, you will need to ... door do , dishwasher must drill pilot holes in cabinet to proper position. Make sure the vinyl pad is properly centered, replace plastic buttons. 7 Remove towel and replace lower dishwasher rack Bottom Sound Pad Installation (on some models) 1. Fold up and vinyl pad faces down . 6 Check side attachment plastic ...


