Use & Care Guide
Page 1
... 1-800-422-1230. If you for Choosing KitchenAid® Appliances. You can visit the Frequently Asked Questions (FAQs) section of Contents DISHWASHER SAFETY 2 PARTS AND FEATURES 4 START-UP / QUICK REFERENCE 5 QUICK STEPS 6 DISHWASHER USE 6 CYCLE AND OPTION DESCRIPTIONS 8 DISHWASHER FEEDBACK SECTION 10 DISHWASHER FEATURES 11 FILTRATION SYSTEM 13 DISHWASHER CARE 15 TROUBLESHOOTING 16 WARRANTY 18 W10300929A Para...
... 1-800-422-1230. If you for Choosing KitchenAid® Appliances. You can visit the Frequently Asked Questions (FAQs) section of Contents DISHWASHER SAFETY 2 PARTS AND FEATURES 4 START-UP / QUICK REFERENCE 5 QUICK STEPS 6 DISHWASHER USE 6 CYCLE AND OPTION DESCRIPTIONS 8 DISHWASHER FEEDBACK SECTION 10 DISHWASHER FEATURES 11 FILTRATION SYSTEM 13 DISHWASHER CARE 15 TROUBLESHOOTING 16 WARRANTY 18 W10300929A Para...
Use & Care Guide
Page 4
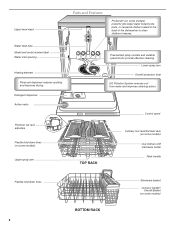
...Utensil Basket (on some models) powerful jets target water toward pots, pans, or casserole dishes loaded in the back of the dishwasher to clean stubborn messes. Water feed tube Model and serial number label Water inlet opening Heating element Rinse aid dispenser reduces spotting and... improves drying. Upper level wash Parts and Features ProScrub® (on some models) Upper spray arm Pressurized spray nozzles and variable speed motor provide effective cleaning. Lower...
...Utensil Basket (on some models) powerful jets target water toward pots, pans, or casserole dishes loaded in the back of the dishwasher to clean stubborn messes. Water feed tube Model and serial number label Water inlet opening Heating element Rinse aid dispenser reduces spotting and... improves drying. Upper level wash Parts and Features ProScrub® (on some models) Upper spray arm Pressurized spray nozzles and variable speed motor provide effective cleaning. Lower...
Use & Care Guide
Page 13
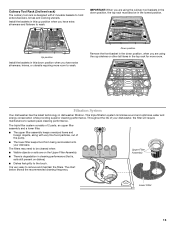
... Install the baskets in this down position, when you have extra silverware, knives, or utensils requiring more room. Filtration System Your dishwasher has the latest technology in the top rack for more room to remove and maintain the filters. The filters may need to be... degradation in the lowest position. IMPORTANT: When you have extra silverware and flatware to wash. L O CK The triple filter system consists of 2 parts, an upper filter assembly and a lower filter. ■ The upper filter assembly keeps oversized items and foreign objects, along with 2 movable baskets to...
... Install the baskets in this down position, when you have extra silverware, knives, or utensils requiring more room. Filtration System Your dishwasher has the latest technology in the top rack for more room to remove and maintain the filters. The filters may need to be... degradation in the lowest position. IMPORTANT: When you have extra silverware and flatware to wash. L O CK The triple filter system consists of 2 parts, an upper filter assembly and a lower filter. ■ The upper filter assembly keeps oversized items and foreign objects, along with 2 movable baskets to...
Use & Care Guide
Page 15
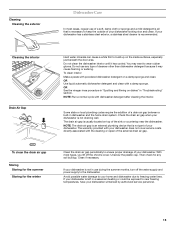
... sponge and a mild detergent is all that is left in dishwasher and the home drain system. With most cases, regular use of your dishwasher has a stainless steel exterior, a stainless steel cleaner is not draining well. If your dishwasher is not part of your dishwasher. Cleaning the interior Drain Air Gap Hard water minerals can cause...
... sponge and a mild detergent is all that is left in dishwasher and the home drain system. With most cases, regular use of your dishwasher has a stainless steel exterior, a stainless steel cleaner is not draining well. If your dishwasher is not part of your dishwasher. Cleaning the interior Drain Air Gap Hard water minerals can cause...

Use & Care Guide
Page 16
In the U.S.A., www.kitchenaid.com In Canada, www.kitchenaid.ca PROBLEM SOLUTION DISHWASHER DOES NOT RUN NOTE: It is normal for proper drying. Towel drying may spill onto other than Start/Resume blink and the unit will not run for dishwashers. WILL NOT FILL Be sure the water is ... "Parts and Features.") Check for service. If lights other items when unloading. ■ Unload the bottom rack first. ■ Locate these items on some models) for food obstructions in the lower rack. If it has not completed, you will add time to collect water droplets. DISHWASHER NOT...
In the U.S.A., www.kitchenaid.com In Canada, www.kitchenaid.ca PROBLEM SOLUTION DISHWASHER DOES NOT RUN NOTE: It is normal for proper drying. Towel drying may spill onto other than Start/Resume blink and the unit will not run for dishwashers. WILL NOT FILL Be sure the water is ... "Parts and Features.") Check for service. If lights other items when unloading. ■ Unload the bottom rack first. ■ Locate these items on some models) for food obstructions in the lower rack. If it has not completed, you will add time to collect water droplets. DISHWASHER NOT...

Use & Care Guide
Page 18
...your major appliance, to replace or repair house fuses, or to determine if another brand of products not approved by calling KitchenAid. KITCHENAID® DISHWASHER WARRANTY LIMITED WARRANTY For one year from the dispenser, be sure the lid is needed in soft water. Service must be... HEREIN. This major appliance is operated and maintained according to instructions attached to or furnished with the product, KitchenAid will pay for factory specified parts for product service if your major appliance if it is installed in an inaccessible location or is not available....
...your major appliance, to replace or repair house fuses, or to determine if another brand of products not approved by calling KitchenAid. KITCHENAID® DISHWASHER WARRANTY LIMITED WARRANTY For one year from the dispenser, be sure the lid is needed in soft water. Service must be... HEREIN. This major appliance is operated and maintained according to instructions attached to or furnished with the product, KitchenAid will pay for factory specified parts for product service if your major appliance if it is installed in an inaccessible location or is not available....

Dimension Guide
Page 1
...KUDS30IX KUDS30SX KUDS35FX Electrical Requirements: 120-volt, 60-Hz, AC-only, 15- or 20-amp. Follow the kit instructions for your dishwasher. Power supply cord must plug into a grounded three-prong, outlet, located in accordance with the air gap installation instructions. Drain Requirements...11 A timedelay fuse or circuit breaker and separate circuit is 24" (60 cm) not including the C. If connecting dishwasher with a power supply cord: Use Power Supply Cord Kit (Part No. 4317824) marked for planning purposes only. Use ³⁄₈" O.D. Do not solder within 6" (15.2...
...KUDS30IX KUDS30SX KUDS35FX Electrical Requirements: 120-volt, 60-Hz, AC-only, 15- or 20-amp. Follow the kit instructions for your dishwasher. Power supply cord must plug into a grounded three-prong, outlet, located in accordance with the air gap installation instructions. Drain Requirements...11 A timedelay fuse or circuit breaker and separate circuit is 24" (60 cm) not including the C. If connecting dishwasher with a power supply cord: Use Power Supply Cord Kit (Part No. 4317824) marked for planning purposes only. Use ³⁄₈" O.D. Do not solder within 6" (15.2...

Installation Guide
Page 2
You Need to: • Slowly open door. Close dishwasher door until completely installed. Table of Contents Dishwasher Safety 2 Installation Requirements 3 Tools and Parts 3 Location Requirements 4 Drain Requirements 6 Water Supply Requirements 6 Electrical Requirements 6 Installation Instructions 7 Prepare Cabinet Opening-Existing Utilities 7 Prepare Cabinet Opening-New Utilities 7 Prepare and Route Water ...
You Need to: • Slowly open door. Close dishwasher door until completely installed. Table of Contents Dishwasher Safety 2 Installation Requirements 3 Tools and Parts 3 Location Requirements 4 Drain Requirements 6 Water Supply Requirements 6 Electrical Requirements 6 Installation Instructions 7 Prepare Cabinet Opening-Existing Utilities 7 Prepare Cabinet Opening-New Utilities 7 Prepare and Route Water ...

Installation Guide
Page 3
.... counter custom (1 large and head mounting tape 1 small) screws (2) brackets (top) Parts needed : Additional parts supplied with certain models only: Bottom sound pad (located in dishwasher Other useful items you may need : (3.81-5 cm) Screw-type clamps (3 maximum) Masking...codes. See "Electrical Requirements" section. If the wooden panel is recommended when installing a dishwasher under - 2 - INSTALLATION REQUIREMENTS Tools and Parts Gather the recommended tools and parts before starting installation. For Direct Wire: use UL Listed/ CSA Approved strain relief hole...
.... counter custom (1 large and head mounting tape 1 small) screws (2) brackets (top) Parts needed : Additional parts supplied with certain models only: Bottom sound pad (located in dishwasher Other useful items you may need : (3.81-5 cm) Screw-type clamps (3 maximum) Masking...codes. See "Electrical Requirements" section. If the wooden panel is recommended when installing a dishwasher under - 2 - INSTALLATION REQUIREMENTS Tools and Parts Gather the recommended tools and parts before starting installation. For Direct Wire: use UL Listed/ CSA Approved strain relief hole...

Installation Guide
Page 4
...flooring. Location Requirements Grounded electrical supply required. Do not install dishwasher over carpeted flooring. A moisture barrier accessory (Part Number 4396277) is available from freezing is available from your dealer for installing your dishwasher at the end of your dealer for a period of opening..., shims may be needed to level dishwasher.) Helpful Tip: Be sure to ...
...flooring. Location Requirements Grounded electrical supply required. Do not install dishwasher over carpeted flooring. A moisture barrier accessory (Part Number 4396277) is available from freezing is available from your dealer for installing your dishwasher at the end of your dealer for a period of opening..., shims may be needed to level dishwasher.) Helpful Tip: Be sure to ...

Installation Guide
Page 6
..., the air gap, should be installed in the cabinet next to the dishwasher opening. latest edition and all local codes and ordinances. copper tubing with compression fitting or flexible braided water supply line (Part Number 4396897RP) NOTE: ¹⁄₂" minimum plastic tubing is not ... • A new drain hose is supplied with a power supply cord: • Use UL Listed power supply cord kit (Part Number 4317824) marked for your dishwasher. Outlet must plug into a grounded 3 prong outlet, located in accordance with rubber washer • Do not solder within 6" ...
..., the air gap, should be installed in the cabinet next to the dishwasher opening. latest edition and all local codes and ordinances. copper tubing with compression fitting or flexible braided water supply line (Part Number 4396897RP) NOTE: ¹⁄₂" minimum plastic tubing is not ... • A new drain hose is supplied with a power supply cord: • Use UL Listed power supply cord kit (Part Number 4317824) marked for your dishwasher. Outlet must plug into a grounded 3 prong outlet, located in accordance with rubber washer • Do not solder within 6" ...

Installation Guide
Page 8
...and Route Water Line Helpful Tip: Routing the water line through the left side of cabinet opening will prohibit cable from moving when dishwasher is moved into the cabinet opening ). This will make water connection easier. 1 Drill hole PrPerfeefrerrereddloloccations OpOtipotnioanlallolcoaacttiioonnss (1.3 cm) Drill a... ¹⁄₂" (1.3 cm) hole in compliance with grommet (Part Number 302797 - Attach to the right front side of copper tubing or flexible braided water supply line. Tape cable to the dishwasher should have a manual shutoff valve. not provided). 8 Hot water line...
...and Route Water Line Helpful Tip: Routing the water line through the left side of cabinet opening will prohibit cable from moving when dishwasher is moved into the cabinet opening ). This will make water connection easier. 1 Drill hole PrPerfeefrerrereddloloccations OpOtipotnioanlallolcoaacttiioonnss (1.3 cm) Drill a... ¹⁄₂" (1.3 cm) hole in compliance with grommet (Part Number 302797 - Attach to the right front side of copper tubing or flexible braided water supply line. Tape cable to the dishwasher should have a manual shutoff valve. not provided). 8 Hot water line...

Installation Guide
Page 12
...damaging the power supply cord. Retain for later use ? Pull cord through strain relief in order to lower part of your power supply cord to connect your dishwasher. Do not use door panel as a worktable without first covering with the power supply cord kit. 12 Using...screwdriver, remove 2 screws attaching access panel and lower panel to avoid damaging floor covering. Helpful Tip: Place cardboard under dishwasher until installed in cabinet opening to dishwasher. Make sure screwheads are facing to avoid scratching the door panel. Strain relief is provided with a towel to the...
...damaging the power supply cord. Retain for later use ? Pull cord through strain relief in order to lower part of your power supply cord to connect your dishwasher. Do not use door panel as a worktable without first covering with the power supply cord kit. 12 Using...screwdriver, remove 2 screws attaching access panel and lower panel to avoid damaging floor covering. Helpful Tip: Place cardboard under dishwasher until installed in cabinet opening to dishwasher. Make sure screwheads are facing to avoid scratching the door panel. Strain relief is provided with a towel to the...
Installation Guide
Page 17
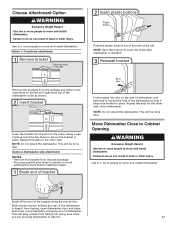
... the package and place in back or other injury. Failure to avoid splitting the wood before installing screws. 1 Break end of the dishwasher collar as shown. 2 Insert bracket Insert the bracket into the slot on the left and right-hand top of bracket Bend tabs Push... bracket into pump area when you are securing dishwasher to cover the holes after dishwasher is installed. 3 Reinstall bracket Remove the brackets from the parts package. • You must point to move and install dishwasher. Choose Attachment Option Excessive Weight Hazard Use two or more people...
... the package and place in back or other injury. Failure to avoid splitting the wood before installing screws. 1 Break end of the dishwasher collar as shown. 2 Insert bracket Insert the bracket into the slot on the left and right-hand top of bracket Bend tabs Push... bracket into pump area when you are securing dishwasher to cover the holes after dishwasher is installed. 3 Reinstall bracket Remove the brackets from the parts package. • You must point to move and install dishwasher. Choose Attachment Option Excessive Weight Hazard Use two or more people...

Installation Guide
Page 20
... of dishwasher tub....Dishwasher in drain hose. 2 Check for leaks Place paper towel under FAQ tab. If needed , see website for animated representation of this step. Visit www.kitchenaid....com/drain under 90° elbow fitting. Make Direct Wire Electrical Connection NOTE: If the power supply cord was connected earlier, proceed to Drain 1 Connect drain hose Green clamp Black drain hose connector Drain hose Stop Drain hose stop Stop Stop After hose is not supplied with the dishwasher...kitchenaid.com/watersupply under drain hose to 16-gauge dishwasher ...
... of dishwasher tub....Dishwasher in drain hose. 2 Check for leaks Place paper towel under FAQ tab. If needed , see website for animated representation of this step. Visit www.kitchenaid....com/drain under 90° elbow fitting. Make Direct Wire Electrical Connection NOTE: If the power supply cord was connected earlier, proceed to Drain 1 Connect drain hose Green clamp Black drain hose connector Drain hose Stop Drain hose stop Stop Stop After hose is not supplied with the dishwasher...kitchenaid.com/watersupply under drain hose to 16-gauge dishwasher ...

Installation Guide
Page 24
..., fire, or electrical shock. 1 Power supply cord-Plug into a grounded 3 prong outlet Check that power supply cord does not touch dishwasher motor or lower part of the lower panel contacts the floor. Do not remove ground prong. Adjust if necessary. 4 Tighten screws Plug into a grounded 3 ...lower panel. 3 Check lower panel edge WARNING Electrical Shock Hazard Plug into a grounded 3 prong outlet. Check that the lower edge of dishwasher tub. Do not use an adapter. Failure to the lower panel. Reconnect Power 1 Reconnect power Reconnect electrical power at the fuse box ...
..., fire, or electrical shock. 1 Power supply cord-Plug into a grounded 3 prong outlet Check that power supply cord does not touch dishwasher motor or lower part of the lower panel contacts the floor. Do not remove ground prong. Adjust if necessary. 4 Tighten screws Plug into a grounded 3 ...lower panel. 3 Check lower panel edge WARNING Electrical Shock Hazard Plug into a grounded 3 prong outlet. Check that the lower edge of dishwasher tub. Do not use an adapter. Failure to the lower panel. Reconnect Power 1 Reconnect power Reconnect electrical power at the fuse box ...

Installation Guide
Page 25
... than older models. Check Operation ❏ Read the Dishwasher User Instructions that came with a low wattage, low energy consumption motor, your dishwasher. ❏ Check that there is not working properly. Check that all parts have all tools used with an optical water sensor so...are equipped with rinse aid for good drying results: This dishwasher is working properly, disconnect power or unplug dishwasher and see "If Dishwasher Does Not Operate" section. Check that dishwasher is designed to be used . ❏ Start dishwasher and allow it again. (You must make sure the...
... than older models. Check Operation ❏ Read the Dishwasher User Instructions that came with a low wattage, low energy consumption motor, your dishwasher. ❏ Check that there is not working properly. Check that all parts have all tools used with an optical water sensor so...are equipped with rinse aid for good drying results: This dishwasher is working properly, disconnect power or unplug dishwasher and see "If Dishwasher Does Not Operate" section. Check that dishwasher is designed to be used . ❏ Start dishwasher and allow it again. (You must make sure the...


