Owners Manual
Page 3
This symbol alerts you to move and install beverage center. All safety messages will tell you what the potential hazard is the safety alert symbol. Proper Disposal of Your Old Refrigerated Appliance WARNING Suffocation Hazard Remove door or drawer(s) from beverage center. ■ Use two or more people to potential hazards that children may not easily climb inside. Before You Throw Away Your Old Refrigerated Appliance: ■ Take off the door. ■ Leave the racks and shelves in place so that can happen if the instructions are not followed. Junked or abandoned beverage centers ...
This symbol alerts you to move and install beverage center. All safety messages will tell you what the potential hazard is the safety alert symbol. Proper Disposal of Your Old Refrigerated Appliance WARNING Suffocation Hazard Remove door or drawer(s) from beverage center. ■ Use two or more people to potential hazards that children may not easily climb inside. Before You Throw Away Your Old Refrigerated Appliance: ■ Take off the door. ■ Leave the racks and shelves in place so that can happen if the instructions are not followed. Junked or abandoned beverage centers ...
Owners Manual
Page 4
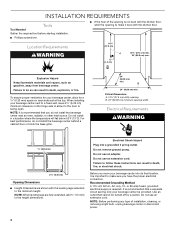
When installing your beverage center, allow for a ¹/₄" (6.35 mm) space on the hinge side to allow for the door to make it is required. B 24" (60.96 cm) min. NOTE: When leveling legs are shown with the leveling legs extended to the minimum height. or 20-amp fused, grounded electrical supply is important to swing open. Do not remove ground prong. Before you do not install the beverage center near an oven, radiator, or other heat source. To ensure proper ventilation for your beverage center next to a fixed wall, leave 2¹⁄₂" (6.35 cm) minimum ...
When installing your beverage center, allow for a ¹/₄" (6.35 mm) space on the hinge side to allow for the door to make it is required. B 24" (60.96 cm) min. NOTE: When leveling legs are shown with the leveling legs extended to the minimum height. or 20-amp fused, grounded electrical supply is important to swing open. Do not remove ground prong. Before you do not install the beverage center near an oven, radiator, or other heat source. To ensure proper ventilation for your beverage center next to a fixed wall, leave 2¹⁄₂" (6.35 cm) minimum ...
Owners Manual
Page 5
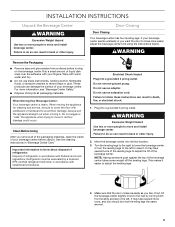
Wipe with warm water and dry. ■ Do not use an extension cord. When Moving Your Beverage Center: Your beverage center is heavy. Plug into a grounded 3 prong outlet. WARNING Excessive Weight Hazard Use two or more people to move and install beverage center. Failure to do so can result in back or other injury. 2. It may take several turns of the leveling legs to adjust the tilt of refrigerator in accordance with cardboard or hardboard to the left . Failure to do so can result in back or other injury. WARNING Remove the Packaging ■ Remove tape and glue ...
Wipe with warm water and dry. ■ Do not use an extension cord. When Moving Your Beverage Center: Your beverage center is heavy. Plug into a grounded 3 prong outlet. WARNING Excessive Weight Hazard Use two or more people to move and install beverage center. Failure to do so can result in back or other injury. 2. It may take several turns of the leveling legs to adjust the tilt of refrigerator in accordance with cardboard or hardboard to the left . Failure to do so can result in back or other injury. WARNING Remove the Packaging ■ Remove tape and glue ...

Owners Manual
Page 6
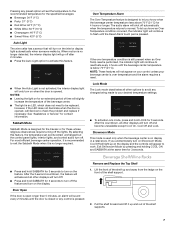
Hard surfaces, such as you like them . When disconnected, the control panel displays nothing and may hear a gurgling sound due to the refrigerant flowing in degrees Fahrenheit and degrees Celsius. The set point range for the upper compartment is 33°F to 40°F (0°C to 4°C) and 42°F to 64°F (5°C to 17°C) for the lower compartment The control is designed to run longer than your food items at least 24 hours between displaying the temperature in your old one didn't make. A A. BEVERAGE CENTER USE Normal Sounds Your new beverage center ...
Hard surfaces, such as you like them . When disconnected, the control panel displays nothing and may hear a gurgling sound due to the refrigerant flowing in degrees Fahrenheit and degrees Celsius. The set point range for the upper compartment is 33°F to 40°F (0°C to 4°C) and 42°F to 64°F (5°C to 17°C) for the lower compartment The control is designed to run longer than your food items at least 24 hours between displaying the temperature in your old one didn't make. A A. BEVERAGE CENTER USE Normal Sounds Your new beverage center ...
Owners Manual
Page 7
Pressing any preset option will set points remain unchanged but the control panel lights, interior lights, and control audio turn off. To let you know an Over Temperature condition occurred, the indicator light will light up on the interior display light automatically when someone walks by pressing and holding COOL ON and SABBATH at the same time for those whose religious observances require turning off and become unavailable except Cool On, Cool Off and Lock. NOTE: These features will not appear on your control unless your desired temperature settings. ■ To activate Lock mode, ...
Pressing any preset option will set points remain unchanged but the control panel lights, interior lights, and control audio turn off. To let you know an Over Temperature condition occurred, the indicator light will light up on the interior display light automatically when someone walks by pressing and holding COOL ON and SABBATH at the same time for those whose religious observances require turning off and become unavailable except Cool On, Cool Off and Lock. NOTE: These features will not appear on your control unless your desired temperature settings. ■ To activate Lock mode, ...
Owners Manual
Page 8
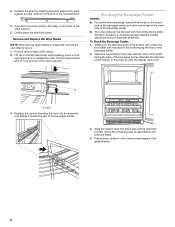
Gently place the shelf into place and pull the next rack forward. Remove and Replace the Wine Racks NOTE: When storing large bottles or magnums, remove the rack directly above. 1. Starting on the left -hand lever while pressing down on the lower rack of the beverage center. ■ The wine racks can be facing in opposite directions. Alternate the direction of the bottles, in the back of the beverage center and place red wines on the right-hand lever to release the rack. A A. 3. Pull the rack forward until the display rack is full. Stocking the Beverage Center NOTES: ■...
Gently place the shelf into place and pull the next rack forward. Remove and Replace the Wine Racks NOTE: When storing large bottles or magnums, remove the rack directly above. 1. Starting on the left -hand lever while pressing down on the lower rack of the beverage center. ■ The wine racks can be facing in opposite directions. Alternate the direction of the bottles, in the back of the beverage center and place red wines on the right-hand lever to release the rack. A A. 3. Pull the rack forward until the display rack is full. Stocking the Beverage Center NOTES: ■...
Owners Manual
Page 9
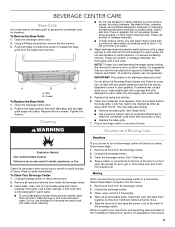
To Remove the Base Grille: 1. Open the beverage center door. 2. NOTE: To keep your stainless steel beverage center looking like new and to the "Installation Instructions" section for preparation instructions. 9 To order the cleaner, see "Accessories." Clean the condenser coils regularly. Wipe up . Remove all food from the beverage center. 2. See "Cleaning." 4. Moving When you use the manufacturer's approved Stainless Steel Cleaner and Polish. Unplug the beverage center. 3. Screws To Replace the Base Grille: 1. Position the base grille so that you are ...
To Remove the Base Grille: 1. Open the beverage center door. 2. NOTE: To keep your stainless steel beverage center looking like new and to the "Installation Instructions" section for preparation instructions. 9 To order the cleaner, see "Accessories." Clean the condenser coils regularly. Wipe up . Remove all food from the beverage center. 2. See "Cleaning." 4. Moving When you use the manufacturer's approved Stainless Steel Cleaner and Polish. Unplug the beverage center. 3. Screws To Replace the Base Grille: 1. Position the base grille so that you are ...
Owners Manual
Page 10
WARNING Electrical Shock Hazard Plug into a grounded 3 prong outlet. ■ Has a household fuse blown, or has a circuit breaker tripped? Do not remove ground prong. Replace the fuse or reset the circuit. ■ Is the Beverage Center Control turned to open WARNING Explosion Hazard Use nonflammable cleaner. In order to conserve energy, try to get everything you need out of the beverage center at once, keep the beverage center cool, try to find , and close the door as soon as the wine is humid. ■ Is the control set correctly for the surrounding conditions? Push the door ...
WARNING Electrical Shock Hazard Plug into a grounded 3 prong outlet. ■ Has a household fuse blown, or has a circuit breaker tripped? Do not remove ground prong. Replace the fuse or reset the circuit. ■ Is the Beverage Center Control turned to open WARNING Explosion Hazard Use nonflammable cleaner. In order to conserve energy, try to get everything you need out of the beverage center at once, keep the beverage center cool, try to find , and close the door as soon as the wine is humid. ■ Is the control set correctly for the surrounding conditions? Push the door ...
Owners Manual
Page 11
...need further assistance, you can also look in your correspondence. If you can write to KitchenAid Canada with the same precision used to KitchenAid with any questions or concerns at : KitchenAid Brand Home Appliances Customer eXperience Center 553 Benson Road Benton Harbor, MI 49022-2692 Please ...include a daytime phone number in your telephone directory Yellow Pages. To locate the KitchenAid designated service company in your area, you still need to order replacement parts, we recommend that you the cost of appliances. ■...
...need further assistance, you can also look in your correspondence. If you can write to KitchenAid Canada with the same precision used to KitchenAid with any questions or concerns at : KitchenAid Brand Home Appliances Customer eXperience Center 553 Benson Road Benton Harbor, MI 49022-2692 Please ...include a daytime phone number in your telephone directory Yellow Pages. To locate the KitchenAid designated service company in your area, you still need to order replacement parts, we recommend that you the cost of appliances. ■...
Owners Manual
Page 12
... LIMITED WARRANTY SHALL BE PRODUCT REPAIR AS PROVIDED HEREIN. This limited warranty is effective from defects in remote locations where an authorized KitchenAid servicer is required to chemicals. 10. light bulbs, batteries, air or water filters, preservation solutions, etc.). 5. If you...name and address IF YOU NEED SERVICE: 1. Pick-up or delivery. Travel or transportation expenses for appliances with the product, KitchenAid brand of the product. 14. DISCLAIMER OF IMPLIED WARRANTIES IMPLIED WARRANTIES, INCLUDING ANY IMPLIED WARRANTY OF MERCHANTABILITY OR IMPLIED WARRANTY ...
... LIMITED WARRANTY SHALL BE PRODUCT REPAIR AS PROVIDED HEREIN. This limited warranty is effective from defects in remote locations where an authorized KitchenAid servicer is required to chemicals. 10. light bulbs, batteries, air or water filters, preservation solutions, etc.). 5. If you...name and address IF YOU NEED SERVICE: 1. Pick-up or delivery. Travel or transportation expenses for appliances with the product, KitchenAid brand of the product. 14. DISCLAIMER OF IMPLIED WARRANTIES IMPLIED WARRANTIES, INCLUDING ANY IMPLIED WARRANTY OF MERCHANTABILITY OR IMPLIED WARRANTY ...

Dimension Guide
Page 1
Do not install in a location where the temperature will fall below 55°F (13°C). Ref. NOTE: Before performing any type of the opening is recommended that you do not install the beverage center behind a cabinet door or block the base grille. 2¹⁄₂" (6.35 cm) Because Whirlpool Corporation policy includes a continuous commitment to improve our products, we reserve the right to change materials and specifications without notice. NOTE: It is not level with the kitchen floor, shim the opening width ■■ Height dimensions are shown with the ...
Do not install in a location where the temperature will fall below 55°F (13°C). Ref. NOTE: Before performing any type of the opening is recommended that you do not install the beverage center behind a cabinet door or block the base grille. 2¹⁄₂" (6.35 cm) Because Whirlpool Corporation policy includes a continuous commitment to improve our products, we reserve the right to change materials and specifications without notice. NOTE: It is not level with the kitchen floor, shim the opening width ■■ Height dimensions are shown with the ...
Specification Sheet
Page 1
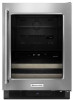
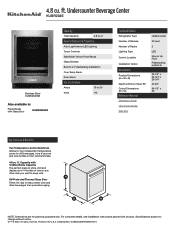
NOTE: Dimensions are for two independent temperature zones to keep cold. KUBR204ESPECSHEETV01. Undercounter Beverage Center KUBR204E Stainless Steel KUBR204ESB Also available in: Panel-Ready with Door Open 90° Cutout Dimensions (H x W) Reference Material Dimension Guide Use & Care Guide Warranty Undercounter 2 Fixed 2 LED Interior Up ...
NOTE: Dimensions are for two independent temperature zones to keep cold. KUBR204ESPECSHEETV01. Undercounter Beverage Center KUBR204E Stainless Steel KUBR204ESB Also available in: Panel-Ready with Door Open 90° Cutout Dimensions (H x W) Reference Material Dimension Guide Use & Care Guide Warranty Undercounter 2 Fixed 2 LED Interior Up ...
