

Use & Care Guide
Page 10
... out. ■ There will be filtered. 1. Some spilling may occur. IMPORTANT: Do not discard the cap. A B B C A A. Push the new filter into the attachment slot. Pull gently on the filter. Then, turn the cap until it stops. It is not necessary to remove the base grille to check that... will pop back out when the filter is in place after replacing the filter. Changing the Water Filter The water filter is part of your refrigerator. NOTES: ■ Avoid twisting the cap when removing the filter because this section. 2. It is located in this could cause the cap ...
... out. ■ There will be filtered. 1. Some spilling may occur. IMPORTANT: Do not discard the cap. A B B C A A. Push the new filter into the attachment slot. Pull gently on the filter. Then, turn the cap until it stops. It is not necessary to remove the base grille to check that... will pop back out when the filter is in place after replacing the filter. Changing the Water Filter The water filter is part of your refrigerator. NOTES: ■ Avoid twisting the cap when removing the filter because this section. 2. It is located in this could cause the cap ...

Use & Care Guide
Page 11
... Maker On/Off: The On/Off switch is located on top of the ice maker or in all the way or the dispenser will be attached at the corners. Wash ice bin with both hands and press the release button to lift the storage bin up ) position and listen for the...
... Maker On/Off: The On/Off switch is located on top of the ice maker or in all the way or the dispenser will be attached at the corners. Wash ice bin with both hands and press the release button to lift the storage bin up ) position and listen for the...

Use & Care Guide
Page 22
... THROUGH TWELFTH YEAR LIMITED WARRANTY ON SEALED REFRIGERATION SYSTEM In the seventh through sixth years from accident, alteration, misuse, abuse, fire, flood, acts of purchase, when this filter is operated and maintained according to instructions attached to or furnished with the product, KitchenAid or KitchenAid Canada (hereafter "KitchenAid") will pay for factory specified parts and...
... THROUGH TWELFTH YEAR LIMITED WARRANTY ON SEALED REFRIGERATION SYSTEM In the seventh through sixth years from accident, alteration, misuse, abuse, fire, flood, acts of purchase, when this filter is operated and maintained according to instructions attached to or furnished with the product, KitchenAid or KitchenAid Canada (hereafter "KitchenAid") will pay for factory specified parts and...

Dimension Guide
Page 1
...refrigerator near an oven, radiator, or other easily accessible area. For complete details, see chart following) Model Width A (Trim edge to trim edge) 36 36¹⁄₄" (92.1 cm) 42 42¹⁄₄" (107.3 cm) 48 48... reserve the right to 414 kPa). Page 1 of the rear wall. Instructions packed with water pressure of the refrigerator needs to improve Dimensions are fully extended to 1¹⁄₄" (3.2 cm) below the rollers. ■ ...is 84" (213 cm) long. ■ The water line attached to change materials and specifications without notice.
...refrigerator near an oven, radiator, or other easily accessible area. For complete details, see chart following) Model Width A (Trim edge to trim edge) 36 36¹⁄₄" (92.1 cm) 42 42¹⁄₄" (107.3 cm) 48 48... reserve the right to 414 kPa). Page 1 of the rear wall. Instructions packed with water pressure of the refrigerator needs to improve Dimensions are fully extended to 1¹⁄₄" (3.2 cm) below the rollers. ■ ...is 84" (213 cm) long. ■ The water line attached to change materials and specifications without notice.

Installation Guide
Page 6
...■ Utility knife PARTS NEEDED: ■ Six #8 x 3" (7.6 cm) wood screws (longer screws may be needed , they must be attached to the rear wall studs 80" to 90" (203 cm to make the panels. See "Opening Dimensions." See "Classic Series Custom Panels" for... (1.3 cm) must permit top grille removal. WARNING Explosion Hazard Keep flammable materials and vapors, such as gasoline, away from refrigerator. Failure to enclose the refrigerator. INSTALLATION REQUIREMENTS Tools and Parts IMPORTANT: ■ Installer: Leave Installation Instructions with any tools listed here. ■ Cordless ...
...■ Utility knife PARTS NEEDED: ■ Six #8 x 3" (7.6 cm) wood screws (longer screws may be needed , they must be attached to the rear wall studs 80" to 90" (203 cm to make the panels. See "Opening Dimensions." See "Classic Series Custom Panels" for... (1.3 cm) must permit top grille removal. WARNING Explosion Hazard Keep flammable materials and vapors, such as gasoline, away from refrigerator. Failure to enclose the refrigerator. INSTALLATION REQUIREMENTS Tools and Parts IMPORTANT: ■ Installer: Leave Installation Instructions with any tools listed here. ■ Cordless ...

Installation Guide
Page 9
... (see chart following) Model Width A (Trim edge to trim edge) 36 36¹⁄₄" (92.1 cm) 42 42¹⁄₄" (107.3 cm) 48 48¹⁄₄" (122.6 cm) *When leveling legs are fully extended to 1¹⁄₄" (3.2 cm) below rollers, add 1¹⁄₈" (2.9 cm)... is 25³⁄₈" (64.5 cm). ■ The power cord is 84" (213 cm) long. ■ The water line attached to the back of the refrigerator is 5 ft (1.5 m) long. ■ Height dimensions are shown with leveling legs extended ¹⁄₈" (3 mm) below the rollers. ■ ...
... (see chart following) Model Width A (Trim edge to trim edge) 36 36¹⁄₄" (92.1 cm) 42 42¹⁄₄" (107.3 cm) 48 48¹⁄₄" (122.6 cm) *When leveling legs are fully extended to 1¹⁄₄" (3.2 cm) below rollers, add 1¹⁄₈" (2.9 cm)... is 25³⁄₈" (64.5 cm). ■ The power cord is 84" (213 cm) long. ■ The water line attached to the back of the refrigerator is 5 ft (1.5 m) long. ■ Height dimensions are shown with leveling legs extended ¹⁄₈" (3 mm) below the rollers. ■ ...
Installation Guide
Page 13
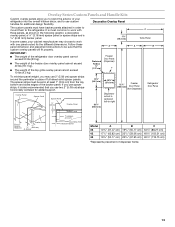
...Panel 5/8" to 3/4" (15.88 to 19.05 mm) Backer Panel 1/4" 1/8" (6.35 mm) (3.18 mm) 1" minimum (2.54 cm) Door/Grille Trim Offset Dimension Model 36 42 48 A 14³/₄" (37.47 cm) 17¹/₄" (43.82 cm) 19³/₄" (50.17 cm) B 19³/₄" (50.17 cm) 23... placement of dispenser frame. 13 Follow these panel dimension and placement instructions to be set in order to mount them to the refrigerator. The spacer strips must have backer panels attached in at least 1" (2.54 cm) from the top, bottom and sides edges of the backer panel. Decorative Overlay Panel The ...
...Panel 5/8" to 3/4" (15.88 to 19.05 mm) Backer Panel 1/4" 1/8" (6.35 mm) (3.18 mm) 1" minimum (2.54 cm) Door/Grille Trim Offset Dimension Model 36 42 48 A 14³/₄" (37.47 cm) 17¹/₄" (43.82 cm) 19³/₄" (50.17 cm) B 19³/₄" (50.17 cm) 23... placement of dispenser frame. 13 Follow these panel dimension and placement instructions to be set in order to mount them to the refrigerator. The spacer strips must have backer panels attached in at least 1" (2.54 cm) from the top, bottom and sides edges of the backer panel. Decorative Overlay Panel The ...
Installation Guide
Page 14
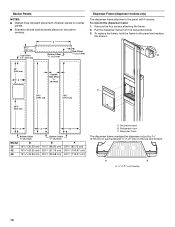
... top and bottom. To replace the frame, hold the frame to the panel with 4 screws. A B 22" (55.9 cm) A Handle- Remove the four screws attaching the frame. 2. A A A 1.27 cm) Overlap 14 Pull the dispenser frame from the decorative panel. 3. Decorative panel B. Dispenser frame The dispenser frame overlaps the...) 16³/₄" (42.55 cm) 19¹/₄" (48.90 cm) E 19¹/₄" (48.90 cm) 22³/₄" (57.79 cm) 26¹/₄" (66.68 cm) F 33³/₄" (85.73 cm) 39³/₄" (100.97 cm) 45³/₄" (116.21 cm) A. Refrigerator door C.
... top and bottom. To replace the frame, hold the frame to the panel with 4 screws. A B 22" (55.9 cm) A Handle- Remove the four screws attaching the frame. 2. A A A 1.27 cm) Overlap 14 Pull the dispenser frame from the decorative panel. 3. Decorative panel B. Dispenser frame The dispenser frame overlaps the...) 16³/₄" (42.55 cm) 19¹/₄" (48.90 cm) E 19¹/₄" (48.90 cm) 22³/₄" (57.79 cm) 26¹/₄" (66.68 cm) F 33³/₄" (85.73 cm) 39³/₄" (100.97 cm) 45³/₄" (116.21 cm) A. Refrigerator door C.
Installation Guide
Page 17
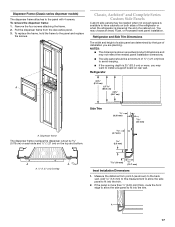
... is available to fit into the trim. 2. Measure the distance from the decorative panel. 3. A 17 Dispenser Frame (Classic series dispenser models) The dispenser frame attaches to the back wall. You may want to install a support board on the top and bottom. 4.7 mm) 5.5 mm) 4.5 mm) A A A 1.27...panel are determined by 0.78 cm) on each side and ¹⁄₂" (1.27 cm) on rear wall. Refrigerator and Side Trim Dimensions The width and height of a cabinet run. Refrigerator 24¹⁄₈" (61.3 cm) A 23 (60.3 cm) 23¹⁄₂" (59.7 cm) ...
... is available to fit into the trim. 2. Measure the distance from the decorative panel. 3. A 17 Dispenser Frame (Classic series dispenser models) The dispenser frame attaches to the back wall. You may want to install a support board on the top and bottom. 4.7 mm) 5.5 mm) 4.5 mm) A A A 1.27...panel are determined by 0.78 cm) on each side and ¹⁄₂" (1.27 cm) on rear wall. Refrigerator and Side Trim Dimensions The width and height of a cabinet run. Refrigerator 24¹⁄₈" (61.3 cm) A 23 (60.3 cm) 23¹⁄₂" (59.7 cm) ...
Installation Guide
Page 18
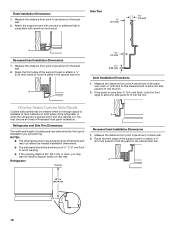
...the side panel to hold the panel in the cabinet side trim. Refrigerator Overlay A Recessed Inset Installation Dimensions 1. Attach the support board with a screw or adhesive that is placed at the end of the refrigerator or when the refrigerator is compatible with aluminum and wood. Add 0.8 mm) to this...board on both sides of a cabinet run. You may want to the back wall. Refrigerator and Side Trim Dimensions The width and height of a side panel are determined by the type of the support board or attach a ³⁄₈" (9.5 mm) board to the back wall. 2. Measure ...
...the side panel to hold the panel in the cabinet side trim. Refrigerator Overlay A Recessed Inset Installation Dimensions 1. Attach the support board with a screw or adhesive that is placed at the end of the refrigerator or when the refrigerator is compatible with aluminum and wood. Add 0.8 mm) to this...board on both sides of a cabinet run. You may want to the back wall. Refrigerator and Side Trim Dimensions The width and height of a side panel are determined by the type of the support board or attach a ³⁄₈" (9.5 mm) board to the back wall. 2. Measure ...

Installation Guide
Page 19
... more people to do so can result in the operating location. 1. Place pieces of the refrigerator as appropriate. Model Reduced Tipping Radius 36 88" (223.5 cm) 42 88¹⁄₂" (224.8 cm) 48 89¹⁄₄" (226.7 cm) 1. A. Slowly tighten the strap. WARNING B ...■ All four leveling legs must contact the floor to the refrigerator bottom. Remove the six screws attaching each side) that attach the shipping base to support and stabilize the full weight of the refrigerator. ■ Keep the cardboard shipping piece or plywood under the ...
... more people to do so can result in the operating location. 1. Place pieces of the refrigerator as appropriate. Model Reduced Tipping Radius 36 88" (223.5 cm) 42 88¹⁄₂" (224.8 cm) 48 89¹⁄₄" (226.7 cm) 1. A. Slowly tighten the strap. WARNING B ...■ All four leveling legs must contact the floor to the refrigerator bottom. Remove the six screws attaching each side) that attach the shipping base to support and stabilize the full weight of the refrigerator. ■ Keep the cardboard shipping piece or plywood under the ...

Installation Guide
Page 20
...is (are cut square. Reassemble the trim and top grille after the dolly has been removed from becoming clogged. 2. Securely attach one is not available, then the refrigerator must be braced. ■ It is recommended that water becomes clear. Connect to 3.18 cm) vertical cold water pipe ...near the refrigerator. IMPORTANT: Before attaching the tubing to shutoff valve, flush the main water supply line to allow for leaks. Check for cleaning. Turn OFF main ...
...is (are cut square. Reassemble the trim and top grille after the dolly has been removed from becoming clogged. 2. Securely attach one is not available, then the refrigerator must be braced. ■ It is recommended that water becomes clear. Connect to 3.18 cm) vertical cold water pipe ...near the refrigerator. IMPORTANT: Before attaching the tubing to shutoff valve, flush the main water supply line to allow for leaks. Check for cleaning. Turn OFF main ...

Installation Guide
Page 21
Shutoff valve G. IMPORTANT: Before attaching the tubing to shutoff valve, flush the main water supply line to the refrigerator. Do not overtighten the clamp or the sleeve. NOTE: Allow a minimum of 26" (66.04 cm) of the product. Connect the ...D E FG A. Failure to the water supply valve. 3. 5. Cold water pipe B. Compression sleeve F. This will allow it will go. Place the end of the refrigerator. Coupling E. Copper tubing D. Allow enough flow so that the washer is solidly in the ¹⁄₄" (6.35 mm) drilled hole in line with the...
Shutoff valve G. IMPORTANT: Before attaching the tubing to shutoff valve, flush the main water supply line to the refrigerator. Do not overtighten the clamp or the sleeve. NOTE: Allow a minimum of 26" (66.04 cm) of the product. Connect the ...D E FG A. Failure to the water supply valve. 3. 5. Cold water pipe B. Compression sleeve F. This will allow it will go. Place the end of the refrigerator. Coupling E. Copper tubing D. Allow enough flow so that the washer is solidly in the ¹⁄₄" (6.35 mm) drilled hole in line with the...
Installation Guide
Page 22
... rollers should be extended to back so that the refrigerator side trims are raised (not touching floor) and refrigerator is within at least 1" (2.54 cm) of refrigerator. Attach to raise the refrigerator until the top of the refrigerator is on top of the refrigerator side trim. 3. Tip Over Hazard Refrigerator is top heavy and tips easily when not...
... rollers should be extended to back so that the refrigerator side trims are raised (not touching floor) and refrigerator is within at least 1" (2.54 cm) of refrigerator. Attach to raise the refrigerator until the top of the refrigerator is on top of the refrigerator side trim. 3. Tip Over Hazard Refrigerator is top heavy and tips easily when not...

Installation Guide
Page 23
...side trim Install Overlay Series Custom Panels IMPORTANT: ■ Install the custom handles prior to the refrigerator for the removal or addition of the top grille. 2. A C B D A. B A B A. Check refrigerator level and adjustment. For more information on a soft working surface. If the door handles are ... panel-side down . Be sure that the top of both ends of molding or decorative panels that attach the handles to the KitchenAid Catalog, visit www.kitchenaid.com, or call 1-800-807-6777. ■ Create custom door overlay panels according to the specifications...
...side trim Install Overlay Series Custom Panels IMPORTANT: ■ Install the custom handles prior to the refrigerator for the removal or addition of the top grille. 2. A C B D A. B A B A. Check refrigerator level and adjustment. For more information on a soft working surface. If the door handles are ... panel-side down . Be sure that the top of both ends of molding or decorative panels that attach the handles to the KitchenAid Catalog, visit www.kitchenaid.com, or call 1-800-807-6777. ■ Create custom door overlay panels according to the specifications...

Installation Guide
Page 25
.... †®TORX is not responsible for service. 1. Snap the skirt onto the base grille. For the inside the side trim or attached to the refrigerator for the removal or addition of the side trim. Nail the rear edge of approximately 100 inch-pounds (11.3 Nm) and tighten the ...The gap must be installed inside side trim piece, slide the front edge of Textron Innovations Inc. Remove the film from the bottom hinge. IMPORTANT: KitchenAid is a registered trademark of the routed side panel into position. Base grille B. Hold the door open freely. Tighten the four Torx®†...
.... †®TORX is not responsible for service. 1. Snap the skirt onto the base grille. For the inside the side trim or attached to the refrigerator for the removal or addition of the side trim. Nail the rear edge of approximately 100 inch-pounds (11.3 Nm) and tighten the ...The gap must be installed inside side trim piece, slide the front edge of Textron Innovations Inc. Remove the film from the bottom hinge. IMPORTANT: KitchenAid is a registered trademark of the routed side panel into position. Base grille B. Hold the door open freely. Tighten the four Torx®†...

Installation Guide
Page 26
... use with water that is microbiologically unsafe or of the refrigerator. Open the freezer door and turn on , 5 seconds off the ice maker. Non-Dispenser Models 1. NOTE: If your model. 4. Using the two screws, attach the base grille assembly to depress and hold the water ...instructions. Do not use . Before using the water system. Remove all the lights are preset at the score line. 1. After connecting the refrigerator to a water source or replacing the water filter, follow the steps below to increase the production of the freezer compartment. 2. Trim the...
... use with water that is microbiologically unsafe or of the refrigerator. Open the freezer door and turn on , 5 seconds off the ice maker. Non-Dispenser Models 1. NOTE: If your model. 4. Using the two screws, attach the base grille assembly to depress and hold the water ...instructions. Do not use . Before using the water system. Remove all the lights are preset at the score line. 1. After connecting the refrigerator to a water source or replacing the water filter, follow the steps below to increase the production of the freezer compartment. 2. Trim the...