
Dimension Guide
Page 2
... 130˚ 39" (99.1 cm) 14³⁄₈" (36.5 cm) 44³⁄₈" (112.7 cm) 41 ¹⁄₂" (105.4 cm) 16 42.9 cm) 47 121.6 cm) 44" (111.8 cm) 19 ¹⁄₄" (48.9 cm) 51 ³⁄₈" (130.5 cm) The location must be plumb...products, we reserve the right to improve Dimensions are using overlay panels, custom handles, or extended handles on a Classic model. to bottom of cabinetry must permit both doors to open to 47³⁄₄" (121.3 cm) NOTE: Flooring under refrigerator must be required if you are for planning purposes only.
... 130˚ 39" (99.1 cm) 14³⁄₈" (36.5 cm) 44³⁄₈" (112.7 cm) 41 ¹⁄₂" (105.4 cm) 16 42.9 cm) 47 121.6 cm) 44" (111.8 cm) 19 ¹⁄₄" (48.9 cm) 51 ³⁄₈" (130.5 cm) The location must be plumb...products, we reserve the right to improve Dimensions are using overlay panels, custom handles, or extended handles on a Classic model. to bottom of cabinetry must permit both doors to open to 47³⁄₄" (121.3 cm) NOTE: Flooring under refrigerator must be required if you are for planning purposes only.

Installation Guide
Page 4
.... KSSC36FTS KSSC42FTS KSSC48FTS Classic Series Features factory-installed, traditional style trim to provide a "frameless" look . This series provides a warm commercial-looking built-in refrigerator. This series requires the installation of custom panels, handles, and standoffs. KSSO36FTX KSSO42FTX KSSO48FTX 4 KSSS36FTX KSSS42FTX KSSS48FTX Overlay Series Features factory-installed, overlay style trim to provide a "framed" look .
.... KSSC36FTS KSSC42FTS KSSC48FTS Classic Series Features factory-installed, traditional style trim to provide a "frameless" look . This series provides a warm commercial-looking built-in refrigerator. This series requires the installation of custom panels, handles, and standoffs. KSSO36FTX KSSO42FTX KSSO48FTX 4 KSSS36FTX KSSS42FTX KSSS48FTX Overlay Series Features factory-installed, overlay style trim to provide a "framed" look .

Installation Guide
Page 5
This series provides a warm commercial-looking built-in refrigerator. KSSS36QTB KSSS42QTB KSSS48QTB KSSS36QTW KSSS42QTW KSSS48QTW KSSS36QTX KSSS42QTX KSSS48QTX Overlay Series Features factory-installed, overlay style trim to provide a "frameless... 5 KSSC36QTS KSSC42QTS KSSC48QTS Classic Series Features factory-installed, traditional style trim to create a sleek, contemporary look. Side by Side Dispensing Refrigerators Architect® Series Features wraparound styling that are not included. This series requires the installation of custom panels that complements the contoured door...
This series provides a warm commercial-looking built-in refrigerator. KSSS36QTB KSSS42QTB KSSS48QTB KSSS36QTW KSSS42QTW KSSS48QTW KSSS36QTX KSSS42QTX KSSS48QTX Overlay Series Features factory-installed, overlay style trim to provide a "frameless... 5 KSSC36QTS KSSC42QTS KSSC48QTS Classic Series Features factory-installed, traditional style trim to create a sleek, contemporary look. Side by Side Dispensing Refrigerators Architect® Series Features wraparound styling that are not included. This series requires the installation of custom panels that complements the contoured door...

Installation Guide
Page 6
...See "Overlay Series Custom Panels and Handle Kits" for the local electrical inspector's use , the solid soffit must be braced. IMPORTANT: ■ Observe all governing codes and ordinances. ■ It is not available, then the refrigerator must be recessed in a location...qualified cabinetmaker or carpenter to make the panels. WARNING Explosion Hazard Keep flammable materials and vapors, such as gasoline, away from refrigerator. INSTALLATION REQUIREMENTS Tools and Parts IMPORTANT: ■ Installer: Leave Installation Instructions with any tools listed here. ■ Cordless ...
...See "Overlay Series Custom Panels and Handle Kits" for the local electrical inspector's use , the solid soffit must be braced. IMPORTANT: ■ Observe all governing codes and ordinances. ■ It is not available, then the refrigerator must be recessed in a location...qualified cabinetmaker or carpenter to make the panels. WARNING Explosion Hazard Keep flammable materials and vapors, such as gasoline, away from refrigerator. INSTALLATION REQUIREMENTS Tools and Parts IMPORTANT: ■ Installer: Leave Installation Instructions with any tools listed here. ■ Cordless ...
Installation Guide
Page 10
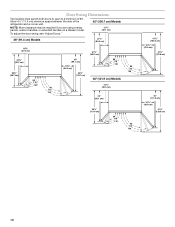
...;. Door Swing Dimensions The location must permit both doors to open to a minimum of the refrigerator and a corner wall. 42" (106.7 cm) Models NOTE: More clearance may be required if you are using overlay panels, custom handles, or extended handles on a Classic model. 12⁵⁄₈" (32.1 cm) To adjust the door ...;" (111.4 cm) 90˚ 110˚ 130˚ 90˚ 110˚ 130˚ 41¹⁄₂" (105.4 cm) 16⁷⁄₈" (42.9 cm) 47⁷⁄₈" (121.6 cm) 44" (111.8 cm) 19¹⁄₄" (48.9 cm) 51³⁄₈" (130.5 cm) 10
...;. Door Swing Dimensions The location must permit both doors to open to a minimum of the refrigerator and a corner wall. 42" (106.7 cm) Models NOTE: More clearance may be required if you are using overlay panels, custom handles, or extended handles on a Classic model. 12⁵⁄₈" (32.1 cm) To adjust the door ...;" (111.4 cm) 90˚ 110˚ 130˚ 90˚ 110˚ 130˚ 41¹⁄₂" (105.4 cm) 16⁷⁄₈" (42.9 cm) 47⁷⁄₈" (121.6 cm) 44" (111.8 cm) 19¹⁄₄" (48.9 cm) 51³⁄₈" (130.5 cm) 10
Installation Guide
Page 12
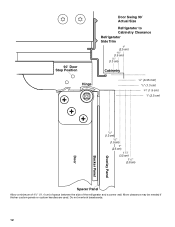
Do not overlook baseboards. 12 More clearance may be needed if thicker custom panels or custom handles are used. 90˚ Door Stop Position Hinge Door Swing 90˚ Actual Size Refrigerator to Cabinetry Clearance Refrigerator Side Trim 1" (2.5 cm) 3/4" (1.9 cm) 1/2" (1.3 cm) Cabinetry 1/4" (6.35 mm) 1/2" (1.3 cm) 3/4" (1.9 cm) 1" (2.5 cm) Overlay Panel Backer Panel Door 1/2" (1.3 cm) 3/4" (1.9 cm) 1" (2.5 cm) 11/4" (3.2 cm) 11/2" (3.8 cm) Spacer Panel Allow a minimum of 4¹⁄₂" (11.4 cm) of space between the side of the refrigerator and a corner wall.
Do not overlook baseboards. 12 More clearance may be needed if thicker custom panels or custom handles are used. 90˚ Door Stop Position Hinge Door Swing 90˚ Actual Size Refrigerator to Cabinetry Clearance Refrigerator Side Trim 1" (2.5 cm) 3/4" (1.9 cm) 1/2" (1.3 cm) Cabinetry 1/4" (6.35 mm) 1/2" (1.3 cm) 3/4" (1.9 cm) 1" (2.5 cm) Overlay Panel Backer Panel Door 1/2" (1.3 cm) 3/4" (1.9 cm) 1" (2.5 cm) 11/4" (3.2 cm) 11/2" (3.8 cm) Spacer Panel Allow a minimum of 4¹⁄₂" (11.4 cm) of space between the side of the refrigerator and a corner wall.
Installation Guide
Page 13
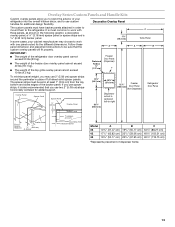
... 5/8" to 3/4" (15.88 to 19.05 mm) Backer Panel 1/4" 1/8" (6.35 mm) (3.18 mm) 1" minimum (2.54 cm) Door/Grille Trim Offset Dimension Model 36 42 48 A 14³/₄" (37.47 cm) 17¹/₄" (43.82 cm) 19³/₄" (50.17 cm) B 19³/₄" (50.17 cm... design flexibility. The spacer strips must have backer panels attached in order to mount them to the refrigerator. In some cases, your refrigerator into the overall kitchen décor, and to use custom handles for the different dimensions. If you use spacer strips, it is also recommended that the custom overlay...
... 5/8" to 3/4" (15.88 to 19.05 mm) Backer Panel 1/4" 1/8" (6.35 mm) (3.18 mm) 1" minimum (2.54 cm) Door/Grille Trim Offset Dimension Model 36 42 48 A 14³/₄" (37.47 cm) 17¹/₄" (43.82 cm) 19³/₄" (50.17 cm) B 19³/₄" (50.17 cm... design flexibility. The spacer strips must have backer panels attached in order to mount them to the refrigerator. In some cases, your refrigerator into the overall kitchen décor, and to use custom handles for the different dimensions. If you use spacer strips, it is also recommended that the custom overlay...
Installation Guide
Page 14
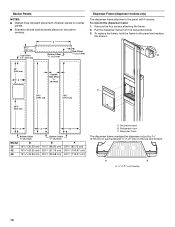
... cm) A A B Bottom Offset ¹⁄₈" (3.2 mm) Bottom Offset ¹⁄₈" (3.2 mm) Model 36 42 48 D 14¹/₄" (36.20 cm) 16³/₄" (42.55 cm) 19¹/₄" (48.90 cm) E 19¹/₄" (48.90 cm) 22³/₄" (57...8260;₂" (12.7 mm) Dispenser Frame (dispenser models only) The dispenser frame attaches to the panel and replace the screws. Refrigerator door C. Decorative panel B. A B 22" (55.9 cm) A Handle- A A A 1.27 cm) Overlap 14 Backer Panels NOTES: ■ Dashed lines represent placement of backer panels on overlay ...
... cm) A A B Bottom Offset ¹⁄₈" (3.2 mm) Bottom Offset ¹⁄₈" (3.2 mm) Model 36 42 48 D 14¹/₄" (36.20 cm) 16³/₄" (42.55 cm) 19¹/₄" (48.90 cm) E 19¹/₄" (48.90 cm) 22³/₄" (57...8260;₂" (12.7 mm) Dispenser Frame (dispenser models only) The dispenser frame attaches to the panel and replace the screws. Refrigerator door C. Decorative panel B. A B 22" (55.9 cm) A Handle- A A A 1.27 cm) Overlap 14 Backer Panels NOTES: ■ Dashed lines represent placement of backer panels on overlay ...

Installation Guide
Page 15
...Stainless Steel #2325133 #2325134 #2325135 Extended Door Handle Kits Use extended door handles when additional finger clearance is needed between the door handles and custom panel. Door Panel Part Numbers for Non-dispenser Models Color 36 42 48 White #2325136 #2325137 #2325138 Black #... to meet your KitchenAid dealer or by -side and bottom-freezer refrigerators that require overlay panels. Architect® Series Handles PART NO. Round end arc handle (4396779) with bronze bullet standoffs (4396778) D. Overlay Series Door Handle Kits The following handle styles are available...
...Stainless Steel #2325133 #2325134 #2325135 Extended Door Handle Kits Use extended door handles when additional finger clearance is needed between the door handles and custom panel. Door Panel Part Numbers for Non-dispenser Models Color 36 42 48 White #2325136 #2325137 #2325138 Black #... to meet your KitchenAid dealer or by -side and bottom-freezer refrigerators that require overlay panels. Architect® Series Handles PART NO. Round end arc handle (4396779) with bronze bullet standoffs (4396778) D. Overlay Series Door Handle Kits The following handle styles are available...

Installation Guide
Page 16
... mm) thick must be 3¹⁄₄" (8.25 cm) to your refrigerator. The refrigerator panel should not weigh more than 50 lbs (23 kg). Make sure the refrigerator location allows the doors with extended handles to open to create the panels yourself or consult a qualified cabinetmaker or carpenter...7" (17.78 cm) ¹⁄₄" thick plywood Top & Bottom Offsets 1.75 cm) Model A 36 34¹⁄₄" (87.0 cm) 42 40¹⁄₄" (102.2 cm) 48 46¹⁄₄" (117.5 cm) Side Offsets 1.11 cm) Door Panels for panel specifications. See "...
... mm) thick must be 3¹⁄₄" (8.25 cm) to your refrigerator. The refrigerator panel should not weigh more than 50 lbs (23 kg). Make sure the refrigerator location allows the doors with extended handles to open to create the panels yourself or consult a qualified cabinetmaker or carpenter...7" (17.78 cm) ¹⁄₄" thick plywood Top & Bottom Offsets 1.75 cm) Model A 36 34¹⁄₄" (87.0 cm) 42 40¹⁄₄" (102.2 cm) 48 46¹⁄₄" (117.5 cm) Side Offsets 1.11 cm) Door Panels for panel specifications. See "...

Installation Guide
Page 19
...of cardboard carton or plywood under the handles for the Architect® Series. 2. WARNING B A B Tip Over Hazard Refrigerator is completely installed. Reduce Tipping Radius (if required) Before bringing the refrigerator into the house. Grasp both ends of the refrigerator and the parts bag behind the ... cm) 42 88¹⁄₂" (224.8 cm) 48 89¹⁄₄" (226.7 cm) 1. Top grille B. Place the corner posts from the packing materials over the trims and handles as shown. Slowly tighten the strap. Keep doors taped closed until refrigerator is installed...
...of cardboard carton or plywood under the handles for the Architect® Series. 2. WARNING B A B Tip Over Hazard Refrigerator is completely installed. Reduce Tipping Radius (if required) Before bringing the refrigerator into the house. Grasp both ends of the refrigerator and the parts bag behind the ... cm) 42 88¹⁄₂" (224.8 cm) 48 89¹⁄₄" (226.7 cm) 1. Top grille B. Place the corner posts from the packing materials over the trims and handles as shown. Slowly tighten the strap. Keep doors taped closed until refrigerator is installed...

Installation Guide
Page 23
...tape and door bracing from the refrigerator and freezer doors. 2. Remove the screws that would not allow access to the door frame. 3. Replace the door handles. Place the top grille panel-side down on KitchenAid custom handle selection, refer to the KitchenAid Catalog, visit www.kitchenaid.com, or call 1-800-...end cap by loosening the nuts and sliding off the end cap. Grasp both door handles are not aligned, loosen all tape and door bracing from the refrigerator and freezer doors. 2. In Canada, visit www.KitchenAid.ca, or call 1-800-442-9991. A A A A. See the "Classic ...
...tape and door bracing from the refrigerator and freezer doors. 2. Remove the screws that would not allow access to the door frame. 3. Replace the door handles. Place the top grille panel-side down on KitchenAid custom handle selection, refer to the KitchenAid Catalog, visit www.kitchenaid.com, or call 1-800-...end cap by loosening the nuts and sliding off the end cap. Grasp both door handles are not aligned, loosen all tape and door bracing from the refrigerator and freezer doors. 2. In Canada, visit www.KitchenAid.ca, or call 1-800-442-9991. A A A A. See the "Classic ...
Installation Guide
Page 24
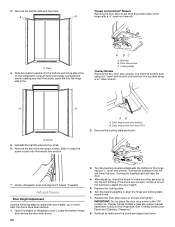
...even. Recheck to adjust the door height. 5. Trims 4. Door stop screw or screws and tighten. Reinstall the handle-side and top trims. 6. Open the freezer or refrigerator door. Locking plate Overlay Models Remove the two door stop screw in the 130° position on Overlay Series ... the door height, up or down, after the doors have been routed on the refrigerator compartment and freezer compartment doors, making sure that the backer panel fits into the handle trim section. A. Remove the handle-side and top trims. A A Classic and Architect® Models Remove the door stop...
...even. Recheck to adjust the door height. 5. Trims 4. Door stop screw or screws and tighten. Reinstall the handle-side and top trims. 6. Open the freezer or refrigerator door. Locking plate Overlay Models Remove the two door stop screw in the 130° position on Overlay Series ... the door height, up or down, after the doors have been routed on the refrigerator compartment and freezer compartment doors, making sure that the backer panel fits into the handle trim section. A. Remove the handle-side and top trims. A A Classic and Architect® Models Remove the door stop...


