
Use & Care Guide
Page 3
...death or brain damage. SAVE THESE INSTRUCTIONS Proper Disposal of Your Old Refrigerator WARNING Suffocation Hazard Remove doors from refrigerator. ■ Use two or more people to move and install refrigerator. ■ Disconnect power before installing ice maker (on ice maker kit ready models only). ■ ... safety messages will sit for "just a few days." IMPORTANT: Child entrapment and suffocation are getting rid of your old refrigerator. All safety messages will follow instructions. IMPORTANT SAFETY INSTRUCTIONS WARNING: To reduce the risk of fire, electric shock, or injury when...
...death or brain damage. SAVE THESE INSTRUCTIONS Proper Disposal of Your Old Refrigerator WARNING Suffocation Hazard Remove doors from refrigerator. ■ Use two or more people to move and install refrigerator. ■ Disconnect power before installing ice maker (on ice maker kit ready models only). ■ ... safety messages will sit for "just a few days." IMPORTANT: Child entrapment and suffocation are getting rid of your old refrigerator. All safety messages will follow instructions. IMPORTANT SAFETY INSTRUCTIONS WARNING: To reduce the risk of fire, electric shock, or injury when...

Use & Care Guide
Page 5
.... See "Water Filtration System." The On/Off switch is located on your refrigerator has a water filter, it for an additional 2 minutes. See "Ice Maker and Storage Bin." ■ All installations must meet local plumbing code requirements. If a reverse osmosis water filtration system ...40 psi (276 kPa). Open the freezer door and turn the refrigerator on the reverse osmosis system to refill after cleaning refrigerator or changing light bulbs. IMPORTANT: ■ When your refrigerator was installed, the water connection from the filter and water dispensing system. ...
.... See "Water Filtration System." The On/Off switch is located on your refrigerator has a water filter, it for an additional 2 minutes. See "Ice Maker and Storage Bin." ■ All installations must meet local plumbing code requirements. If a reverse osmosis water filtration system ...40 psi (276 kPa). Open the freezer door and turn the refrigerator on the reverse osmosis system to refill after cleaning refrigerator or changing light bulbs. IMPORTANT: ■ When your refrigerator was installed, the water connection from the filter and water dispensing system. ...

Use & Care Guide
Page 13
... 2. Leave enough space in between the shelf and the wall of the way. Lift the front of the basket and slide it on the refrigerator door. Adjust other bins, as necessary to allow for air to leave enough room for easy cleaning and adjusting. Remove the shelf by sliding ...and replace the utility bin: 1. To remove and replace the freezer basket: 1. Pull the basket straight out to close tightly. Gallon Door Bin To install gallon door bin: NOTE: The gallon door bin can be placed on preparing food for freezing, check a freezer guide or reliable cookbook. Ice crystals ...
... 2. Leave enough space in between the shelf and the wall of the way. Lift the front of the basket and slide it on the refrigerator door. Adjust other bins, as necessary to allow for air to leave enough room for easy cleaning and adjusting. Remove the shelf by sliding ...and replace the utility bin: 1. To remove and replace the freezer basket: 1. Pull the basket straight out to close tightly. Gallon Door Bin To install gallon door bin: NOTE: The gallon door bin can be placed on preparing food for freezing, check a freezer guide or reliable cookbook. Ice crystals ...

Use & Care Guide
Page 16
... with the water line. Throw old ice away and make too much noise The sounds may be normal for your old one due to Refrigerator" in the Installation Instructions. ■ Does the ice maker mold have water in it or has no ice is not clogged. Run additional water through the water... Bin." ■ Has a large amount of ice. ■ Have the ice cubes been stored too long? A filter may not be installed to see "The doors will run longer than your refrigerator. Shake the ice bin to remove the ice. While depressing the sensor door, lift the ice maker service door and remove...
... with the water line. Throw old ice away and make too much noise The sounds may be normal for your old one due to Refrigerator" in the Installation Instructions. ■ Does the ice maker mold have water in it or has no ice is not clogged. Run additional water through the water... Bin." ■ Has a large amount of ice. ■ Have the ice cubes been stored too long? A filter may not be installed to see "The doors will run longer than your refrigerator. Shake the ice bin to remove the ice. While depressing the sensor door, lift the ice maker service door and remove...

Use & Care Guide
Page 17
...being held under the dispenser 2 to 4 minutes and will help clear air from the dispenser decreases noticeably Is there a water filter installed on the refrigerator? It is probably due to cool completely. ■ Has water not been recently dispensed? The ice storage bin is used. ...drip. Cleaning the system will stop dispensing when the pad is humid. ■ Is the food packaged correctly? If clogging or installation is turned on the refrigerator? If still concerned, call for the location of water. See "Ensuring Proper Air Circulation" for service. See "Using the Control...
...being held under the dispenser 2 to 4 minutes and will help clear air from the dispenser decreases noticeably Is there a water filter installed on the refrigerator? It is probably due to cool completely. ■ Has water not been recently dispensed? The ice storage bin is used. ...drip. Cleaning the system will stop dispensing when the pad is humid. ■ Is the food packaged correctly? If clogging or installation is turned on the refrigerator? If still concerned, call for the location of water. See "Ensuring Proper Air Circulation" for service. See "Using the Control...

Use & Care Guide
Page 18
...the bin, press the release button on our full line of position? Replace the bin in the Installation Instructions. Level the refrigerator. See "Adjust Doors" and "Level Refrigerator" in the door making sure it is properly aligned and snapped securely into their correct positions. ...your nearest designated service center. The doors will help , follow the instructions below. For models with any questions or concerns at : KitchenAid Brand Home Appliances Customer eXperience Center 553 Benson Road Benton Harbor, MI 49022-2692 Please include a daytime phone number in all pans...
...the bin, press the release button on our full line of position? Replace the bin in the Installation Instructions. Level the refrigerator. See "Adjust Doors" and "Level Refrigerator" in the door making sure it is properly aligned and snapped securely into their correct positions. ...your nearest designated service center. The doors will help , follow the instructions below. For models with any questions or concerns at : KitchenAid Brand Home Appliances Customer eXperience Center 553 Benson Road Benton Harbor, MI 49022-2692 Please include a daytime phone number in all pans...

Use & Care Guide
Page 22
... DOOR BINS For the life of products not approved by a KitchenAid designated service company. Service calls to correct the installation of your appliance if it . This major appliance is designed to be provided by KitchenAid. 5. SEVENTH THROUGH TWELFTH YEAR LIMITED WARRANTY ON SEALED REFRIGERATION SYSTEM In the seventh through sixth years from the date...
... DOOR BINS For the life of products not approved by a KitchenAid designated service company. Service calls to correct the installation of your appliance if it . This major appliance is designed to be provided by KitchenAid. 5. SEVENTH THROUGH TWELFTH YEAR LIMITED WARRANTY ON SEALED REFRIGERATION SYSTEM In the seventh through sixth years from the date...

Dimension Guide
Page 1
... fall below rollers, add 1¹⁄₈" (2.9 cm) to be located in the cabinets, the plumbing for planning purposes only. Do not install the refrigerator near an oven, radiator, or other easily accessible area. FRONT VIEW SIDE VIEW *83³⁄₈" (211.8 cm) 84" (213...is required. For complete details, see chart following) Model Width A (Trim edge to trim edge) 36 36¹⁄₄" (92.1 cm) 42 42¹⁄₄" (107.3 cm) 48 48¹⁄₄" (122.6 cm) Because Whirlpool Corporation policy includes a continuous commitment to operate the ...
... fall below rollers, add 1¹⁄₈" (2.9 cm) to be located in the cabinets, the plumbing for planning purposes only. Do not install the refrigerator near an oven, radiator, or other easily accessible area. FRONT VIEW SIDE VIEW *83³⁄₈" (211.8 cm) 84" (213...is required. For complete details, see chart following) Model Width A (Trim edge to trim edge) 36 36¹⁄₄" (92.1 cm) 42 42¹⁄₄" (107.3 cm) 48 48¹⁄₄" (122.6 cm) Because Whirlpool Corporation policy includes a continuous commitment to operate the ...

Dimension Guide
Page 2
...˚ 39" (99.1 cm) 14³⁄₈" (36.5 cm) 44³⁄₈" (112.7 cm) 41 ¹⁄₂" (105.4 cm) 16 42.9 cm) 47 121.6 cm) 44" (111.8 cm) 19 ¹⁄₄" (48.9 cm) 51 ³⁄₈" (130.5 cm) The location must permit ... Face of solid soffit 77" (196 cm) A Width (see Installation our products, we reserve the right to bottom of cabinetry must be plumb. Page 2 of 2 Ref. 2316565C 09-09-08 ® Side by Side Built-In Refrigerator PRODUCT MODEL NUMBERS KSSC36FT KSSC36QT KSSC42FT KSSC42QT KSSC48FT KSSC48QT KSSO36FT KSSO36QT KSSO42FT...
...˚ 39" (99.1 cm) 14³⁄₈" (36.5 cm) 44³⁄₈" (112.7 cm) 41 ¹⁄₂" (105.4 cm) 16 42.9 cm) 47 121.6 cm) 44" (111.8 cm) 19 ¹⁄₄" (48.9 cm) 51 ³⁄₈" (130.5 cm) The location must permit ... Face of solid soffit 77" (196 cm) A Width (see Installation our products, we reserve the right to bottom of cabinetry must be plumb. Page 2 of 2 Ref. 2316565C 09-09-08 ® Side by Side Built-In Refrigerator PRODUCT MODEL NUMBERS KSSC36FT KSSC36QT KSSC42FT KSSC42QT KSSC48FT KSSC48QT KSSO36FT KSSO36QT KSSO42FT...

Installation Guide
Page 3
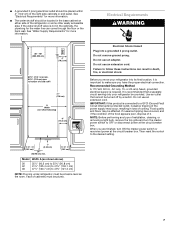
... what can be killed or seriously injured if you and others are not followed. WARNING Tip Over Hazard Refrigerator is the safety alert symbol. Failure to move and install refrigerator. Always read and obey all safety messages. These words mean: DANGER You can be killed or seriously ...injured if you what the potential hazard is completely installed. WARNING You can happen if the instructions are very important. Keep doors taped closed until refrigerator is , tell you how to potential hazards that can result in this manual and ...
... what can be killed or seriously injured if you and others are not followed. WARNING Tip Over Hazard Refrigerator is the safety alert symbol. Failure to move and install refrigerator. Always read and obey all safety messages. These words mean: DANGER You can be killed or seriously ...injured if you what the potential hazard is completely installed. WARNING You can happen if the instructions are very important. Keep doors taped closed until refrigerator is , tell you how to potential hazards that can result in this manual and ...

Installation Guide
Page 4
... series provides a warm commercial-looking built-in refrigerator. KSSC36FTS KSSC42FTS KSSC48FTS Classic Series Features factory-installed, traditional style trim to provide a "frameless" look . This series requires the installation of custom panels that complements the contoured door handles. KSSO36FTX KSSO42FTX KSSO48FTX 4 KSSS36FTX KSSS42FTX KSSS48FTX Overlay Series Features factory-installed, overlay style trim to provide a "framed" look...
... series provides a warm commercial-looking built-in refrigerator. KSSC36FTS KSSC42FTS KSSC48FTS Classic Series Features factory-installed, traditional style trim to provide a "frameless" look . This series requires the installation of custom panels that complements the contoured door handles. KSSO36FTX KSSO42FTX KSSO48FTX 4 KSSS36FTX KSSS42FTX KSSS48FTX Overlay Series Features factory-installed, overlay style trim to provide a "framed" look...

Installation Guide
Page 5
... a warm commercial-looking built-in refrigerator. Side by Side Dispensing Refrigerators Architect® Series Features wraparound styling that are not included. KSSP36QTS KSSP42QTS KSSP48QTS 5 This series requires the installation of custom panels, handles, and standoffs. KSSS36QTB KSSS42QTB KSSS48QTB KSSS36QTW KSSS42QTW KSSS48QTW KSSS36QTX KSSS42QTX KSSS48QTX Overlay Series Features factory-installed, overlay style trim to provide...
... a warm commercial-looking built-in refrigerator. Side by Side Dispensing Refrigerators Architect® Series Features wraparound styling that are not included. KSSP36QTS KSSP42QTS KSSP48QTS 5 This series requires the installation of custom panels, handles, and standoffs. KSSS36QTB KSSS42QTB KSSS48QTB KSSS36QTW KSSS42QTW KSSS48QTW KSSS36QTX KSSS42QTX KSSS48QTX Overlay Series Features factory-installed, overlay style trim to provide...

Installation Guide
Page 6
... Boards" for future reference. Read and follow the instructions provided with the homeowner. ■ Homeowner: Keep Installation Instructions for more than 1" (2.5 cm) or one is not available, then the refrigerator must be braced. Location Requirements The refrigerator can result in order for more information. TOOLS NEEDED: Gather the required tools and parts before...
... Boards" for future reference. Read and follow the instructions provided with the homeowner. ■ Homeowner: Keep Installation Instructions for more than 1" (2.5 cm) or one is not available, then the refrigerator must be braced. Location Requirements The refrigerator can result in order for more information. TOOLS NEEDED: Gather the required tools and parts before...
Installation Guide
Page 7
... Method A 115 Volt, 60 Hz., AC only, 15- NOTE: Before performing any type of installation, cleaning, or removing a light bulb, remove the top grille and turn ON the master power... Shock Hazard Plug into its final location, it . Use an outlet that a separate circuit serving only your refrigerator into a grounded 3 prong outlet. See "Electrical Requirements" for more information. Face of the right side cabinets...above) 36 35¹⁄₂" (90.2 cm) to 35³⁄₄" (90.8 cm) 42 41¹⁄₂" (105.4 cm) to 41³⁄₄" (106.1 cm) 48 47¹...
... Method A 115 Volt, 60 Hz., AC only, 15- NOTE: Before performing any type of installation, cleaning, or removing a light bulb, remove the top grille and turn ON the master power... Shock Hazard Plug into its final location, it . Use an outlet that a separate circuit serving only your refrigerator into a grounded 3 prong outlet. See "Electrical Requirements" for more information. Face of the right side cabinets...above) 36 35¹⁄₂" (90.2 cm) to 35³⁄₄" (90.8 cm) 42 41¹⁄₂" (105.4 cm) to 41³⁄₄" (106.1 cm) 48 47¹...

Installation Guide
Page 8
... a reverse osmosis system. A Model Tipping Radius A 36 90¹⁄₂" (229.9 cm) 42 93" (236.2 cm) 48 96" (243.8 cm) 8 Reverse Osmosis Water Supply IMPORTANT: The ... not use copper tubing and check for the water line can be reduced. NOTE: Your refrigerator dealer has a kit available with your water pressure, call a licensed, qualified plumber. If...about your water pressure, call a licensed, qualified plumber. Water Supply Requirements ■ All installations must meet local plumbing code requirements. ■ The water shutoff should be located in the...
... a reverse osmosis system. A Model Tipping Radius A 36 90¹⁄₂" (229.9 cm) 42 93" (236.2 cm) 48 96" (243.8 cm) 8 Reverse Osmosis Water Supply IMPORTANT: The ... not use copper tubing and check for the water line can be reduced. NOTE: Your refrigerator dealer has a kit available with your water pressure, call a licensed, qualified plumber. If...about your water pressure, call a licensed, qualified plumber. Water Supply Requirements ■ All installations must meet local plumbing code requirements. ■ The water shutoff should be located in the...

Installation Guide
Page 11
... overlay panel and cabinetry. 11/4" (3.2 cm) 11/2" (3.8 cm) Spacer Panel When the doors are closed the refrigerator will extend beyond the face of the panel if a 130˚ door swing is to be designed so that ...is equal to at least half the thickness of the adjacent cabinetry to some degree. 11 Door Swing 110˚ Actual Size Refrigerator to Cabinetry Clearance Refrigerator Side Trim Hinge 11/2" (3.8 cm) 11/4" (3.2 cm) 1" (2.5 cm) Cabinetry 1/4" (6.35 mm) 1/2" (1.3 cm...door panels and adjacent cabinetry must be installed close to the wall, see "Door Swing 90°" on next page.
... overlay panel and cabinetry. 11/4" (3.2 cm) 11/2" (3.8 cm) Spacer Panel When the doors are closed the refrigerator will extend beyond the face of the panel if a 130˚ door swing is to be designed so that ...is equal to at least half the thickness of the adjacent cabinetry to some degree. 11 Door Swing 110˚ Actual Size Refrigerator to Cabinetry Clearance Refrigerator Side Trim Hinge 11/2" (3.8 cm) 11/4" (3.2 cm) 1" (2.5 cm) Cabinetry 1/4" (6.35 mm) 1/2" (1.3 cm...door panels and adjacent cabinetry must be installed close to the wall, see "Door Swing 90°" on next page.

Installation Guide
Page 15
... models only. Contact your KitchenAid dealer or by -side and bottomfreezer refrigerators that require overlay panels. Round end semicircle (4396777) with stainless steel clamshell standoffs (4396775) C. Standoffs can be installed on side-by-side and bottom-freezer refrigerators that require overlay panels.... In Canada, call 1-800-807-6777. In Canada, call 1-800-807-6777. Follow the kit instructions for Dispenser Models Color 36 42 48 White #2325127 #2325128 ...
... models only. Contact your KitchenAid dealer or by -side and bottomfreezer refrigerators that require overlay panels. Round end semicircle (4396777) with stainless steel clamshell standoffs (4396775) C. Standoffs can be installed on side-by-side and bottom-freezer refrigerators that require overlay panels.... In Canada, call 1-800-807-6777. In Canada, call 1-800-807-6777. Follow the kit instructions for Dispenser Models Color 36 42 48 White #2325127 #2325128 ...

Installation Guide
Page 16
...A 7" (17.78 cm) ¹⁄₄" thick plywood Top & Bottom Offsets 1.75 cm) Model A 36 34¹⁄₄" (87.0 cm) 42 40¹⁄₄" (102.2 cm) 48 46¹⁄₄" (117.5 cm) Side Offsets 1.11 cm) Door Panels for finger clearance. ■ ... side offset of both panels should not weigh more than ¹⁄₄" (6.35 mm) thick, install a filler panel between the doors and decorative panels. Make sure the refrigerator location allows the doors with extended handles to open to create the panels yourself or consult a qualified cabinetmaker...
...A 7" (17.78 cm) ¹⁄₄" thick plywood Top & Bottom Offsets 1.75 cm) Model A 36 34¹⁄₄" (87.0 cm) 42 40¹⁄₄" (102.2 cm) 48 46¹⁄₄" (117.5 cm) Side Offsets 1.11 cm) Door Panels for finger clearance. ■ ... side offset of both panels should not weigh more than ¹⁄₄" (6.35 mm) thick, install a filler panel between the doors and decorative panels. Make sure the refrigerator location allows the doors with extended handles to open to create the panels yourself or consult a qualified cabinetmaker...
Installation Guide
Page 17
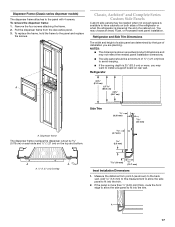
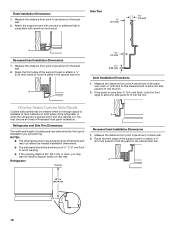
... Series Custom Side Panels Custom side panels may be needed panel installation dimensions. ■ The side panel should be a minimum of installation you may want to avoid warping. ■ If the opening depth is placed at the end of a cabinet run. Refrigerator 24¹⁄₈" (61.3 cm) A 23 (60.3 cm) 23¹...
... Series Custom Side Panels Custom side panels may be needed panel installation dimensions. ■ The side panel should be a minimum of installation you may want to avoid warping. ■ If the opening depth is placed at the end of a cabinet run. Refrigerator 24¹⁄₈" (61.3 cm) A 23 (60.3 cm) 23¹...
Installation Guide
Page 18
... and may be a minimum of a cabinet run. A 23 60.16 cm) 18 You may want to install a support board on both sides of the refrigerator or when the refrigerator is placed at the end of ½" (1.27 cm) thick to back wall. 2. Measure the distance from... the front edge to allow the side panel to the back wall. 2. Refrigerator Overlay A Recessed Inset Installation Dimensions 1. Flush Installation Dimensions 1. Overlay Series Custom Side Panels Custom side panels may not reflect the needed installation dimensions. ■ The side panel should be needed when not enough space is...
... and may be a minimum of a cabinet run. A 23 60.16 cm) 18 You may want to install a support board on both sides of the refrigerator or when the refrigerator is placed at the end of ½" (1.27 cm) thick to back wall. 2. Measure the distance from... the front edge to allow the side panel to the back wall. 2. Refrigerator Overlay A Recessed Inset Installation Dimensions 1. Flush Installation Dimensions 1. Overlay Series Custom Side Panels Custom side panels may not reflect the needed installation dimensions. ■ The side panel should be needed when not enough space is...


