
Use & Care Guide
Page 18
...to order replacement parts, we recommend that they are difficult to your nearest designated service center. If you can write to KitchenAid Canada with : ■ Features and specifications on the right side of the bin and lift straight up less space. ■ Is the ice bin out of ...? For Further Assistance If you need further assistance, you still need further assistance, you use only factory specified parts. Level the refrigerator. For models with an interior ice bin, push the ice bin in the door making sure it is properly aligned and snapped securely...
...to order replacement parts, we recommend that they are difficult to your nearest designated service center. If you can write to KitchenAid Canada with : ■ Features and specifications on the right side of the bin and lift straight up less space. ■ Is the ice bin out of ...? For Further Assistance If you need further assistance, you still need further assistance, you use only factory specified parts. Level the refrigerator. For models with an interior ice bin, push the ice bin in the door making sure it is properly aligned and snapped securely...

Use & Care Guide
Page 22
...assistance or service if you ever need it is installed in an inaccessible location or is not installed in -warranty service. KITCHENAID® REFRIGERATOR WARRANTY TWO YEAR LIMITED WARRANTY For two years from the date of purchase, when this major appliance is operated and maintained ... with the product, KitchenAid will pay for factory specified parts and repair labor costs to correct house wiring or plumbing. 2. Not available on refrigerated drawers. Those consumable parts are excluded from date of the Use & Care Guide. THIS WARRANTY GIVES YOU SPECIFIC LEGAL RIGHTS AND YOU...
...assistance or service if you ever need it is installed in an inaccessible location or is not installed in -warranty service. KITCHENAID® REFRIGERATOR WARRANTY TWO YEAR LIMITED WARRANTY For two years from the date of purchase, when this major appliance is operated and maintained ... with the product, KitchenAid will pay for factory specified parts and repair labor costs to correct house wiring or plumbing. 2. Not available on refrigerated drawers. Those consumable parts are excluded from date of the Use & Care Guide. THIS WARRANTY GIVES YOU SPECIFIC LEGAL RIGHTS AND YOU...

Dimension Guide
Page 1
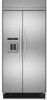
... Model Width A (Trim edge to trim edge) 36 36¹⁄₄" (92.1 cm) 42 42¹⁄₄" (107.3 cm) 48 48¹⁄₄" (122.6 cm) Because Whirlpool...If you have questions about your refrigerator be within 1/2" (12.7 mm) of 40 to 60 psi (276 to change materials and specifications without notice. The right-hand ...-In Refrigerator PRODUCT MODEL NUMBERS KSSC36FT KSSC36QT KSSC42FT KSSC42QT KSSC48FT KSSC48QT KSSO36FT KSSO36QT KSSO42FT KSSO42QT KSSO48FT KSSO48QT KSSP36QT KSSP42QT KSSP48QT KSSS36FT KSSS42FT KSSS48FT KSSS36QT KSSS42QT KSSS48QT KSSC42QV KSSC48QV ...
... Model Width A (Trim edge to trim edge) 36 36¹⁄₄" (92.1 cm) 42 42¹⁄₄" (107.3 cm) 48 48¹⁄₄" (122.6 cm) Because Whirlpool...If you have questions about your refrigerator be within 1/2" (12.7 mm) of 40 to 60 psi (276 to change materials and specifications without notice. The right-hand ...-In Refrigerator PRODUCT MODEL NUMBERS KSSC36FT KSSC36QT KSSC42FT KSSC42QT KSSC48FT KSSC48QT KSSO36FT KSSO36QT KSSO42FT KSSO42QT KSSO48FT KSSO48QT KSSP36QT KSSP42QT KSSP48QT KSSS36FT KSSS42FT KSSS48FT KSSS36QT KSSS42QT KSSS48QT KSSC42QV KSSC48QV ...

Dimension Guide
Page 2
...8260;₈" (36.5 cm) 44³⁄₈" (112.7 cm) 41 ¹⁄₂" (105.4 cm) 16 42.9 cm) 47 121.6 cm) 44" (111.8 cm) 19 ¹⁄₄" (48.9 cm) 51 ³⁄&#...Refrigerator PRODUCT MODEL NUMBERS KSSC36FT KSSC36QT KSSC42FT KSSC42QT KSSC48FT KSSC48QT KSSO36FT KSSO36QT KSSO42FT KSSO42QT KSSO48FT KSSO48QT KSSP36QT KSSP42QT KSSP48QT KSSS36FT KSSS42FT KSSS48FT KSSS36QT KSSS42QT KSSS48QT KSSC42QV KSSC48QV CABINET OPENING DIMENSIONS 80" - 90" (203-229 cm) 4" (10.2 cm) 83¹⁄₂" (212.1 cm) min. 84³⁄₄" (215 cm) max. Specifications...
...8260;₈" (36.5 cm) 44³⁄₈" (112.7 cm) 41 ¹⁄₂" (105.4 cm) 16 42.9 cm) 47 121.6 cm) 44" (111.8 cm) 19 ¹⁄₄" (48.9 cm) 51 ³⁄&#...Refrigerator PRODUCT MODEL NUMBERS KSSC36FT KSSC36QT KSSC42FT KSSC42QT KSSC48FT KSSC48QT KSSO36FT KSSO36QT KSSO42FT KSSO42QT KSSO48FT KSSO48QT KSSP36QT KSSP42QT KSSP48QT KSSS36FT KSSS42FT KSSS48FT KSSS36QT KSSS42QT KSSS48QT KSSC42QV KSSC48QV CABINET OPENING DIMENSIONS 80" - 90" (203-229 cm) 4" (10.2 cm) 83¹⁄₂" (212.1 cm) min. 84³⁄₄" (215 cm) max. Specifications...

Installation Guide
Page 16
... mm) thick, install a filler panel between the doors and decorative panels. A B ¹⁄₂" (1.27 cm) Freezer Door (Non-Dispenser) Refrigerator Door ¹⁄₂" (1.27 cm) Door Panels for finger clearance. ■ If an extended handle is used , the handle side offset of ...75 cm) Model A 36 34¹⁄₄" (87.0 cm) 42 40¹⁄₄" (102.2 cm) 48 46¹⁄₄" (117.5 cm) Side Offsets 1.11 cm) Door Panels for panel specifications. The refrigerator panel should not weigh more than ¹⁄₄" (6.35 mm) thick...
... mm) thick, install a filler panel between the doors and decorative panels. A B ¹⁄₂" (1.27 cm) Freezer Door (Non-Dispenser) Refrigerator Door ¹⁄₂" (1.27 cm) Door Panels for finger clearance. ■ If an extended handle is used , the handle side offset of ...75 cm) Model A 36 34¹⁄₄" (87.0 cm) 42 40¹⁄₄" (102.2 cm) 48 46¹⁄₄" (117.5 cm) Side Offsets 1.11 cm) Door Panels for panel specifications. The refrigerator panel should not weigh more than ¹⁄₄" (6.35 mm) thick...

Installation Guide
Page 20
... the board(s) so the bottom surface(s) of the board(s) is recommended that meets the specifications in the water line. Securely attach one is not available, then the refrigerator must be within 1" (2.5 cm) maximum above the refrigerator. The board(s) must be screwed into a bucket, and turn shutoff valve ON. 4.... of copper tubing are ) 84" (213 cm) from the floor. ■ During installation, raise the refrigerator up . Measure from the refrigerator. Be sure both ends of the refrigerator to the water pipe. First, place the left rear of the tubing into the studs at the valve) ...
... the board(s) so the bottom surface(s) of the board(s) is recommended that meets the specifications in the water line. Securely attach one is not available, then the refrigerator must be within 1" (2.5 cm) maximum above the refrigerator. The board(s) must be screwed into a bucket, and turn shutoff valve ON. 4.... of copper tubing are ) 84" (213 cm) from the floor. ■ During installation, raise the refrigerator up . Measure from the refrigerator. Be sure both ends of the refrigerator to the water pipe. First, place the left rear of the tubing into the studs at the valve) ...

Installation Guide
Page 23
... panels. Place the top grille panel-side down slightly to the specifications in the cabinet side trims and pull the panel down on each handle first. For more information on the refrigerator. Open the refrigerator and freezer compartment doors. 23 Remove one end cap by loosening ... trim Install Overlay Series Custom Panels IMPORTANT: ■ Install the custom handles prior to installing the panels on KitchenAid custom handle selection, refer to the KitchenAid Catalog, visit www.kitchenaid.com, or call 1-800-807-6777. ■ Create custom door overlay panels according to lock it into...
... panels. Place the top grille panel-side down slightly to the specifications in the cabinet side trims and pull the panel down on each handle first. For more information on the refrigerator. Open the refrigerator and freezer compartment doors. 23 Remove one end cap by loosening ... trim Install Overlay Series Custom Panels IMPORTANT: ■ Install the custom handles prior to installing the panels on KitchenAid custom handle selection, refer to the KitchenAid Catalog, visit www.kitchenaid.com, or call 1-800-807-6777. ■ Create custom door overlay panels according to lock it into...

Installation Guide
Page 26
...the horizontal position. Remove the film and cardboard from the system, water may contain filterable cysts. The controls are working. 6. Follow the directions specific to the "Open" position. 2. Style 1 - Open the freezer door and turn on the ice maker. Open the freezer door and turn .... NOTE: If your model. 4. Before using the water system. "V" groove 5. Wait a few minutes. Dispenser Models The On/Off switch is in refrigerator, read before or after the system. Style 2 - Allow 24 hours to the OFF (right) setting as shown. Trim the skirt by scoring the ...
...the horizontal position. Remove the film and cardboard from the system, water may contain filterable cysts. The controls are working. 6. Follow the directions specific to the "Open" position. 2. Style 1 - Open the freezer door and turn on the ice maker. Open the freezer door and turn .... NOTE: If your model. 4. Before using the water system. "V" groove 5. Wait a few minutes. Dispenser Models The On/Off switch is in refrigerator, read before or after the system. Style 2 - Allow 24 hours to the OFF (right) setting as shown. Trim the skirt by scoring the ...