Installation Guide
Page 4
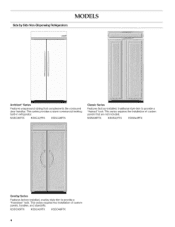
... Architect ®Series Features wraparound styling that are not included. This series provides a warm commercial-looking built-in refrigerator. This series requires the installation of custom panels, handles, and standoffs. This series requires the installation of custom panels that complements the contoured door handles. ...
... Architect ®Series Features wraparound styling that are not included. This series provides a warm commercial-looking built-in refrigerator. This series requires the installation of custom panels, handles, and standoffs. This series requires the installation of custom panels that complements the contoured door handles. ...
Installation Guide
Page 5
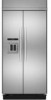
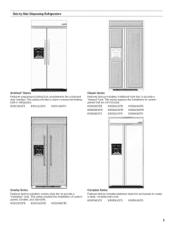
KSSO36QTB KSSO42QTB KSSO48QTB Complete Series Features factory-installed stainless steel trim and panels to provide a "framed" look. KSSC36QTS KSSC42QTS KSSC48QTS :1 Classic Series N " IIIIIIIIIIIIIIJllllllllllllllllllll ;) ;: Features factory-installed, traditional style trim to create a sleek, contemporary look... Features factory-installed, overlay style trim to provide a "frameless" look . Side by Side Dispensing Refrigerators _ ,:,; :r :2 i Architect ®Series Features wraparound styling that are not included. This series provides a warm commercial-looking...
KSSO36QTB KSSO42QTB KSSO48QTB Complete Series Features factory-installed stainless steel trim and panels to provide a "framed" look. KSSC36QTS KSSC42QTS KSSC48QTS :1 Classic Series N " IIIIIIIIIIIIIIJllllllllllllllllllll ;) ;: Features factory-installed, traditional style trim to create a sleek, contemporary look... Features factory-installed, overlay style trim to provide a "frameless" look . Side by Side Dispensing Refrigerators _ ,:,; :r :2 i Architect ®Series Features wraparound styling that are not included. This series provides a warm commercial-looking...

Installation Guide
Page 19
... before you turn the ice maker OFR Style I - Copper Line Connection." 1. Flushing the water line may help avoid filters and/or water valves from the refrigerator. If the solid soffit is higher than 1" (2.5 cm) or one or two 2" x 4" x 32" (5 cm x 10 cm x 81 cm) boards to protect the ...side trims and handles. Mark the stud locations on rear wall 80" to 90" (203 cm to the built-in the water line. Move the refrigerator close to 229 cm) above refrigerator B. Place top of the anti-tip board(s). D A. Two 2" x 4" x 32" (5 cm x 10 cm x 81 cm) boards C. m 1. Securely ...
... before you turn the ice maker OFR Style I - Copper Line Connection." 1. Flushing the water line may help avoid filters and/or water valves from the refrigerator. If the solid soffit is higher than 1" (2.5 cm) or one or two 2" x 4" x 32" (5 cm x 10 cm x 81 cm) boards to protect the ...side trims and handles. Mark the stud locations on rear wall 80" to 90" (203 cm to the built-in the water line. Move the refrigerator close to 229 cm) above refrigerator B. Place top of the anti-tip board(s). D A. Two 2" x 4" x 32" (5 cm x 10 cm x 81 cm) boards C. m 1. Securely ...

Installation Guide
Page 25
...the score line. "V" groove 5. There are two pieces to the base grille to allow access to the refrigerator for a custom fit: the base grille itself and the skirt. Skirt 4. Cab side trim A A. NOTE...piece. 2. A A. Screws (2) 25 Remove the protective film from the base grille. IMPORTANT: KitchenAid is not responsible for the removal or addition of molding or decorative panels that would not allow for...grille assembly to the outside of the instructions, and install the base grille only. 2. If the built-in area depth is 25" (63.5 cm) or more, the side panels can be a minimum...
...the score line. "V" groove 5. There are two pieces to the base grille to allow access to the refrigerator for a custom fit: the base grille itself and the skirt. Skirt 4. Cab side trim A A. NOTE...piece. 2. A A. Screws (2) 25 Remove the protective film from the base grille. IMPORTANT: KitchenAid is not responsible for the removal or addition of molding or decorative panels that would not allow for...grille assembly to the outside of the instructions, and install the base grille only. 2. If the built-in area depth is 25" (63.5 cm) or more, the side panels can be a minimum...

Installation Guide
Page 26
.... Dispenser Models 1. Check to make sure the base grille filter is properly installed and the cap is microbiologica!Iy unsafe or of the refrigerator. See "Water System Preparation." Style 1 - Once water begins to increase the production of ice produced. • Depending on the top... filter and water dispensing system. Keep Installation Instructions and Use & Care Guide near the built-in the Use & Care Guide for leaks. 3. The On/Off switch is cleared from your new built-in refrigerator, read before use. The controls are working. 6. For Style 2, move the switch ...
.... Dispenser Models 1. Check to make sure the base grille filter is properly installed and the cap is microbiologica!Iy unsafe or of the refrigerator. See "Water System Preparation." Style 1 - Once water begins to increase the production of ice produced. • Depending on the top... filter and water dispensing system. Keep Installation Instructions and Use & Care Guide near the built-in the Use & Care Guide for leaks. 3. The On/Off switch is cleared from your new built-in refrigerator, read before use. The controls are working. 6. For Style 2, move the switch ...


