Use & Care Guide
Page 2
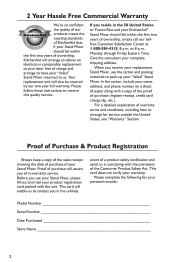
...materials to arrange for your personal records: Model Number Serial Number Date Purchased Store Name 2 When you receive your replacement Stand Mixer, use your Stand Mixer, please fill out and mail your product registration card packed with a copy of the proof of purchase (register receipt, credit...of our products meets the exacting standards of KitchenAid that, if your Stand Mixer should fail within the first two years of ownership, KitchenAid will assure you of in the 50 United States or Puerto Rico and your KitchenAid® Stand Mixer should fail within the first two years of...
...materials to arrange for your personal records: Model Number Serial Number Date Purchased Store Name 2 When you receive your replacement Stand Mixer, use your Stand Mixer, please fill out and mail your product registration card packed with a copy of the proof of purchase (register receipt, credit...of our products meets the exacting standards of KitchenAid that, if your Stand Mixer should fail within the first two years of ownership, KitchenAid will assure you of in the 50 United States or Puerto Rico and your KitchenAid® Stand Mixer should fail within the first two years of...
Use & Care Guide
Page 3
...of Contents 2 Year Hassle Free Warranty Inside Front Cover Proof of Purchase & Product Registration Card Inside Front Cover Stand Mixer Safety...4 Warranty...5 For the 50 United States, District of Columbia, and Puerto Rico 5 Arranging for Service After ...Accessories and Replacement Parts 6 Electrical Requirements...7 Troubleshooting Problems...7 Stand Mixer Features...8 Assembling Your Bowl Lift Stand Mixer 9 Using Your KitchenAid® Attachments 10 Mixing Time...10 Mixer Use...10 Speed Control Guide - 10 Speed Stand Mixers 11 Beater To Bowl Clearance...12 Mixing Tips...13 Basic White...
...of Contents 2 Year Hassle Free Warranty Inside Front Cover Proof of Purchase & Product Registration Card Inside Front Cover Stand Mixer Safety...4 Warranty...5 For the 50 United States, District of Columbia, and Puerto Rico 5 Arranging for Service After ...Accessories and Replacement Parts 6 Electrical Requirements...7 Troubleshooting Problems...7 Stand Mixer Features...8 Assembling Your Bowl Lift Stand Mixer 9 Using Your KitchenAid® Attachments 10 Mixing Time...10 Mixer Use...10 Speed Control Guide - 10 Speed Stand Mixers 11 Beater To Bowl Clearance...12 Mixing Tips...13 Basic White...
Use & Care Guide
Page 4
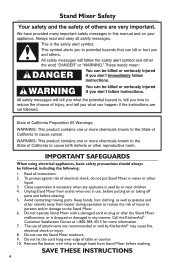
... When using electrical appliances, basic safety precautions should always be followed, including the following: 1. Do not operate Stand Mixer with a damaged cord or plug or after the Stand Mixer malfunctions, or is used by KitchenAid® may cause fire, electrical shock or injury. 8. Do not let the cord hang over edge of attachments...
... When using electrical appliances, basic safety precautions should always be followed, including the following: 1. Do not operate Stand Mixer with a damaged cord or plug or after the Stand Mixer malfunctions, or is used by KitchenAid® may cause fire, electrical shock or injury. 8. Do not let the cord hang over edge of attachments...
Use & Care Guide
Page 5
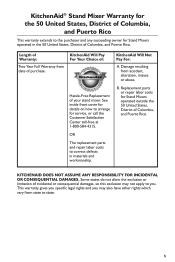
.... 5 B. This warranty gives you specific legal rights and you . KitchenAid® Stand Mixer Warranty for the 50 United States, District of Columbia, and Puerto Rico This warranty extends to the purchaser and any succeeding owner for Stand Mixers operated in materials and workmanship. KITCHENAID DOES NOT ASSUME ANY RESPONSIBILITY FOR INCIDENTAL OR CONSEQUENTIAL DAMAGES.
.... 5 B. This warranty gives you specific legal rights and you . KitchenAid® Stand Mixer Warranty for the 50 United States, District of Columbia, and Puerto Rico This warranty extends to the purchaser and any succeeding owner for Stand Mixers operated in materials and workmanship. KITCHENAID DOES NOT ASSUME ANY RESPONSIBILITY FOR INCIDENTAL OR CONSEQUENTIAL DAMAGES.
Use & Care Guide
Page 6
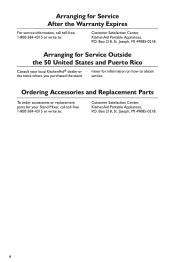
... for Service Outside the 50 United States and Puerto Rico Consult your local KitchenAid® dealer or the store where you purchased the stand mixer for your Stand Mixer, call toll-free 1-800-584-4315 or write to : Customer Satisfaction Center, KitchenAid Portable Appliances, P.O. Box 218, St. Joseph, MI 49085-0218. 6 Arranging for Service...
... for Service Outside the 50 United States and Puerto Rico Consult your local KitchenAid® dealer or the store where you purchased the stand mixer for your Stand Mixer, call toll-free 1-800-584-4315 or write to : Customer Satisfaction Center, KitchenAid Portable Appliances, P.O. Box 218, St. Joseph, MI 49085-0218. 6 Arranging for Service...
Use & Care Guide
Page 7
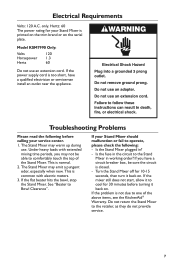
...Mixer in ? - only. The Stand Mixer may emit a pungent odor, especially when new. If your Stand Mixer is closed. - If the mixer.... Do not return the Stand Mixer to one of the Stand Mixer. Under heavy loads with electric motors... brand or on the serial plate. Turn the Stand Mixer off for 30 minutes before calling your service center. ...Clearance". Hertz: 60 The power rating for your Stand Mixer should malfunction or fail to cool for 10-15 ... Stand Mixer plugged in working order? This is normal. 2. If the flat beater hits the bowl, stop the Stand Mixer. Electrical...
...Mixer in ? - only. The Stand Mixer may emit a pungent odor, especially when new. If your Stand Mixer is closed. - If the mixer.... Do not return the Stand Mixer to one of the Stand Mixer. Under heavy loads with electric motors... brand or on the serial plate. Turn the Stand Mixer off for 30 minutes before calling your service center. ...Clearance". Hertz: 60 The power rating for your Stand Mixer should malfunction or fail to cool for 10-15 ... Stand Mixer plugged in working order? This is normal. 2. If the flat beater hits the bowl, stop the Stand Mixer. Electrical...
Use & Care Guide
Page 8
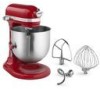
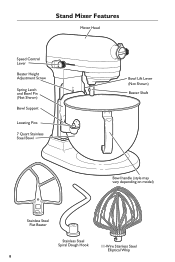
Stand Mixer Features Motor Head Speed Control Lever Beater Height Adjustment Screw Spring Latch and Bowl Pin (Not Shown) Bowl Support Locating Pins 7 Quart Stainless Steel Bowl Bowl Lift Lever (Not Shown) Beater Shaft Bowl handle (style may vary depending on model) Stainless Steel Flat Beater Stainless Steel Spiral Dough Hook 11-Wire Stainless Steel Elliptical Whip 8
Stand Mixer Features Motor Head Speed Control Lever Beater Height Adjustment Screw Spring Latch and Bowl Pin (Not Shown) Bowl Support Locating Pins 7 Quart Stainless Steel Bowl Bowl Lift Lever (Not Shown) Beater Shaft Bowl handle (style may vary depending on model) Stainless Steel Flat Beater Stainless Steel Spiral Dough Hook 11-Wire Stainless Steel Elliptical Whip 8
Use & Care Guide
Page 9
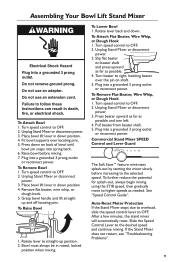
... control to straight-up and off locating pins. Remove flat beater, wire whip, or dough hook. 5. Rotate lever to OFF. 2. Unplug Stand Mixer or disconnect power. 3. Plug into a grounded 3 prong outlet or reconnect power. Press beater upward as far as needed. Turn speed control to ...OFF. 2. Plug into a grounded 3 prong outlet or reconnect power. Unplug Stand Mixer or disconnect power. 3. Grasp bowl handle and lift straight up position. 2. Turn speed control to OFF. 2. Slip flat beater on back ...
... control to straight-up and off locating pins. Remove flat beater, wire whip, or dough hook. 5. Rotate lever to OFF. 2. Unplug Stand Mixer or disconnect power. 3. Plug into a grounded 3 prong outlet or reconnect power. Press beater upward as far as needed. Turn speed control to ...OFF. 2. Plug into a grounded 3 prong outlet or reconnect power. Unplug Stand Mixer or disconnect power. 3. Grasp bowl handle and lift straight up position. 2. Turn speed control to OFF. 2. Slip flat beater on back ...
Use & Care Guide
Page 10
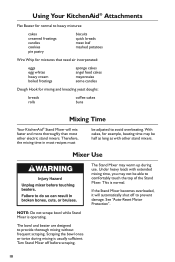
... will mix faster and more thoroughly than most recipes must be able to comfortably touch the top of the Stand Mixer. Scraping the bowl once or twice during use. Using Your KitchenAid® Attachments Flat Beater for normal to heavy mixtures: cakes creamed frostings candies cookies pie pastry biscuits quick breads meat...
... will mix faster and more thoroughly than most recipes must be able to comfortably touch the top of the Stand Mixer. Scraping the bowl once or twice during use. Using Your KitchenAid® Attachments Flat Beater for normal to heavy mixtures: cakes creamed frostings candies cookies pie pastry biscuits quick breads meat...
Use & Care Guide
Page 11
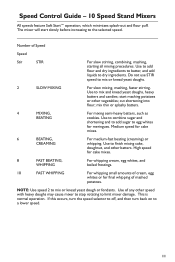
..., turn the speed selector to off, and then turn back on to mix and knead yeast doughs, heavy batters and candies; The mixer will start mashing potatoes or other batters. Do not use STIR speed to dry ingredients. start slowly before increasing to finish mixing cake,...whipping. mix thin or splashy batters. 4 MIXING, BEATING For mixing semi-heavy batters, such as cookies. Speed Control Guide - 10 Speed Stand Mixers All speeds feature Soft Start™ operation, which minimizes splash-out and flour puff. Use to add flour and dry ingredients to batter, and...
..., turn the speed selector to off, and then turn back on to mix and knead yeast doughs, heavy batters and candies; The mixer will start mashing potatoes or other batters. Do not use STIR speed to dry ingredients. start slowly before increasing to finish mixing cake,...whipping. mix thin or splashy batters. 4 MIXING, BEATING For mixing semi-heavy batters, such as cookies. Speed Control Guide - 10 Speed Stand Mixers All speeds feature Soft Start™ operation, which minimizes splash-out and flour puff. Use to add flour and dry ingredients to batter, and...
Use & Care Guide
Page 12
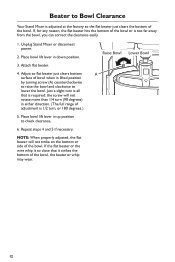
... the flat beater or the wire whip is adjusted at the factory so the flat beater just clears the bottom of the bowl. Unplug Stand Mixer or disconnect power. 2. NOTE: When properly adjusted, the flat beater will not rotate more than 1/4 turn , or 180 degrees.) 5. Beater to Bowl Clearance Your ...Stand Mixer is so close that is required: the screw will not strike on the bottom or side of the bowl. If, for any reason, the flat ...
... the flat beater or the wire whip is adjusted at the factory so the flat beater just clears the bottom of the bowl. Unplug Stand Mixer or disconnect power. 2. NOTE: When properly adjusted, the flat beater will not rotate more than 1/4 turn , or 180 degrees.) 5. Beater to Bowl Clearance Your ...Stand Mixer is so close that is required: the screw will not strike on the bottom or side of the bowl. If, for any reason, the flat ...
Use & Care Guide
Page 13
...mixing method. See "Beater to avoid splashing. Liquid Mixtures Mixtures containing large amounts of liquid ingredients should be dusted with your KitchenAid® Stand Mixer. To help determine the ideal mixing time, observe the batter or dough and mix only until it has the desired appearance ...described in your KitchenAid® Stand Mixer works more quickly than other ingredients are not thoroughly mixed, then the beater is ideal for high speed. For example, the ...
...mixing method. See "Beater to avoid splashing. Liquid Mixtures Mixtures containing large amounts of liquid ingredients should be dusted with your KitchenAid® Stand Mixer. To help determine the ideal mixing time, observe the batter or dough and mix only until it has the desired appearance ...described in your KitchenAid® Stand Mixer works more quickly than other ingredients are not thoroughly mixed, then the beater is ideal for high speed. For example, the ...
Use & Care Guide
Page 14
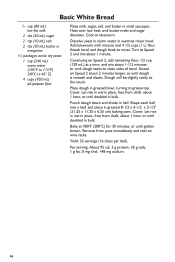
.... Attach bowl and dough hook to grease top. Continuing on wire racks. Place dough in bulk. Shape each half into a loaf, and place in warmed mixer bowl. Cover. Remove from pans immediately and cool on Speed 2, add remaining flour, 1/2 cup (120 mL) at 400°F (200°C) for 30 minutes... to clean sides of bowl. Cover. Let rise in bulk. Bake at a time, and mix about 1-1/2 minutes, or until doubled in greased bowl, turning to mixer. Per serving: About 95 cal, 3 g protein, 18 g carb, 1 g fat, 0 mg chol, 148 mg sodium. 14 Knead on Speed 2 about 1 minute. Heat over low heat...
.... Attach bowl and dough hook to grease top. Continuing on wire racks. Place dough in bulk. Shape each half into a loaf, and place in warmed mixer bowl. Cover. Remove from pans immediately and cool on Speed 2, add remaining flour, 1/2 cup (120 mL) at 400°F (200°C) for 30 minutes... to clean sides of bowl. Cover. Let rise in bulk. Bake at a time, and mix about 1-1/2 minutes, or until doubled in greased bowl, turning to mixer. Per serving: About 95 cal, 3 g protein, 18 g carb, 1 g fat, 0 mg chol, 148 mg sodium. 14 Knead on Speed 2 about 1 minute. Heat over low heat...

Use & Care Guide
Page 15
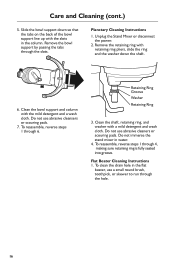
...), for cleaning 1. It can also be washed in hot sudsy water, rinsed thoroughly, and dried. • Wipe the Stand Mixer with a clean damp cloth. Screws Screw 15 Remove the Stand Mixer base by removing the 3 screws located on shaft. • The bowl is not necessary to slide down. Remove the nut... the lifter rod located inside the column, then remove the washer and spring. it is dishwasher-safe. Remove the vent screen and the mixer base. 3. Loosen the screw holding the bowl clip to the front of the mixer. Do not store beaters on the bottom of the bowl support - Unplug Stand...
...), for cleaning 1. It can also be washed in hot sudsy water, rinsed thoroughly, and dried. • Wipe the Stand Mixer with a clean damp cloth. Screws Screw 15 Remove the Stand Mixer base by removing the 3 screws located on shaft. • The bowl is not necessary to slide down. Remove the nut... the lifter rod located inside the column, then remove the washer and spring. it is dishwasher-safe. Remove the vent screen and the mixer base. 3. Loosen the screw holding the bowl clip to the front of the mixer. Do not store beaters on the bottom of the bowl support - Unplug Stand...
Use & Care Guide
Page 16
Do not use abrasive cleaners or scouring pads. Flat Beater Cleaning Instructions 1. Unplug the Stand Mixer or disconnect the power. 2. To reassemble, reverse steps 1 through 6. Do not immerse the stand mixer in the column. To reassemble, reverse steps 1 through 4, making sure retaining ring is fully seated into groove. Clean the bowl support and...
Do not use abrasive cleaners or scouring pads. Flat Beater Cleaning Instructions 1. Unplug the Stand Mixer or disconnect the power. 2. To reassemble, reverse steps 1 through 6. Do not immerse the stand mixer in the column. To reassemble, reverse steps 1 through 4, making sure retaining ring is fully seated into groove. Clean the bowl support and...


