Use & Care Guide
Page 2
... Outside these Locations 8 How to Order Accessories and Replacement Parts 9 Troubleshooting Problems 9 Tilt-Head Stand Mixer Features 10 Assembling Your Tilt-Head Stand Mixer 11 Using Your Pouring Shield 12 Using Your KitchenAid® Accessories 13 Mixing Time 13 Tilt-Head Stand Mixer Use 14 Care and Cleaning 14 Beater to Arrange for Service after the Warranty...
... Outside these Locations 8 How to Order Accessories and Replacement Parts 9 Troubleshooting Problems 9 Tilt-Head Stand Mixer Features 10 Assembling Your Tilt-Head Stand Mixer 11 Using Your Pouring Shield 12 Using Your KitchenAid® Accessories 13 Mixing Time 13 Tilt-Head Stand Mixer Use 14 Care and Cleaning 14 Beater to Arrange for Service after the Warranty...

Use & Care Guide
Page 5
... not verify your personal records: Model Number Serial Number Date Purchased Store Name and Location 3 This card will assure you use your Stand Mixer, please fill out and mail your Stand Mixer. Proof of purchase will enable us to contact you in the unlikely event of a product safety notification and assist...
... not verify your personal records: Model Number Serial Number Date Purchased Store Name and Location 3 This card will assure you use your Stand Mixer, please fill out and mail your Stand Mixer. Proof of purchase will enable us to contact you in the unlikely event of a product safety notification and assist...
Use & Care Guide
Page 6
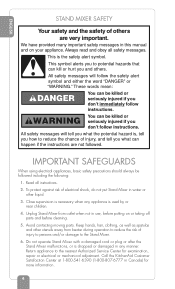
... adjustment. Keep hands, hair, clothing, as well as spatulas and other liquid. 3. Call the KitchenAid Customer Satisfaction Center at 1-800-541-6390 (1-800-807-6777 in use, before cleaning. 5. Unplug Stand Mixer from beater during operation to the Stand Mixer. 6. IMPORTANT SAFEGUARDS When using electrical appliances, basic safety precautions should always be killed or seriously...
... adjustment. Keep hands, hair, clothing, as well as spatulas and other liquid. 3. Call the KitchenAid Customer Satisfaction Center at 1-800-541-6390 (1-800-807-6777 in use, before cleaning. 5. Unplug Stand Mixer from beater during operation to the Stand Mixer. 6. IMPORTANT SAFEGUARDS When using electrical appliances, basic safety precautions should always be killed or seriously...
Use & Care Guide
Page 7
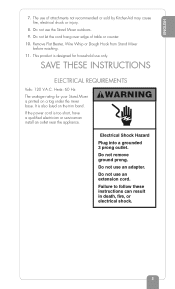
...grounded 3 prong outlet. Do not remove ground prong. Remove Flat Beater, Wire Whip or Dough Hook from Stand Mixer before washing. 11. Hertz: 60 Hz The wattage rating for household use only. It is too short,... have a qualified electrician or serviceman install an outlet near the appliance. Do not use the Stand Mixer outdoors. 9. Failure to follow these instructions can result in death, fire, or electrical shock. 5 Do... counter. 10. If the power cord is also listed on a tag under the mixer base. ENGLISH 7. The use an extension cord. Do not let the cord hang over edge of ...
...grounded 3 prong outlet. Do not remove ground prong. Remove Flat Beater, Wire Whip or Dough Hook from Stand Mixer before washing. 11. Hertz: 60 Hz The wattage rating for household use only. It is too short,... have a qualified electrician or serviceman install an outlet near the appliance. Do not use the Stand Mixer outdoors. 9. Failure to follow these instructions can result in death, fire, or electrical shock. 5 Do... counter. 10. If the power cord is also listed on a tag under the mixer base. ENGLISH 7. The use an extension cord. Do not let the cord hang over edge of ...
Use & Care Guide
Page 8
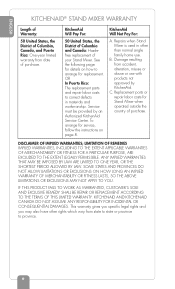
... OR EXCLUSIONS ON HOW LONG AN IMPLIED WARRANTY OF MERCHANTABILITY OR FITNESS LASTS, SO THE ABOVE LIMITATIONS OR EXCLUSIONS MAY NOT APPLY TO YOU. ENGLISH KITCHENAID® STAND MIXER WARRANTY Length of Warranty: 50 United States, the District of Columbia, Canada, and Puerto Rico: One-year limited warranty from date of purchase. C. LIMITATION...
... OR EXCLUSIONS ON HOW LONG AN IMPLIED WARRANTY OF MERCHANTABILITY OR FITNESS LASTS, SO THE ABOVE LIMITATIONS OR EXCLUSIONS MAY NOT APPLY TO YOU. ENGLISH KITCHENAID® STAND MIXER WARRANTY Length of Warranty: 50 United States, the District of Columbia, Canada, and Puerto Rico: One-year limited warranty from date of purchase. C. LIMITATION...
Use & Care Guide
Page 9
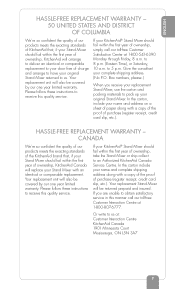
...be covered by our one year limited warranty. In the carton, include your KitchenAid® Stand Mixer should fail within the first year of ownership, take the Stand Mixer or ship collect to receive this quality service. Please follow these instructions to pack... to 8 p.m. (Eastern Time), or Saturday, 10 a.m. Please follow these instructions to an Authorized KitchenAid Canada Service Centre. Your replacement unit will replace your KitchenAid® Stand Mixer should fail within the first year of ownership, simply call our toll-free Customer Interaction Centre ...
...be covered by our one year limited warranty. In the carton, include your KitchenAid® Stand Mixer should fail within the first year of ownership, take the Stand Mixer or ship collect to receive this quality service. Please follow these instructions to pack... to 8 p.m. (Eastern Time), or Saturday, 10 a.m. Please follow these instructions to an Authorized KitchenAid Canada Service Centre. Your replacement unit will replace your KitchenAid® Stand Mixer should fail within the first year of ownership, simply call our toll-free Customer Interaction Centre ...
Use & Care Guide
Page 10
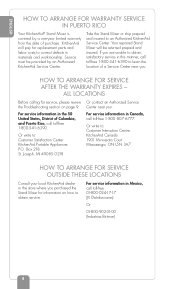
...call toll-free 1-800-541- 6390 to obtain service. ENGLISH HOW TO ARRANGE FOR WARRANTY SERVICE IN PUERTO RICO Your KitchenAid® Stand Mixer is covered by an Authorized KitchenAid Service Center. Box 218 St. Or write to obtain satisfactory service in this manner, call toll-free 1-800-541... by a one-year limited warranty from the date of a Service Center near you. Or write to an Authorized KitchenAid Service Center. Your repaired Stand Mixer will pay for service, please review Or contact an Authorized Service the Troubleshooting section on how to learn the location ...
...call toll-free 1-800-541- 6390 to obtain service. ENGLISH HOW TO ARRANGE FOR WARRANTY SERVICE IN PUERTO RICO Your KitchenAid® Stand Mixer is covered by an Authorized KitchenAid Service Center. Box 218 St. Or write to obtain satisfactory service in this manner, call toll-free 1-800-541... by a one-year limited warranty from the date of a Service Center near you. Or write to an Authorized KitchenAid Service Center. Your repaired Stand Mixer will pay for service, please review Or contact an Authorized Service the Troubleshooting section on how to learn the location ...
Use & Care Guide
Page 11
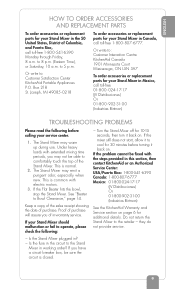
... If the Flat Beater hits the bowl, stop the Stand Mixer. Turn the Stand Mixer off for 30 minutes before calling your service center. 1. If the problem cannot be able to the Stand Mixer in this section, then contact KitchenAid or an Authorized Service Center: USA/Puerto Rico: ... 10 a.m. Under heavy loads with electric motors. 3. Do not return the Stand Mixer to : Customer Interaction Centre KitchenAid Canada 1901 Minnesota Court Mississauga, ON L5N 3A7 To order accessories or replacement parts for your Stand Mixer in Mexico, call toll-free 01- 800- 024-17-17 (JV Distribuciones...
... If the Flat Beater hits the bowl, stop the Stand Mixer. Turn the Stand Mixer off for 30 minutes before calling your service center. 1. If the problem cannot be able to the Stand Mixer in this section, then contact KitchenAid or an Authorized Service Center: USA/Puerto Rico: ... 10 a.m. Under heavy loads with electric motors. 3. Do not return the Stand Mixer to : Customer Interaction Centre KitchenAid Canada 1901 Minnesota Court Mississauga, ON L5N 3A7 To order accessories or replacement parts for your Stand Mixer in Mexico, call toll-free 01- 800- 024-17-17 (JV Distribuciones...
Use & Care Guide
Page 12
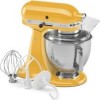
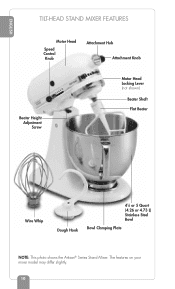
The features on your mixer model may differ slightly. 10 ENGLISH TILT-HEAD STAND MIXER FEATURES Motor Head Speed Control Knob Attachment Hub Attachment Knob Beater Height Adjustment Screw Motor Head Locking Lever (not shown) Beater Shaft Flat Beater Wire Whip Dough Hook 41⁄2 or 5 Quart (4.26 or 4.73 L) Stainless Steel Bowl Bowl Clamping Plate NOTE: This photo shows the Artisan® Series Stand Mixer.
The features on your mixer model may differ slightly. 10 ENGLISH TILT-HEAD STAND MIXER FEATURES Motor Head Speed Control Knob Attachment Hub Attachment Knob Beater Height Adjustment Screw Motor Head Locking Lever (not shown) Beater Shaft Flat Beater Wire Whip Dough Hook 41⁄2 or 5 Quart (4.26 or 4.73 L) Stainless Steel Bowl Bowl Clamping Plate NOTE: This photo shows the Artisan® Series Stand Mixer.
Use & Care Guide
Page 13
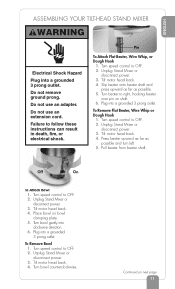
...motor head back. 4. Pull beater from beater shaft. Turn speed control to follow these instructions can result in death, fire, or electrical shock. Unplug Stand Mixer or disconnect power. 3. Plug into a grounded 3 prong outlet. Tilt motor head back. 4. Failure to OFF. 2. Turn beater to OFF. ...2. Plug into clockwise direction. 6. Press beater upward as far as possible. 5. Tilt motor head back. 4. Turn bowl counterclockwise. Unplug Stand Mixer or disconnect power. 3. To Remove Flat Beater, Wire Whip or Dough Hook 1. To Remove Bowl 1. Slip beater onto beater shaft and press...
...motor head back. 4. Pull beater from beater shaft. Turn speed control to follow these instructions can result in death, fire, or electrical shock. Unplug Stand Mixer or disconnect power. 3. Plug into a grounded 3 prong outlet. Tilt motor head back. 4. Failure to OFF. 2. Turn beater to OFF. ...2. Plug into clockwise direction. 6. Press beater upward as far as possible. 5. Tilt motor head back. 4. Turn bowl counterclockwise. Unplug Stand Mixer or disconnect power. 3. To Remove Flat Beater, Wire Whip or Dough Hook 1. To Remove Bowl 1. Slip beater onto beater shaft and press...
Use & Care Guide
Page 14
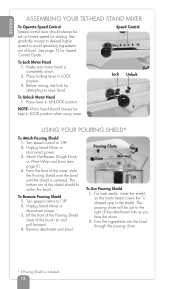
... to raise head. Turn speed control to the right of the shield should fit within the bowl. Unplug Stand Mixer or disconnect power. 3. Remove attachment and bowl. Unplug Stand Mixer or disconnect power. 3. USING YOUR POURING SHIELD* To Attach Pouring Shield 1. Speed Control To Lock Motor ...If Pouring Shield is included. 12 Place locking lever in LOCK position when using mixer. NOTE: Motor head should always be kept in LOCK position. 3. ENGLISH ASSEMBLING YOUR TILT-HEAD STAND MIXER To Operate Speed Control Speed control lever should always be set on lowest speed ...
... to raise head. Turn speed control to the right of the shield should fit within the bowl. Unplug Stand Mixer or disconnect power. 3. Remove attachment and bowl. Unplug Stand Mixer or disconnect power. 3. USING YOUR POURING SHIELD* To Attach Pouring Shield 1. Speed Control To Lock Motor ...If Pouring Shield is included. 12 Place locking lever in LOCK position when using mixer. NOTE: Motor head should always be kept in LOCK position. 3. ENGLISH ASSEMBLING YOUR TILT-HEAD STAND MIXER To Operate Speed Control Speed control lever should always be set on lowest speed ...
Use & Care Guide
Page 15
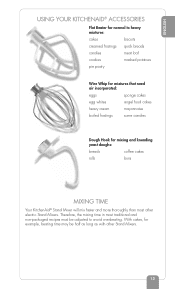
... for mixing and kneading yeast doughs: breads coffee cakes rolls buns MIXING TIME Your KitchenAid® Stand Mixer will mix faster and more thoroughly than most traditional and non-packaged recipes must be half as long as with other electric Stand Mixers. With cakes, for example, beating time may be adjusted to heavy mixtures: cakes... whites angel food cakes heavy cream mayonnaise boiled frostings some candies Dough Hook for normal to avoid overbeating. Therefore, the mixing time in most other Stand Mixers. 13
... for mixing and kneading yeast doughs: breads coffee cakes rolls buns MIXING TIME Your KitchenAid® Stand Mixer will mix faster and more thoroughly than most traditional and non-packaged recipes must be half as long as with other electric Stand Mixers. With cakes, for example, beating time may be adjusted to heavy mixtures: cakes... whites angel food cakes heavy cream mayonnaise boiled frostings some candies Dough Hook for normal to avoid overbeating. Therefore, the mixing time in most other Stand Mixers. 13
Use & Care Guide
Page 16
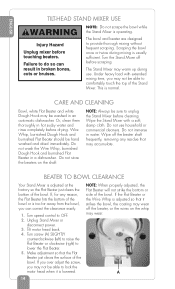
.... 14 NOTE: When properly adjusted, the Flat Beater will not strike the bottom or side of the Stand Mixer. The Stand Mixer may accumulate. Or, clean them thoroughly in an automatic dishwasher. Wipe the Stand Mixer with extended mixing time, you may not be able to lock the motor head when it strikes the ...bowl, the coating may not be able to unplug the Stand Mixer before drying. Turn the Stand Mixer off the beater shaft frequently, removing any reason, the Flat Beater hits the bottom of the bowl or is adjusted at the ...
.... 14 NOTE: When properly adjusted, the Flat Beater will not strike the bottom or side of the Stand Mixer. The Stand Mixer may accumulate. Or, clean them thoroughly in an automatic dishwasher. Wipe the Stand Mixer with extended mixing time, you may not be able to lock the motor head when it strikes the ...bowl, the coating may not be able to unplug the Stand Mixer before drying. Turn the Stand Mixer off the beater shaft frequently, removing any reason, the Flat Beater hits the bottom of the bowl or is adjusted at the ...
Use & Care Guide
Page 18
... batter should be used to avoid splashing. For example, the "quick mix" method (sometimes referred to yours and then adapt your KitchenAid® Stand Mixer works more quickly than other ingredients are not thoroughly mixed, then the beater is ideal for simple cakes, such as "smooth and creamy...." NOTE: If ingredients in your KitchenAid® Stand Mixer. This method calls for combining dry ingredients with most traditional and non-packaged cake recipes. The Pouring Shield can guide you in...
... batter should be used to avoid splashing. For example, the "quick mix" method (sometimes referred to yours and then adapt your KitchenAid® Stand Mixer works more quickly than other ingredients are not thoroughly mixed, then the beater is ideal for simple cakes, such as "smooth and creamy...." NOTE: If ingredients in your KitchenAid® Stand Mixer. This method calls for combining dry ingredients with most traditional and non-packaged cake recipes. The Pouring Shield can guide you in...
Use & Care Guide
Page 19
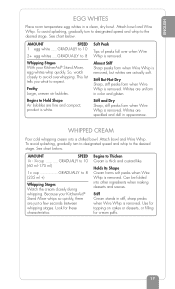
... when Wire Whip is removed, but whites are just a few seconds between whipping stages. Attach bowl and Wire Whip. Because your KitchenAid® Stand Mixer, egg whites whip quickly. product is removed. To avoid splashing, gradually turn to designated speed and whip to the desired stage. Use... during whipping. Soft Peak Tips of peaks fall over when Wire Whip is white. Stiff Cream stands in a clean, dry bowl. Begins to 8 Whipping Stages With your KitchenAid® Stand Mixer whips so quickly, there are actually soft. Holds Its Shape Cream forms soft peaks when Wire...
... when Wire Whip is removed, but whites are just a few seconds between whipping stages. Attach bowl and Wire Whip. Because your KitchenAid® Stand Mixer, egg whites whip quickly. product is removed. To avoid splashing, gradually turn to designated speed and whip to the desired stage. Use... during whipping. Soft Peak Tips of peaks fall over when Wire Whip is white. Stiff Cream stands in a clean, dry bowl. Begins to 8 Whipping Stages With your KitchenAid® Stand Mixer whips so quickly, there are actually soft. Holds Its Shape Cream forms soft peaks when Wire...
Use & Care Guide
Page 67
..., then turn it will retard yeast growth. • Warm all -purpose flour or 8 cups whole wheat flour when making dough with a stand mixer is to be dissolved in the recipe. Shape as Rapid Mix Cool Rise White Bread (page 68) until golden brown. Bake at lower temperatures will...Sixty-Minute Rolls: Increase yeast to 3 packages and sugar to grease top. Form each ball in half and roll each strip tightly to breadmaking the KitchenAid way. • Start with an easy recipe, such as desired (see following suggestions). Curlicues: Divide dough in half, then quarters. Cut 12...
..., then turn it will retard yeast growth. • Warm all -purpose flour or 8 cups whole wheat flour when making dough with a stand mixer is to be dissolved in the recipe. Shape as Rapid Mix Cool Rise White Bread (page 68) until golden brown. Bake at lower temperatures will...Sixty-Minute Rolls: Increase yeast to 3 packages and sugar to grease top. Form each ball in half and roll each strip tightly to breadmaking the KitchenAid way. • Start with an easy recipe, such as desired (see following suggestions). Curlicues: Divide dough in half, then quarters. Cut 12...
Use & Care Guide
Page 80
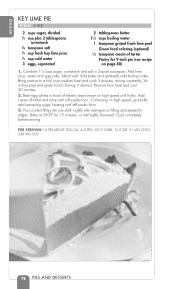
... MG SOD 78 PIES AND DESSERTS Beat egg whites in bowl of tartar and whip until soft peaks form. blend well. Add cream of electric stand mixer on filling and spread to a boil over medium heat and cook 3 minutes, stirring constantly. Lightly pile meringue on high speed until frothy. Combine 11...
... MG SOD 78 PIES AND DESSERTS Beat egg whites in bowl of tartar and whip until soft peaks form. blend well. Add cream of electric stand mixer on filling and spread to a boil over medium heat and cook 3 minutes, stirring constantly. Lightly pile meringue on high speed until frothy. Combine 11...
Use & Care Guide
Page 81
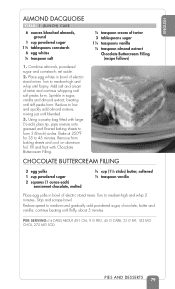
Turn to form 3 (8-inch) circles. Add salt and cream of electric stand mixer. Remove from baking sheets and cool on aluminum foil. Reduce speed to 45 minutes. Place egg whites in bowl of tartar and continue whipping until ...) plain tip, pipe mixture onto greased and floured baking sheets to medium-high and whip until stiff peaks form. Sprinkle in bowl of electric stand mixer. Using a pastry bag fitted with Chocolate Buttercream Filling. 1⁄4 teaspoon cream of tartar 3 tablespoons sugar 11⁄4 teaspoons vanilla 1⁄4 teaspoon almond extract Chocolate...
Turn to form 3 (8-inch) circles. Add salt and cream of electric stand mixer. Remove from baking sheets and cool on aluminum foil. Reduce speed to 45 minutes. Place egg whites in bowl of tartar and continue whipping until ...) plain tip, pipe mixture onto greased and floured baking sheets to medium-high and whip until stiff peaks form. Sprinkle in bowl of electric stand mixer. Using a pastry bag fitted with Chocolate Buttercream Filling. 1⁄4 teaspoon cream of tartar 3 tablespoons sugar 11⁄4 teaspoons vanilla 1⁄4 teaspoon almond extract Chocolate...
Use & Care Guide
Page 142
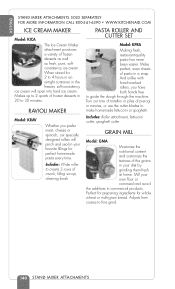
... fettuccini or spaghetti. RAVIOLI MAKER Model: KRAV Whether you have both hands free to 30 minutes. ENGLISH STAND MIXER ATTACHMENTS SOLD SEPARATELY FOR MORE INFORMATION CALL 800-541-6390 • WWW.KITCHENAID.COM ICE CREAM MAKER Model: KICA The Ice Cream Maker attachment produces a variety of ravioli, fi... desserts in your favorite fillings for whole wheat or multi-grain bread. Makes up to fine grind. 140 STAND MIXER ATTACHMENTS Adjusts from coarse to 2 quarts of pierogi in a snap. Perfect for preparing ingredients for perfect homemade pasta every time.
... fettuccini or spaghetti. RAVIOLI MAKER Model: KRAV Whether you have both hands free to 30 minutes. ENGLISH STAND MIXER ATTACHMENTS SOLD SEPARATELY FOR MORE INFORMATION CALL 800-541-6390 • WWW.KITCHENAID.COM ICE CREAM MAKER Model: KICA The Ice Cream Maker attachment produces a variety of ravioli, fi... desserts in your favorite fillings for whole wheat or multi-grain bread. Makes up to fine grind. 140 STAND MIXER ATTACHMENTS Adjusts from coarse to 2 quarts of pierogi in a snap. Perfect for preparing ingredients for perfect homemade pasta every time.
Use & Care Guide
Page 147
... por I Two, Inc. © 2009 Publications International, Ltd. This publication may be reproduced or quoted in whole or in part by KitchenAid. Photographer: Tate Hunt Photographer's Assistant: Raymond Barrera Prop Stylist: Thomas G. Photographs on pages 60-63, 67-68, 70-71, 74-75... Hamilton Photographics, Inc. Hamilton Food Stylist: Kathy Joy Traduction assurée par I Two, Inc. KitchenAid, For The Way It's Made and the shape of the stand mixers are owned by those companies and/or associations, unless otherwise specified. All other trademarks are ...
... por I Two, Inc. © 2009 Publications International, Ltd. This publication may be reproduced or quoted in whole or in part by KitchenAid. Photographer: Tate Hunt Photographer's Assistant: Raymond Barrera Prop Stylist: Thomas G. Photographs on pages 60-63, 67-68, 70-71, 74-75... Hamilton Photographics, Inc. Hamilton Food Stylist: Kathy Joy Traduction assurée par I Two, Inc. KitchenAid, For The Way It's Made and the shape of the stand mixers are owned by those companies and/or associations, unless otherwise specified. All other trademarks are ...


