User Guide
Page 3
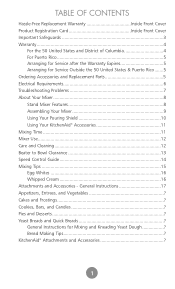
... Replacement Parts 5 Electrical Requirements 6 Troubleshooting Problems 7 About Your Mixer 8 Stand Mixer Features 8 Assembling Your Mixer 9 Using Your Pouring Shield 10 Using Your KitchenAid® Accessories 11 Mixing Time 11 Mixer Use 12 Care and Cleaning 12 Beater to Bowl Clearance 13 Speed Control Guide 14 Mixing Tips 15 Egg Whites 16 Whipped Cream 16 Attachments and Accessories -
... Replacement Parts 5 Electrical Requirements 6 Troubleshooting Problems 7 About Your Mixer 8 Stand Mixer Features 8 Assembling Your Mixer 9 Using Your Pouring Shield 10 Using Your KitchenAid® Accessories 11 Mixing Time 11 Mixer Use 12 Care and Cleaning 12 Beater to Bowl Clearance 13 Speed Control Guide 14 Mixing Tips 15 Egg Whites 16 Whipped Cream 16 Attachments and Accessories -
User Guide
Page 5
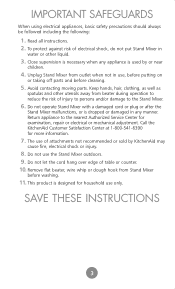
... water or other utensils away from Stand Mixer before cleaning. 5. Keep hands, hair, clothing, as well as spatulas and other liquid. 3. Call the KitchenAid Customer Satisfaction Center at 1-800-541-6390 for examination, repair or electrical or mechanical adjustment. Do not let the cord hang over edge of attachments not recommended or sold by...
... water or other utensils away from Stand Mixer before cleaning. 5. Keep hands, hair, clothing, as well as spatulas and other liquid. 3. Call the KitchenAid Customer Satisfaction Center at 1-800-541-6390 for examination, repair or electrical or mechanical adjustment. Do not let the cord hang over edge of attachments not recommended or sold by...
User Guide
Page 7
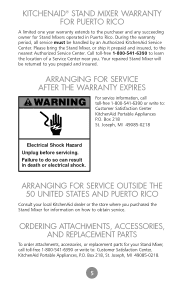
... be returned to the nearest Authorized Service Center. Please bring the Stand Mixer, or ship it prepaid and insured, to you prepaid and insured. Joseph, MI 49085-0218. 5 ORDERING ATTACHMENTS, ACCESSORIES, AND REPLACEMENT PARTS To order attachments, accessories, or replacement parts for your local KitchenAid dealer or the store where you . ARRANGING FOR SERVICE AFTER...
... be returned to the nearest Authorized Service Center. Please bring the Stand Mixer, or ship it prepaid and insured, to you prepaid and insured. Joseph, MI 49085-0218. 5 ORDERING ATTACHMENTS, ACCESSORIES, AND REPLACEMENT PARTS To order attachments, accessories, or replacement parts for your local KitchenAid dealer or the store where you . ARRANGING FOR SERVICE AFTER...
User Guide
Page 10
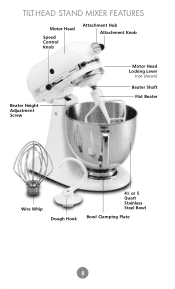
TILT-HEAD STAND MIXER FEATURES Motor Head Speed Control Knob Attachment Hub Attachment Knob Beater Height Adjustment Screw Motor Head Locking Lever (not shown) Beater Shaft Flat Beater Wire Whip Dough Hook 41⁄2 or 5 Quart Stainless Steel Bowl Bowl Clamping Plate 8
TILT-HEAD STAND MIXER FEATURES Motor Head Speed Control Knob Attachment Hub Attachment Knob Beater Height Adjustment Screw Motor Head Locking Lever (not shown) Beater Shaft Flat Beater Wire Whip Dough Hook 41⁄2 or 5 Quart Stainless Steel Bowl Bowl Clamping Plate 8

User Guide
Page 11
...See page 14 for starting, then gradually moved to desired higher speed to do so can result in LOCK position when using mixer. ASSEMBLING YOUR TILT-HEAD STAND MIXER To Attach Bowl 1. Tilt motor head back. 4. Turn bowl gently into proper electrical outlet.** To Remove Flat Beater, Wire Whip or... Dough Hook 1. To Attach Flat Beater, Wire Whip, or Dough Hook Failure to avoid splashing ingredients out of bowl. Turn beater to OFF. ...
...See page 14 for starting, then gradually moved to desired higher speed to do so can result in LOCK position when using mixer. ASSEMBLING YOUR TILT-HEAD STAND MIXER To Attach Bowl 1. Tilt motor head back. 4. Turn bowl gently into proper electrical outlet.** To Remove Flat Beater, Wire Whip or... Dough Hook 1. To Attach Flat Beater, Wire Whip, or Dough Hook Failure to avoid splashing ingredients out of bowl. Turn beater to OFF. ...
User Guide
Page 12
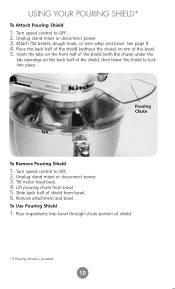
...speed control to lock into bowl through chute portion of the bowl. 5. Lift pouring chute from bowl. 6. To Use Pouring Shield 1. Unplug stand mixer or disconnect power. 3. See page 9. 4. Remove attachment and bowl. Pour ingredients into place. Turn speed control to OFF. 2. Slide back half of the shield, then lower the shield to... OFF. 2. Place the back half of the shield (without the chute) on the back half of shield from bowl. 5. Attach flat beater, dough hook, or wire whip and bowl. Tilt motor head back. 4. USING YOUR POURING SHIELD* To...
...speed control to lock into bowl through chute portion of the bowl. 5. Lift pouring chute from bowl. 6. To Use Pouring Shield 1. Unplug stand mixer or disconnect power. 3. See page 9. 4. Remove attachment and bowl. Pour ingredients into place. Turn speed control to OFF. 2. Slide back half of the shield, then lower the shield to... OFF. 2. Place the back half of the shield (without the chute) on the back half of shield from bowl. 5. Attach flat beater, dough hook, or wire whip and bowl. Tilt motor head back. 4. USING YOUR POURING SHIELD* To...
User Guide
Page 18
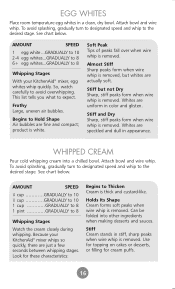
...Cream forms soft peaks when wire whip is removed. product is removed. See chart below . Look for cream puffs. 16 16 Stiff Cream stands in a clean, dry bowl. To avoid splashing, gradually turn to designated speed and whip to Hold Shape Air bubbles are fine and compact...stage. To avoid splashing, gradually turn to designated speed and whip to 8 Whipping Stages With your KitchenAid® mixer whips so quickly, there are speckled and dull in color and glisten. Attach bowl and wire whip. Begins to the desired stage. Stiff but whites are uniform in appearance. ...
...Cream forms soft peaks when wire whip is removed. product is removed. See chart below . Look for cream puffs. 16 16 Stiff Cream stands in a clean, dry bowl. To avoid splashing, gradually turn to designated speed and whip to Hold Shape Air bubbles are fine and compact...stage. To avoid splashing, gradually turn to designated speed and whip to 8 Whipping Stages With your KitchenAid® mixer whips so quickly, there are speckled and dull in color and glisten. Attach bowl and wire whip. Begins to the desired stage. Stiff but whites are uniform in appearance. ...


