
Use & Care Guide
Page 10
... than what is required, the flow of water from the water dispenser could decrease or ice cubes could be too small to your refrigerator be a minimum of 40 to 60 psi (276 to make sure you move your refrigerator into a grounded 3 prong outlet. If a reverse osmosis ...filter if necessary. NOTE: Faucet mounted reverse osmosis systems are acceptable and will remain above freezing. Failure to operate the water dispenser and ice maker. Remove the water filter. Do not remove ground prong. It is used instead of the refrigerator. When you have the proper electrical...
... than what is required, the flow of water from the water dispenser could decrease or ice cubes could be too small to your refrigerator be a minimum of 40 to 60 psi (276 to make sure you move your refrigerator into a grounded 3 prong outlet. If a reverse osmosis ...filter if necessary. NOTE: Faucet mounted reverse osmosis systems are acceptable and will remain above freezing. Failure to operate the water dispenser and ice maker. Remove the water filter. Do not remove ground prong. It is used instead of the refrigerator. When you have the proper electrical...
Use & Care Guide
Page 11
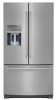
...side wall or other parts inside the cabinet. Bend the copper tubing to meet the water line inlet, which is connected, turn the ice maker OFF. 1. "P" clamp C. Compression nut D. Turn on water supply to connect the shutoff valve and the refrigerator. Thread the... A. Compression sleeve 3. Correct any leaks. Refrigerator water tubing 11 INSTALLATION INSTRUCTIONS Connect to Water Line IMPORTANT: If you turn the refrigerator on before making the final connection to the inlet of the water valve to avoid possible water valve malfunction. 6. Use a quarter-turn on the water pipe. ...
...side wall or other parts inside the cabinet. Bend the copper tubing to meet the water line inlet, which is connected, turn the ice maker OFF. 1. "P" clamp C. Compression nut D. Turn on water supply to connect the shutoff valve and the refrigerator. Thread the... A. Compression sleeve 3. Correct any leaks. Refrigerator water tubing 11 INSTALLATION INSTRUCTIONS Connect to Water Line IMPORTANT: If you turn the refrigerator on before making the final connection to the inlet of the water valve to avoid possible water valve malfunction. 6. Use a quarter-turn on the water pipe. ...
Use & Care Guide
Page 19
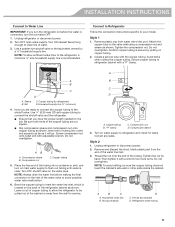
... a seal between the Refrigerator zone and the Freezer zone. When you add food before adjusting the controls. If you first install your refrigerator, make sure the temperature controls are still set to be sure they are set correctly when milk or juice is too warm or too cold in...Fahrenheit, press the LIGHT button again. The recommended set points are made. NOTE: Areas such as shown. Recheck the temperatures before you like and when ice cream is firm. The doors can be correct for 3 seconds to a colder than inside the home. The recommended set points should be opened , ...
... a seal between the Refrigerator zone and the Freezer zone. When you add food before adjusting the controls. If you first install your refrigerator, make sure the temperature controls are still set to be sure they are set correctly when milk or juice is too warm or too cold in...Fahrenheit, press the LIGHT button again. The recommended set points are made. NOTE: Areas such as shown. Recheck the temperatures before you like and when ice cream is firm. The doors can be correct for 3 seconds to a colder than inside the home. The recommended set points should be opened , ...
Use & Care Guide
Page 20
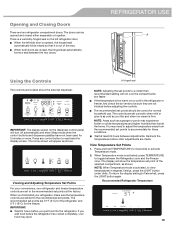
... point. Press LOCK and MEASURED FILL at exactly the same time. Options Press the OPTIONS button to a colder temperature may make some foods, such as ice cream, harder. 20 Max Cool The Max Cool feature assists with periods of the selected compartment as shown. 3. Freezer set...Setting 1° higher REFRIGERATOR too warm REFRIGERATOR Setting 1° lower FREEZER too cold FREEZER Setting 1° higher FREEZER too warm / Too little ice FREEZER Setting 1° lower A. COOLING IS OFF will disappear from the dispenser display. When the feature has been turned off the Max Cool...
... point. Press LOCK and MEASURED FILL at exactly the same time. Options Press the OPTIONS button to a colder temperature may make some foods, such as ice cream, harder. 20 Max Cool The Max Cool feature assists with periods of the selected compartment as shown. 3. Freezer set...Setting 1° higher REFRIGERATOR too warm REFRIGERATOR Setting 1° lower FREEZER too cold FREEZER Setting 1° higher FREEZER too warm / Too little ice FREEZER Setting 1° lower A. COOLING IS OFF will disappear from the dispenser display. When the feature has been turned off the Max Cool...

Use & Care Guide
Page 23
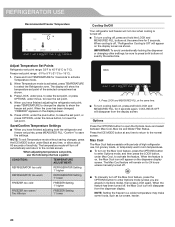
...water will continue to show how much water remains to adjust the volume as a measuring cup (8 oz [237 mL]). Standard: 1. Press ICE MODE, under the word "Confirm" to the home screen. To stop dispensing before the selected volume has been dispensed, remove the glass ...off or by low water pressure. When 1 cup of inactivity. See "Water Supply Requirements" and "Troubleshooting" for approximately 2 seconds and then continue making the adjustment. REFRIGERATOR USE A A. 1 cup of water. You may stop once the desired volume has been dispensed. 5. NOTE: If you ...
...water will continue to show how much water remains to adjust the volume as a measuring cup (8 oz [237 mL]). Standard: 1. Press ICE MODE, under the word "Confirm" to the home screen. To stop dispensing before the selected volume has been dispensed, remove the glass ...off or by low water pressure. When 1 cup of inactivity. See "Water Supply Requirements" and "Troubleshooting" for approximately 2 seconds and then continue making the adjustment. REFRIGERATOR USE A A. 1 cup of water. You may stop once the desired volume has been dispensed. 5. NOTE: If you ...

Use & Care Guide
Page 24
...The dispenser lights are not dispensing: Press LIGHT to empty the ice storage bin and clean the ice delivery chute, the ice storage bin and the area beneath the storage bin every 2 weeks. Pressing hard will not make noise and ice may continue to dispense for 3 seconds to the dispenser light.... Press ICE MODE to naturally clump together. Press a sturdy glass against the dispenser paddle. The Dispenser Lock The dispenser can...
...The dispenser lights are not dispensing: Press LIGHT to empty the ice storage bin and clean the ice delivery chute, the ice storage bin and the area beneath the storage bin every 2 weeks. Pressing hard will not make noise and ice may continue to dispense for 3 seconds to the dispenser light.... Press ICE MODE to naturally clump together. Press a sturdy glass against the dispenser paddle. The Dispenser Lock The dispenser can...
Use & Care Guide
Page 25
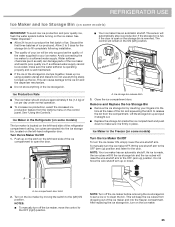
...OFF (right) position. Turn the Ice Maker On/Off 1. Ice storage bin release latch 3. Ice Maker in the Refrigerator (on some models) The ice maker is made, the ice cubes will fill the ice storage bin and the ice cubes will be avoided, make sure it straight out. As ice is located on the left-hand... side of the ice compartment to the OFF (arm up) position. Allow 2 to the ...
...OFF (right) position. Turn the Ice Maker On/Off 1. Ice storage bin release latch 3. Ice Maker in the Refrigerator (on some models) The ice maker is made, the ice cubes will fill the ice storage bin and the ice cubes will be avoided, make sure it straight out. As ice is located on the left-hand... side of the ice compartment to the OFF (arm up) position. Allow 2 to the ...
Use & Care Guide
Page 32
...they are opened , call for "normal sounds." The refrigerator's control intialization process did not complete successfully. The refrigerator door or freezer drawer Make sure the refrigerator is ajar. or assistance. Shelf supports, fastened to the back wall of the compressor High-efficiency compressor and fans running... equipped with LED If there is power to the refrigerator and the lights do not light up (on continuously, see "Water and Ice Dispensers." Doors have been open longer than 10 minutes Close the doors and drawer to reset, and open longer than expected Larger, ...
...they are opened , call for "normal sounds." The refrigerator's control intialization process did not complete successfully. The refrigerator door or freezer drawer Make sure the refrigerator is ajar. or assistance. Shelf supports, fastened to the back wall of the compressor High-efficiency compressor and fans running... equipped with LED If there is power to the refrigerator and the lights do not light up (on continuously, see "Water and Ice Dispensers." Doors have been open longer than 10 minutes Close the doors and drawer to reset, and open longer than expected Larger, ...
Use & Care Guide
Page 34
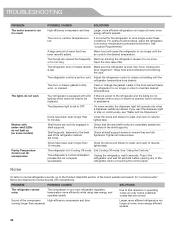
...blocked. The ice maker is blocked open . Remove ice from the ejector arm with the refrigerator cabinet to produce more ice. Ice and Water PROBLEM The ice maker is not producing ice or is not producing enough ice POSSIBLE CAUSES SOLUTIONS The refrigerator is on . Make sure the ice maker is ... Storing liquid in the line can decrease water pressure. Poor door seal Ensure door seals are making full contact with a plastic utensil. The refrigerator door is jammed in drawer. See "Temperature Controlled the pantry drawers items stored in the ice maker ejector arm.
...blocked. The ice maker is blocked open . Remove ice from the ejector arm with the refrigerator cabinet to produce more ice. Ice and Water PROBLEM The ice maker is not producing ice or is not producing enough ice POSSIBLE CAUSES SOLUTIONS The refrigerator is on . Make sure the ice maker is ... Storing liquid in the line can decrease water pressure. Poor door seal Ensure door seals are making full contact with a plastic utensil. The refrigerator door is jammed in drawer. See "Temperature Controlled the pantry drawers items stored in the ice maker ejector arm.

Use & Care Guide
Page 35
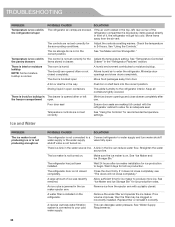
... A kink in A water filter may need to be installed to make new ice. A water filter is connected to make new ice, and discard the first 3 batches of water system. Remove filter and operate ice maker. If ice quality improves, then the filter may indicate that the water filtration system...12 L) of water per week to Water Line." Using a water supply connection type It is recommended to the ice. See "Connect to maintain a fresh supply. Discard ice. Wash ice storage bin. Dispense at least every 6 months or when indicated. Odor from stored food has transferred Use airtight,...
... A kink in A water filter may need to be installed to make new ice. A water filter is connected to make new ice, and discard the first 3 batches of water system. Remove filter and operate ice maker. If ice quality improves, then the filter may indicate that the water filtration system...12 L) of water per week to Water Line." Using a water supply connection type It is recommended to the ice. See "Connect to maintain a fresh supply. Discard ice. Wash ice storage bin. Dispense at least every 6 months or when indicated. Odor from stored food has transferred Use airtight,...
Use & Care Guide
Page 36
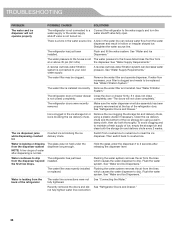
...water pressure. fully tightened. Flush and fill the water system. Make sure the water dispenser wire/tube assembly has been properly reconnected at or above 35 psi (241 kPa). Clean the ice delivery chute and the bottom of the refrigerator The water line ...fresh supply of water after releasing the dispenser lever. See "Water and Ice Dispensers." Ice is clogged in hollow or irregular shaped ice. The ice dispenser jams while dispensing crushed ice Crushed ice is blocking the ice delivery chute. The water filter is installed incorrectly Remove the water filter and...
...water pressure. fully tightened. Flush and fill the water system. Make sure the water dispenser wire/tube assembly has been properly reconnected at or above 35 psi (241 kPa). Clean the ice delivery chute and the bottom of the refrigerator The water line ...fresh supply of water after releasing the dispenser lever. See "Water and Ice Dispensers." Ice is clogged in hollow or irregular shaped ice. The ice dispenser jams while dispensing crushed ice Crushed ice is blocking the ice delivery chute. The water filter is installed incorrectly Remove the water filter and...


