
User Guide
Page 1
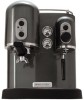
INTRODUCTION P R O L I N E™ S E R I E S MODEL KPES100 ESPRESSO MACHINE Introduction Section Contents Table of Contents 3 Espresso Machine Safety 4 Important Safeguards 5 Proof of Purchase & Registration.........6 Electrical Requirements 7 1
INTRODUCTION P R O L I N E™ S E R I E S MODEL KPES100 ESPRESSO MACHINE Introduction Section Contents Table of Contents 3 Espresso Machine Safety 4 Important Safeguards 5 Proof of Purchase & Registration.........6 Electrical Requirements 7 1
User Guide
Page 2
... discriminating home chef. Instead of simple indicator lights, dial gauges provide a continuous readout of pressure perfect espresso demands. The outstanding style and performance of the PRO LINE™ Series Espresso Machine is matched by its legendary craftsmanship. 2 The KitchenAid® PRO LINE™ Series: commercial quality for brewing and frothing provide an immense workspace. A 3-way solenoid valve instantly...
... discriminating home chef. Instead of simple indicator lights, dial gauges provide a continuous readout of pressure perfect espresso demands. The outstanding style and performance of the PRO LINE™ Series Espresso Machine is matched by its legendary craftsmanship. 2 The KitchenAid® PRO LINE™ Series: commercial quality for brewing and frothing provide an immense workspace. A 3-way solenoid valve instantly...

User Guide
Page 3
... of Purchase & Product Registration 6 Electrical Requirements 7 FEATURES AND OPERATION Espresso Machine Features 10 Preparing the Espresso Machine for Use Attaching the Cup Rail 13 Removing & Washing the Reservoir 13 Filling the Boilers 13 Brewing Espresso 16 Frothing & Steaming Milk 19 Preparing Cappuccino 20 Preparing Café... Latte 21 Dispensing Hot Water 22 Care & Cleaning Before Cleaning the Espresso Machine 23 Cleaning the Frothing Arm & Nozzle 23 Cleaning the Housing, Filters, & Trays 23 Cleaning the Shower Screen 24...
... of Purchase & Product Registration 6 Electrical Requirements 7 FEATURES AND OPERATION Espresso Machine Features 10 Preparing the Espresso Machine for Use Attaching the Cup Rail 13 Removing & Washing the Reservoir 13 Filling the Boilers 13 Brewing Espresso 16 Frothing & Steaming Milk 19 Preparing Cappuccino 20 Preparing Café... Latte 21 Dispensing Hot Water 22 Care & Cleaning Before Cleaning the Espresso Machine 23 Cleaning the Frothing Arm & Nozzle 23 Cleaning the Housing, Filters, & Trays 23 Cleaning the Shower Screen 24...

User Guide
Page 4
... symbol and either the word "DANGER" or "WARNING." These words mean: You can be killed or seriously injured if you and others are not followed. 4 ESPRESSO MACHINE SAFETY Your safety and the safety of injury, and tell you what can kill or hurt you don't immediately follow instructions. This is , tell you...
... symbol and either the word "DANGER" or "WARNING." These words mean: You can be killed or seriously injured if you and others are not followed. 4 ESPRESSO MACHINE SAFETY Your safety and the safety of injury, and tell you what can kill or hurt you don't immediately follow instructions. This is , tell you...

User Guide
Page 6
... your product registration card packed with the provisions of the Consumer Product Safety Act. Proof of purchase will enable us to contact you use your Espresso Machine, please fill out and mail your Espresso Machine. Before you in the unlikely event of a product safety notification and assist us in -warranty service.
... your product registration card packed with the provisions of the Consumer Product Safety Act. Proof of purchase will enable us to contact you use your Espresso Machine, please fill out and mail your Espresso Machine. Before you in the unlikely event of a product safety notification and assist us in -warranty service.
User Guide
Page 7
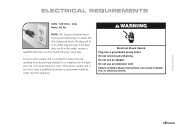
To reduce the risk of electrical shock, this plug will fit in any way. Do not use an extension cord. Hertz: 60 Hz NOTE: This Espresso Machine has a 3 prong grounded plug. Do not modify the plug in an outlet only one way. A short power-supply cord is too short, have a qualified electrician ...
To reduce the risk of electrical shock, this plug will fit in any way. Do not use an extension cord. Hertz: 60 Hz NOTE: This Espresso Machine has a 3 prong grounded plug. Do not modify the plug in an outlet only one way. A short power-supply cord is too short, have a qualified electrician ...
User Guide
Page 9
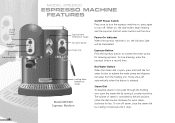
FEATURES AND OPERATION P R O L I N E™ S E R I E S FEATURES AND OPERATION Features and Operation Section Contents Espresso Machine Features 10 Preparing for Use 13 Brewing Espresso 16 Frothing & Steaming Milk 19 Preparing Cappuccino 20 Preparing Café Latte 21 Dispensing Hot Water 22 Care & Cleaning 23 Troubleshooting 26 9
FEATURES AND OPERATION P R O L I N E™ S E R I E S FEATURES AND OPERATION Features and Operation Section Contents Espresso Machine Features 10 Preparing for Use 13 Brewing Espresso 16 Frothing & Steaming Milk 19 Preparing Cappuccino 20 Preparing Café Latte 21 Dispensing Hot Water 22 Care & Cleaning 23 Troubleshooting 26 9
User Guide
Page 10
...close the steam dial by turning it stops. To stop brewing, press the espresso button a second time. On/Off Power Switch Power-On Indicator Espresso Button 10 MODEL KPES100 ESPRESSO MACHINE FEATURES Espresso Boiler Temperature Gauge Hot Water Button On/Off Power Switch Press once to ...turn the espresso machine on, press again to turn off . Power-On Indicator When the espresso machine is open the steam dial by...
...close the steam dial by turning it stops. To stop brewing, press the espresso button a second time. On/Off Power Switch Power-On Indicator Espresso Button 10 MODEL KPES100 ESPRESSO MACHINE FEATURES Espresso Boiler Temperature Gauge Hot Water Button On/Off Power Switch Press once to ...turn the espresso machine on, press again to turn off . Power-On Indicator When the espresso machine is open the steam dial by...

User Guide
Page 12
... The small basket also accommodates paper coffee pods. The shower-screen brush will help keep the brew head and shower screen free of espresso, and the large capacity basket for a single shot (1 oz.) of grounds. The portafilter can be removed immediately after brewing without ... and brewing. Boiler heating elements never touch water: they are located on the outside of pressure that perfect espresso demands. 12 MODEL KPES100 ESPRESSO MACHINE FEATURES Portafilter Commercial-size portafilter features chrome-plated brass construction and an easy-to the right. Filter Baskets Stainless...
... The small basket also accommodates paper coffee pods. The shower-screen brush will help keep the brew head and shower screen free of espresso, and the large capacity basket for a single shot (1 oz.) of grounds. The portafilter can be removed immediately after brewing without ... and brewing. Boiler heating elements never touch water: they are located on the outside of pressure that perfect espresso demands. 12 MODEL KPES100 ESPRESSO MACHINE FEATURES Portafilter Commercial-size portafilter features chrome-plated brass construction and an easy-to the right. Filter Baskets Stainless...
User Guide
Page 13
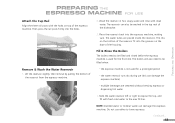
...top, and fill with the holes on the base of the espresso machine. Continued... 13 PREPARING THE ESPRESSO MACHINE FOR USE FEATURES AND OPERATION Attach the Cup Rail Align the three rail posts with fresh cold water to the max fill line. Wash the reservoir in the top rack of the reservoir from... the espresso machine. 2. Remove & Wash the Water Reservoir 1. The boilers will also need to be filled and rinsed before...
...top, and fill with the holes on the base of the espresso machine. Continued... 13 PREPARING THE ESPRESSO MACHINE FOR USE FEATURES AND OPERATION Attach the Cup Rail Align the three rail posts with fresh cold water to the max fill line. Wash the reservoir in the top rack of the reservoir from... the espresso machine. 2. Remove & Wash the Water Reservoir 1. The boilers will also need to be filled and rinsed before...

User Guide
Page 14
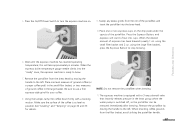
... cord receptacle in death, fire, or electrical shock. 2. PREPARING THE ESPRESSO MACHINE FOR USE WARNING 4. Do not use an adapter. Insert the end of the espresso machine. 5. When the espresso machine is closed by rotating it clockwise as far as possible. Failure to turn the espresso machine on indicator will illuminate, the dual boilers will begin heating, and...
... cord receptacle in death, fire, or electrical shock. 2. PREPARING THE ESPRESSO MACHINE FOR USE WARNING 4. Do not use an adapter. Insert the end of the espresso machine. 5. When the espresso machine is closed by rotating it clockwise as far as possible. Failure to turn the espresso machine on indicator will illuminate, the dual boilers will begin heating, and...

User Guide
Page 15
... close the Steam Dial by turning it is not necessary to wait for use . 11.If no espresso is now ready for the boiler to heat. Do not attach the portafilter to turn the espresso machine off. 8. Place the frothing pitcher under the nozzle of the frothing arm. After a few seconds, ...water will start flowing from the brew head. NOTE: Do not press the Espresso or Hot Water Buttons without water in the reservoir. it ...
... close the Steam Dial by turning it is not necessary to wait for use . 11.If no espresso is now ready for the boiler to heat. Do not attach the portafilter to turn the espresso machine off. 8. Place the frothing pitcher under the nozzle of the frothing arm. After a few seconds, ...water will start flowing from the brew head. NOTE: Do not press the Espresso or Hot Water Buttons without water in the reservoir. it ...
User Guide
Page 17
... "Leveling" and "Tamping" on page 32 and 33 for your coffee. 8. Remove the portafilter by moving the handle to turn the espresso machine on the drip plate under the spouts of the portafilter. FEATURES AND OPERATION 6. Remove the portafilter from the brew head by moving the handle...grind for details. Make sure the surface of the portafilter, and insert the portafilter into the "ready" zone, the espresso machine is equipped with a twisting motion. The espresso machine is ready to brew. 7. When knocking coffee grounds from the rim of the coffee is switched off, so the ...
... "Leveling" and "Tamping" on page 32 and 33 for your coffee. 8. Remove the portafilter by moving the handle to turn the espresso machine on the drip plate under the spouts of the portafilter. FEATURES AND OPERATION 6. Remove the portafilter from the brew head by moving the handle...grind for details. Make sure the surface of the portafilter, and insert the portafilter into the "ready" zone, the espresso machine is equipped with a twisting motion. The espresso machine is ready to brew. 7. When knocking coffee grounds from the rim of the coffee is switched off, so the ...
User Guide
Page 19
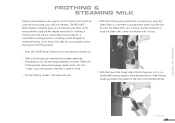
... take approximately 6 minutes. When the frothing boiler temperature gauge needle climbs into an empty cup, open the Steam Dial, turn the espresso machine on. 2. To open the Steam Dial for a comfortable working position, and submerse the tip of the frothing nozzle just below the...the frothing arm so it stops. 1. With the frothing arm pointed into the "ready" zone, the espresso machine is ready to purge excess water from the line. The PRO LINE™ Series Espresso Machine gives you all the tools you need: an 81⁄2 ounce stainless steel pitcher shaped especially for ...
... take approximately 6 minutes. When the frothing boiler temperature gauge needle climbs into an empty cup, open the Steam Dial, turn the espresso machine on. 2. To open the Steam Dial for a comfortable working position, and submerse the tip of the frothing nozzle just below the...the frothing arm so it stops. 1. With the frothing arm pointed into the "ready" zone, the espresso machine is ready to purge excess water from the line. The PRO LINE™ Series Espresso Machine gives you all the tools you need: an 81⁄2 ounce stainless steel pitcher shaped especially for ...
User Guide
Page 21
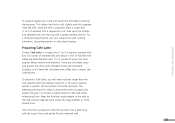
...about 1⁄4-inch of foamed milk. Preparing Café Latte A basic Café Latte is to impart a velvety texture to 2 ounces of espresso into a cappuccino cup, then pour the frothed and steamed milk into a latte mug, add the syrup if any, and gently fill with a ... AND OPERATION To prepare cappuccino, froth and steam the milk before brewing the espresso. For a show-stopping flourish, top your cappuccino with cold milk. The steaming technique for lattes is almost the same as cappuccino, except the goal is a single shot (1 oz.) of espresso topped with the espresso machine.
...about 1⁄4-inch of foamed milk. Preparing Café Latte A basic Café Latte is to impart a velvety texture to 2 ounces of espresso into a cappuccino cup, then pour the frothed and steamed milk into a latte mug, add the syrup if any, and gently fill with a ... AND OPERATION To prepare cappuccino, froth and steam the milk before brewing the espresso. For a show-stopping flourish, top your cappuccino with cold milk. The steaming technique for lattes is almost the same as cappuccino, except the goal is a single shot (1 oz.) of espresso topped with the espresso machine.
User Guide
Page 22
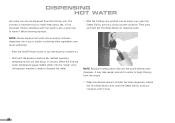
...Residual frothing steam may take about 6 minutes. With the frothing arm pointed into an empty container - dispensing into the "ready" zone, the espresso machine is also a great way to begin flowing from the frothing arm. NOTE: Always dispense hot water into an empty cup, open the Steam Dial... by turning it clockwise until the espresso machine has reached operating temperature; DISPENSING HOT WATER Hot water can also be dispensed from the nozzle. 4. When the desired amount of water ...
...Residual frothing steam may take about 6 minutes. With the frothing arm pointed into an empty container - dispensing into the "ready" zone, the espresso machine is also a great way to begin flowing from the frothing arm. NOTE: Always dispense hot water into an empty cup, open the Steam Dial... by turning it clockwise until the espresso machine has reached operating temperature; DISPENSING HOT WATER Hot water can also be dispensed from the nozzle. 4. When the desired amount of water ...
User Guide
Page 23
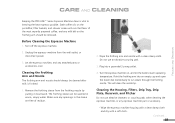
... frothing arm should always be washed in the sleeve are free of the most expertly prepared coffee, and any espresso machine part or accessory. • Wipe the espresso machine housing with a clean damp cloth and dry with a clean damp cloth. Point the frothing arm into a ...portafilter, filter baskets, and shower screen will clean the nozzle tip. Continued... 23 Before Cleaning the Espresso Machine 1. CARE AND CLEANING FEATURES AND OPERATION Keeping the PRO LINE™ Series Espresso Machine clean is frothed. 1. Wipe the frothing arm and nozzle with a soft cloth. Stale coffee ...
... frothing arm should always be washed in the sleeve are free of the most expertly prepared coffee, and any espresso machine part or accessory. • Wipe the espresso machine housing with a clean damp cloth and dry with a clean damp cloth. Point the frothing arm into a ...portafilter, filter baskets, and shower screen will clean the nozzle tip. Continued... 23 Before Cleaning the Espresso Machine 1. CARE AND CLEANING FEATURES AND OPERATION Keeping the PRO LINE™ Series Espresso Machine clean is frothed. 1. Wipe the frothing arm and nozzle with a soft cloth. Stale coffee ...

User Guide
Page 25
...Periods of Non-Use For the best tasting espresso, prime the espresso machine with fresh water after a long period of the reservoir, alternating between the brew head and frothing arm. Fill the boilers with fresh water to the max fill line. 2. For instructions, see "Fill and Rinse... deposits ("scale") from the brew head. Use a packaged descaling agent or appropriate decalcification tablets to the max fill line. Following the directions on , and flush the espresso machine by turning it to run completely dry. 9. Every 20 minutes, keep repeating steps 4-7 until nearly all the solution...
...Periods of Non-Use For the best tasting espresso, prime the espresso machine with fresh water after a long period of the reservoir, alternating between the brew head and frothing arm. Fill the boilers with fresh water to the max fill line. 2. For instructions, see "Fill and Rinse... deposits ("scale") from the brew head. Use a packaged descaling agent or appropriate decalcification tablets to the max fill line. Following the directions on , and flush the espresso machine by turning it to run completely dry. 9. Every 20 minutes, keep repeating steps 4-7 until nearly all the solution...
User Guide
Page 26
...breaker on the electrical circuit the espresso machine is closed. • If coffee does not flow from the portafilter... - coffee may not be empty - coffee grinds may be completely open - water reservoir may be fixed with the steps above, see the KitchenAid Warranty and Service section on ...indicator remains off and the boilers fail to heat when the On/Off Power Switch is , unplug the espresso machine, plug it back in ; espresso machine may not be filled If the problem cannot be ...
...breaker on the electrical circuit the espresso machine is closed. • If coffee does not flow from the portafilter... - coffee may not be empty - coffee grinds may be completely open - water reservoir may be fixed with the steps above, see the KitchenAid Warranty and Service section on ...indicator remains off and the boilers fail to heat when the On/Off Power Switch is , unplug the espresso machine, plug it back in ; espresso machine may not be filled If the problem cannot be ...
User Guide
Page 29
... need several elements to extract the easily dissolved oils and compounds while leaving the rest in the grounds. Before Brewing: The Elements of Great Espresso Before the espresso machine is in contact with a dark roast. A medium roast is called overextraction. Freezing can help preserve beans stored for an extended period, but the extra...
... need several elements to extract the easily dissolved oils and compounds while leaving the rest in the grounds. Before Brewing: The Elements of Great Espresso Before the espresso machine is in contact with a dark roast. A medium roast is called overextraction. Freezing can help preserve beans stored for an extended period, but the extra...


