Use and Care Manual
Page 3
KITCHENAID® COMMERCIAL BLENDER TABLE OF CONTENTS INTRODUCTION Blender Safety 2 Important Safeguards 3 Proof of Purchase & Product Registration 4 Electrical Requirements 5 FEATURES AND OPERATION Commercial Blender Features 6 Using the Blender Before First Use 9 Operating the Blender 9 Using the Pulse Feature 11 Using the ...On Safeguard 11 Operating Tips 12 Care & Cleaning General Procedures 13 Washing & Rinsing the Blender Jar 13 Cleaning the Base 13 Sanitizing the Blender 14 Troubleshooting 15 Accessories/Replacement Parts List 17 WARRANTY AND SERVICE Warranty for the 50 ...
KITCHENAID® COMMERCIAL BLENDER TABLE OF CONTENTS INTRODUCTION Blender Safety 2 Important Safeguards 3 Proof of Purchase & Product Registration 4 Electrical Requirements 5 FEATURES AND OPERATION Commercial Blender Features 6 Using the Blender Before First Use 9 Operating the Blender 9 Using the Pulse Feature 11 Using the ...On Safeguard 11 Operating Tips 12 Care & Cleaning General Procedures 13 Washing & Rinsing the Blender Jar 13 Cleaning the Base 13 Sanitizing the Blender 14 Troubleshooting 15 Accessories/Replacement Parts List 17 WARRANTY AND SERVICE Warranty for the 50 ...
Use and Care Manual
Page 4
... killed or seriously injured if you what the potential hazard is the safety alert symbol. WARNING You can happen if the instructions are very important. BLENDER SAFETY Your safety and the safety of injury, and tell you what can be killed or seriously injured if you and others are not followed...
... killed or seriously injured if you what the potential hazard is the safety alert symbol. WARNING You can happen if the instructions are very important. BLENDER SAFETY Your safety and the safety of injury, and tell you what can be killed or seriously injured if you and others are not followed...
Use and Care Manual
Page 5
...appliances, basic safety precautions should always be used by KitchenAid may be used, but must be followed, including the following: 1. Unplug the Blender from the outlet when not in any appliance is used only when the Blender is designed for examination, repair, or electrical or ...mechanical adjustment. 7. When blending hot liquids, remove the center piece of attachments, including canning jars, not recommended by or near children. 4. Return appliance to...
...appliances, basic safety precautions should always be used by KitchenAid may be used, but must be followed, including the following: 1. Unplug the Blender from the outlet when not in any appliance is used only when the Blender is designed for examination, repair, or electrical or ...mechanical adjustment. 7. When blending hot liquids, remove the center piece of attachments, including canning jars, not recommended by or near children. 4. Return appliance to...
Use and Care Manual
Page 6
... fill out and mail your personal records: Model Number: Chef's Blender - This card does not verify your Blender. KCB348 Bar Blender - KCB148 Serial Number Date Purchased Store Name 4 Proof of purchase will enable us in -warranty service. This card will assure you in the unlikely event ...
... fill out and mail your personal records: Model Number: Chef's Blender - This card does not verify your Blender. KCB348 Bar Blender - KCB148 Serial Number Date Purchased Store Name 4 Proof of purchase will enable us in -warranty service. This card will assure you in the unlikely event ...
Use and Care Manual
Page 7
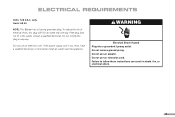
..., have a qualified electrician or serviceman install an outlet near the appliance. ELECTRICAL REQUIREMENTS Volts: 120 V.A.C. Do not remove ground prong. Hertz: 60 Hz NOTE: This Blender has a 3 prong grounded plug. If the plug does not fit in death, fire, or electrical shock. 5 Do not use an adapter. only. WARNING Electrical Shock...
..., have a qualified electrician or serviceman install an outlet near the appliance. ELECTRICAL REQUIREMENTS Volts: 120 V.A.C. Do not remove ground prong. Hertz: 60 Hz NOTE: This Blender has a 3 prong grounded plug. If the plug does not fit in death, fire, or electrical shock. 5 Do not use an adapter. only. WARNING Electrical Shock...
Use and Care Manual
Page 8
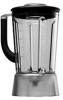
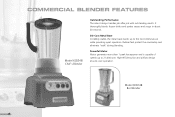
... about 20 seconds. Rubber feet protect the countertop and eliminate "walk" during blending. High-efficiency fan and airflow design ensures cool operation. Model KCB148 Bar Blender 6 Die-Cast Metal Base Incredibly stable, the metal base stands up to the most intensive use while providing quiet operation. COMMERCIAL...
... about 20 seconds. Rubber feet protect the countertop and eliminate "walk" during blending. High-efficiency fan and airflow design ensures cool operation. Model KCB148 Bar Blender 6 Die-Cast Metal Base Incredibly stable, the metal base stands up to the most intensive use while providing quiet operation. COMMERCIAL...
Use and Care Manual
Page 9
... seals are dishwasher safe. Scalloped Inner Jar Collar and Base The jar can be conveniently placed in the "Pulse" position. When pulsed, the blender operates at the Low speed setting; To produce similar results with soft covering for additional comfort. The polycarbonate jar includes a durable handle with the Chef's Blender, use the High speed setting. The...
... seals are dishwasher safe. Scalloped Inner Jar Collar and Base The jar can be conveniently placed in the "Pulse" position. When pulsed, the blender operates at the Low speed setting; To produce similar results with soft covering for additional comfort. The polycarbonate jar includes a durable handle with the Chef's Blender, use the High speed setting. The...

Use and Care Manual
Page 10
.... 8 The blade assembly does not need to be removed from starting if it is jammed, overloaded, or overheated, special electronic controls will prevent the blender from the jar for light or heavy ingredients. Easy-to-Clean Design The smooth base and round power cord are dishwasher safe. Overload, Jam, Thermal, and Power...
.... 8 The blade assembly does not need to be removed from starting if it is jammed, overloaded, or overheated, special electronic controls will prevent the blender from the jar for light or heavy ingredients. Easy-to-Clean Design The smooth base and round power cord are dishwasher safe. Overload, Jam, Thermal, and Power...

Use and Care Manual
Page 11
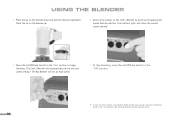
...the power cord from the storage area on the bottom of the blender base. Continued... 9 WARNING Electrical Shock Hazard Plug into a grounded 3 prong outlet. Do not use an extension cord. Do not use an adapter. Operating the Blender 1. Do not remove ground prong. Plug the power cord into... a grounded 3 prong outlet. See page 13 for the first time. USING THE BLENDER Before First Use Wash, rinse, and sanitize the blender before using it for cleaning instructions. Failure to follow these instructions can result in the "Off" position. 3. Make...
...the power cord from the storage area on the bottom of the blender base. Continued... 9 WARNING Electrical Shock Hazard Plug into a grounded 3 prong outlet. Do not use an extension cord. Do not use an adapter. Operating the Blender 1. Do not remove ground prong. Plug the power cord into... a grounded 3 prong outlet. See page 13 for the first time. USING THE BLENDER Before First Use Wash, rinse, and sanitize the blender before using it for cleaning instructions. Failure to follow these instructions can result in the "Off" position. 3. Make...
Use and Care Manual
Page 12
...) or High speed settings, move the On/Off/Pulse Switch to the "Off" position. * To start at the Low speed setting.* The Bar Blender will show the current speed selected. 5. Move the On/Off/Pulse Switch to the "On" position to the "On" position while pressing the desired... Speed Selection Button. 10 Place the jar on the Chef's Blender by pushing the appropriate Speed Selection Button. The Chef's Blender will automatically start the Chef's Blender at high speed. 7. Place the lid on the...
...) or High speed settings, move the On/Off/Pulse Switch to the "Off" position. * To start at the Low speed setting.* The Bar Blender will show the current speed selected. 5. Move the On/Off/Pulse Switch to the "On" position to the "On" position while pressing the desired... Speed Selection Button. 10 Place the jar on the Chef's Blender by pushing the appropriate Speed Selection Button. The Chef's Blender will automatically start the Chef's Blender at high speed. 7. Place the lid on the...
Use and Care Manual
Page 13
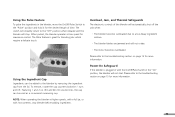
...be added to the "Off" position when released and the blender will stop blender before adding ingredients. When pulsed, the blender operates at higher speeds, with a full jar, or with the On/Off/Pulse Switch in the "On" position, the blender will not start. The switch will instantly return to the... blender by removing the ingredient cap from the lid. Featuring 1 and 2 oz. (30 and 60 ml) volume lines, the ...
...be added to the "Off" position when released and the blender will stop blender before adding ingredients. When pulsed, the blender operates at higher speeds, with a full jar, or with the On/Off/Pulse Switch in the "On" position, the blender will not start. The switch will instantly return to the... blender by removing the ingredient cap from the lid. Featuring 1 and 2 oz. (30 and 60 ml) volume lines, the ...
Use and Care Manual
Page 14
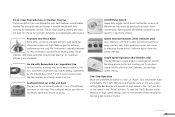
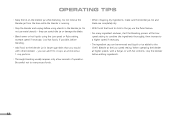
..., and blade are completely dry. • With foods that tend to stick to the blender jar in the blender jar. Do not remove the blender jar from the base while the blender is running. • Stop the blender and unplug before adding ingredients. 12 Increase speed if necessary. Do not use the Pulse feature. • For many ingredient...
..., and blade are completely dry. • With foods that tend to stick to the blender jar in the blender jar. Do not remove the blender jar from the base while the blender is running. • Stop the blender and unplug before adding ingredients. 12 Increase speed if necessary. Do not use the Pulse feature. • For many ingredient...
Use and Care Manual
Page 15
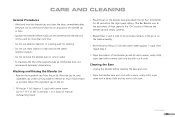
... or scouring pads for 30 seconds at the High speed setting. (The Bar Blender runs at the equivalent of manual dishwashing liquid. 3. Rinse the jar, lid, and ingredient cap under running water to the lid. 2. Wipe the exterior of the polycarbonate jar, KitchenAid does not recommend automatic dishwashing. wipe clean with a damp cloth and dry...
... or scouring pads for 30 seconds at the High speed setting. (The Bar Blender runs at the equivalent of manual dishwashing liquid. 3. Rinse the jar, lid, and ingredient cap under running water to the lid. 2. Wipe the exterior of the polycarbonate jar, KitchenAid does not recommend automatic dishwashing. wipe clean with a damp cloth and dry...
Use and Care Manual
Page 16
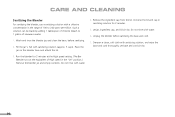
... base and cord thoroughly. Wash and rinse the blender jar, and clean the base, before sanitizing the base and cord. 7. Let jar, ingredient cap, and lid air dry. Unplug the blender before sanitizing. 2. Do not rinse with water. 6. CARE AND CLEANING Sanitizing the Blender For sanitizing the blender, use a sanitizing solution with a chlorine concentration in the...
... base and cord thoroughly. Wash and rinse the blender jar, and clean the base, before sanitizing the base and cord. 7. Let jar, ingredient cap, and lid air dry. Unplug the blender before sanitizing. 2. Do not rinse with water. 6. CARE AND CLEANING Sanitizing the Blender For sanitizing the blender, use a sanitizing solution with a chlorine concentration in the...
Use and Care Manual
Page 17
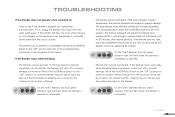
...be overheated. Move the On/Off/Pulse Switch to reset the blender. Adding liquid to see if the blender is closed. - Check to the jar may happen when blending multiple jars of heavy ingredients for an additional 30 minutes. If the blender does not start, move the On/Off/Pulse Switch back ...to the troubleshooting instructions in the remainder of the jar. On the Chef's Blender, the low speed indicator light will flash when the blender is overheated or jammed. - Move the On/Off/Pulse Switch to the "Off" position and refer to the ...
...be overheated. Move the On/Off/Pulse Switch to reset the blender. Adding liquid to see if the blender is closed. - Check to the jar may happen when blending multiple jars of heavy ingredients for an additional 30 minutes. If the blender does not start, move the On/Off/Pulse Switch back ...to the troubleshooting instructions in the remainder of the jar. On the Chef's Blender, the low speed indicator light will flash when the blender is overheated or jammed. - Move the On/Off/Pulse Switch to the "Off" position and refer to the ...

Use and Care Manual
Page 18
...safeguard will engage and the blender will now operate normally. To reset the blender, move the On/Off/Pulse Switch to the retailer. Retailers do not provide service. 16 If the problem cannot be fixed with the On/Off/Pulse Switch in this section, see the KitchenAid Warranty and Service on ...safeguard is plugged in with the steps in the "On" position: - The blender will not start. On the Chef's Blender, all three speed indicator lights will flash when the power-on page 18.* ...
...safeguard will engage and the blender will now operate normally. To reset the blender, move the On/Off/Pulse Switch to the retailer. Retailers do not provide service. 16 If the problem cannot be fixed with the On/Off/Pulse Switch in this section, see the KitchenAid Warranty and Service on ...safeguard is plugged in with the steps in the "On" position: - The blender will not start. On the Chef's Blender, all three speed indicator lights will flash when the power-on page 18.* ...
Use and Care Manual
Page 19
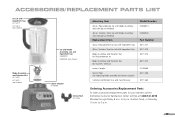
... Model Number KCB48PCJ KCB48SSJ Part Number 8211477 8211478 8211473 8211472 4176868 8211458 8211464 Ordering Accessories/Replacement Parts To order accessories/replacement parts for your blender, call the KitchenAid Customer Satisfaction Center toll-free at 1-800-541-6390 Monday through Friday, 8 a.m. to 8 p.m. (Eastern Time), or Saturday, 10 a.m. Polycarbonate Jar Lid with Ingredient Cap 48 oz.
... Model Number KCB48PCJ KCB48SSJ Part Number 8211477 8211478 8211473 8211472 4176868 8211458 8211464 Ordering Accessories/Replacement Parts To order accessories/replacement parts for your blender, call the KitchenAid Customer Satisfaction Center toll-free at 1-800-541-6390 Monday through Friday, 8 a.m. to 8 p.m. (Eastern Time), or Saturday, 10 a.m. Polycarbonate Jar Lid with Ingredient Cap 48 oz.
Use and Care Manual
Page 20
...Any shipping or handling costs to arrange for KitchenAid® Commercial Blenders, Models KCB348 and KCB148, operated in materials and workmanship. See the KitchenAid® Commercial Blender Warranty for Puerto Rico for details on how to deliver your Blender. During the warranty period, all service ...apply to 8 p.m. (Eastern Time), or Saturday, 10 a.m. Your repaired Blender will be returned to learn the location of your Blender to an Authorized Service Center. Length of Warranty: KitchenAid Will Pay For Your Choice of incidental or consequential damages, so this exclusion...
...Any shipping or handling costs to arrange for KitchenAid® Commercial Blenders, Models KCB348 and KCB148, operated in materials and workmanship. See the KitchenAid® Commercial Blender Warranty for Puerto Rico for details on how to deliver your Blender. During the warranty period, all service ...apply to 8 p.m. (Eastern Time), or Saturday, 10 a.m. Your repaired Blender will be returned to learn the location of your Blender to an Authorized Service Center. Length of Warranty: KitchenAid Will Pay For Your Choice of incidental or consequential damages, so this exclusion...
Use and Care Manual
Page 21
.... (No P.O. to 5 p.m., or write to 5 p.m. Failure to do so can result in the 50 United States and your KitchenAid® Commercial Blender should fail within 12 months of ownership, simply call our toll-free Customer Satisfaction Center at 1-800-541-6390 Monday through Friday, 8...Friday, 8 a.m. Box 218, St. WARNING Electrical Shock Hazard Unplug before servicing. to : Customer Satisfaction Center, KitchenAid Portable Appliances, P.O. Give the consultant your "failed" Blender returned to us. In the carton, include your name and address on how to obtain service. 19 Arranging for ...
.... (No P.O. to 5 p.m., or write to 5 p.m. Failure to do so can result in the 50 United States and your KitchenAid® Commercial Blender should fail within 12 months of ownership, simply call our toll-free Customer Satisfaction Center at 1-800-541-6390 Monday through Friday, 8...Friday, 8 a.m. Box 218, St. WARNING Electrical Shock Hazard Unplug before servicing. to : Customer Satisfaction Center, KitchenAid Portable Appliances, P.O. Give the consultant your "failed" Blender returned to us. In the carton, include your name and address on how to obtain service. 19 Arranging for ...


