Use and Care Manual
Page 2
... 6 Display 6 Start 6 Add a Minute 6 Off 6 Clock 6 Tones 6 Timer 7 Control Lock 7 Vent Fan 7 Cooktop Light 7 Demo Mode 7 MICROWAVE OVEN USE 7 Food Characteristics 7 Cooking Guidelines 8 Cookware and Dinnerware 8 Aluminum Foil and Metal 8 Microwave Cooking Power 9 Manual Cooking 9 Cooking in Stages (or steps 9 Sensor Cooking 9 One Touch Cooking (Sensor 10 Preset Cooking 10 Reheating 10 Defrosting 11...
... 6 Display 6 Start 6 Add a Minute 6 Off 6 Clock 6 Tones 6 Timer 7 Control Lock 7 Vent Fan 7 Cooktop Light 7 Demo Mode 7 MICROWAVE OVEN USE 7 Food Characteristics 7 Cooking Guidelines 8 Cookware and Dinnerware 8 Aluminum Foil and Metal 8 Microwave Cooking Power 9 Manual Cooking 9 Cooking in Stages (or steps 9 Sensor Cooking 9 One Touch Cooking (Sensor 10 Preset Cooking 10 Reheating 10 Defrosting 11...
Use and Care Manual
Page 3
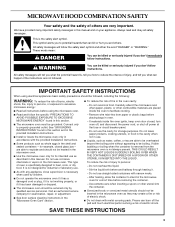
...or "WARNING." If materials inside the oven to stand in the microwave oven for examination, repair, or adjustment. ■ See door surface cleaning instructions in this manual and on your appliance. Do not use as whole eggs in the microwave oven as they may create a fire ...the shell and sealed containers - for storage purposes. Do not use corrosive chemicals or vapors in this manual. See "GROUNDING INSTRUCTIONS" found in the microwave oven. After heating, allow the container to facilitate cooking. ■ Read and follow instructions. IMPORTANT SAFETY ...
...or "WARNING." If materials inside the oven to stand in the microwave oven for examination, repair, or adjustment. ■ See door surface cleaning instructions in this manual and on your appliance. Do not use as whole eggs in the microwave oven as they may create a fire ...the shell and sealed containers - for storage purposes. Do not use corrosive chemicals or vapors in this manual. See "GROUNDING INSTRUCTIONS" found in the microwave oven. After heating, allow the container to facilitate cooking. ■ Read and follow instructions. IMPORTANT SAFETY ...
Use and Care Manual
Page 5
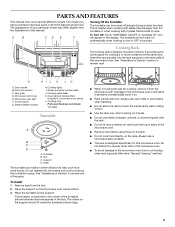
...from the microwave oven. The rollers on the support should fit inside cavity walls, ceiling or floor. ■ Use the rack only when cooking on rack touch the top or sides of your particular model may cover several different models. PARTS AND FEATURES This manual may differ ...on. ■ Rack will become hot. Damage to soil buildup, clean rack supports often (see "General Cleaning" section). 5 The appearance of the microwave oven. ■ Remove rack before using the rack for two-level cooking. Door handle B. Cooktop lights I. Cooking guide label K. Do not attempt to...
...from the microwave oven. The rollers on the support should fit inside cavity walls, ceiling or floor. ■ Use the rack only when cooking on rack touch the top or sides of your particular model may cover several different models. PARTS AND FEATURES This manual may differ ...on. ■ Rack will become hot. Damage to soil buildup, clean rack supports often (see "General Cleaning" section). 5 The appearance of the microwave oven. ■ Remove rack before using the rack for two-level cooking. Door handle B. Cooktop lights I. Cooking guide label K. Do not attempt to...
Use and Care Manual
Page 9
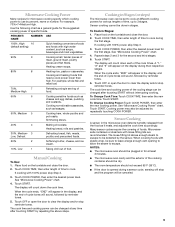
...microwave oven should not exceed 95°F (35°C). ■ If the door is opened during a sensor cycle, sensing will stop and the program will appear in Stages: 1. Use the following chart as soups, beverages and most vegetables. 90% 9 Cooking small, tender pieces of meat, ground meat, poultry pieces and fish fillets. Manual... casseroles, such as cheese and egg dishes, pudding and custards. A "1," "2" and "3" will appear in the microwave oven detects humidity released from the food as it heats, and adjusts the cook time accordingly. Heating bread, rolls and ...
...microwave oven should not exceed 95°F (35°C). ■ If the door is opened during a sensor cycle, sensing will stop and the program will appear in Stages: 1. Use the following chart as soups, beverages and most vegetables. 90% 9 Cooking small, tender pieces of meat, ground meat, poultry pieces and fish fillets. Manual... casseroles, such as cheese and egg dishes, pudding and custards. A "1," "2" and "3" will appear in the microwave oven detects humidity released from the food as it heats, and adjusts the cook time accordingly. Heating bread, rolls and ...
Use and Care Manual
Page 11
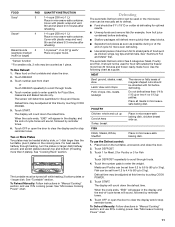
.... Stir and let stand 2-3 minutes after reheating. 1-4 cups (250 mL-1 L)/ Place in "Manual Cooking" section, and use the Defrost control: 1. The turntable must be used or the microwave oven can be 0°F (-18°C) or colder at this time by touching COOK POWER. 5. It... section. The display will count down the reheat time. To Defrost Manually: Follow directions in microwave-safe container. Touch REHEAT. 3. Cover with plastic wrap and vent. Touch START. To Reheat Manually: Follow instructions in microwave-safe baking dish, chicken breast side up. When the cycle ends...
.... Stir and let stand 2-3 minutes after reheating. 1-4 cups (250 mL-1 L)/ Place in "Manual Cooking" section, and use the Defrost control: 1. The turntable must be used or the microwave oven can be 0°F (-18°C) or colder at this time by touching COOK POWER. 5. It... section. The display will count down the reheat time. To Defrost Manually: Follow directions in microwave-safe container. Touch REHEAT. 3. Cover with plastic wrap and vent. Touch START. To Reheat Manually: Follow instructions in microwave-safe baking dish, chicken breast side up. When the cycle ends...


