
User Guide
Page 1
www.kitchenaid.com Table of Contents...2 Model KHHC2090S W10131852 SPEEDCOOK MICROWAVE HOOD COMBINATION WITH CONVECTION Use & Care Guide For questions about features, operation/performance, parts, accessories or service, call: 1-800-422-1230, or visit our website at...
www.kitchenaid.com Table of Contents...2 Model KHHC2090S W10131852 SPEEDCOOK MICROWAVE HOOD COMBINATION WITH CONVECTION Use & Care Guide For questions about features, operation/performance, parts, accessories or service, call: 1-800-422-1230, or visit our website at...

User Guide
Page 2
TABLE OF CONTENTS MICROWAVE HOOD COMBINATION SAFETY 3 Electrical Requirements 4 PARTS AND FEATURES 5 Microwave Oven Cavity Coating 5 Microwave System - OPTIMAWAVE™ Technology 5 Grill Element 5 Convection Element and Fan 6 Turntable 6 ACCESSORIES 7 Browning Pan and Handle 7 Grill Rack 7 Convection Rack 7 KITCHENAID™ Steamer Vessel 7 MICROWAVE OVEN CONTROL 8 Control Panel 8 Interactive Touch Display 8 Main Menu 9 Settings & Info 10 Clock 10 Date 11 Demo...
TABLE OF CONTENTS MICROWAVE HOOD COMBINATION SAFETY 3 Electrical Requirements 4 PARTS AND FEATURES 5 Microwave Oven Cavity Coating 5 Microwave System - OPTIMAWAVE™ Technology 5 Grill Element 5 Convection Element and Fan 6 Turntable 6 ACCESSORIES 7 Browning Pan and Handle 7 Grill Rack 7 Convection Rack 7 KITCHENAID™ Steamer Vessel 7 MICROWAVE OVEN CONTROL 8 Control Panel 8 Interactive Touch Display 8 Main Menu 9 Settings & Info 10 Clock 10 Date 11 Demo...

User Guide
Page 3
... the safety alert symbol and either the word "DANGER" or "WARNING." for example, closed , turn oven off, and disconnect the power cord, or shut off the pad and touch electrical parts involving a risk of fire in the microwave oven for industrial or laboratory use straight-sided containers with the provided Installation Instructions. ■ Some...
... the safety alert symbol and either the word "DANGER" or "WARNING." for example, closed , turn oven off, and disconnect the power cord, or shut off the pad and touch electrical parts involving a risk of fire in the microwave oven for industrial or laboratory use straight-sided containers with the provided Installation Instructions. ■ Some...

User Guide
Page 4
... all cord connected appliances: The microwave oven must be plugged into a grounded 3 prong outlet. IMPORTANT SAFETY INSTRUCTIONS ■ Suitable for use above both gas and electric cooking equipment. ■ Intended to be used above ranges with Part 18 of the FCC Rules. 4 for the electric current. It is important not to defeat or...
... all cord connected appliances: The microwave oven must be plugged into a grounded 3 prong outlet. IMPORTANT SAFETY INSTRUCTIONS ■ Suitable for use above both gas and electric cooking equipment. ■ Intended to be used above ranges with Part 18 of the FCC Rules. 4 for the electric current. It is important not to defeat or...

User Guide
Page 5
... or all -visible. (See "Troubleshooting" for various cooking functions. Microwave oven door B. Halogen cooktop lights (2) J H O P F. Interactive touch display J. Grease and charcoal filters (2 each) K. Microwave oven light Q N. For example, to achieve a 50% power level ("medium") in a typical microwave oven, the microwave oven operates 50% of the time at all of microwave oven) G. PARTS AND FEATURES This manual may differ slightly from food...
... or all -visible. (See "Troubleshooting" for various cooking functions. Microwave oven door B. Halogen cooktop lights (2) J H O P F. Interactive touch display J. Grease and charcoal filters (2 each) K. Microwave oven light Q N. For example, to achieve a 50% power level ("medium") in a typical microwave oven, the microwave oven operates 50% of the time at all of microwave oven) G. PARTS AND FEATURES This manual may differ slightly from food...

User Guide
Page 6
...by side. The rollers on the microwave oven cavity bottom. 2. B C A. Glass turntable B. To Turn On/Off: 1. Support C. Convection Element and Fan A B C A. The convection system is composed of a convection element, which heats in the wall of the parts. 6 Turning Off the Turntable The ...turntable can rotate in place. Protective screen B. Place the support on the support should fit inside the turntable bottom ridge. A 2. The microwave oven cavity and door will appear on the ...
...by side. The rollers on the microwave oven cavity bottom. 2. B C A. Glass turntable B. To Turn On/Off: 1. Support C. Convection Element and Fan A B C A. The convection system is composed of a convection element, which heats in the wall of the parts. 6 Turning Off the Turntable The ...turntable can rotate in place. Protective screen B. Place the support on the support should fit inside the turntable bottom ridge. A 2. The microwave oven cavity and door will appear on the ...

User Guide
Page 7
...KITCHENAID™ Steamer Vessel Use the KITCHENAID™ steamer vessel with your new microwave oven. Rack and Pan Configurations Browning Pan Feature Grill Feature A B A B C A. Do not use plastic utensils. ■ Do not overfill. Any of water in the microwave oven. See "Assistance or Service" to order replacement parts...been provided with the Steam Cook feature or Boil & Simmer feature to steam or simmer foods. Lid: Always use in the microwave oven. See "Bake" and "Roast" sections. Place insert with "Browning Pan" or "Grill" functions, any convection function or...
...KITCHENAID™ Steamer Vessel Use the KITCHENAID™ steamer vessel with your new microwave oven. Rack and Pan Configurations Browning Pan Feature Grill Feature A B A B C A. Do not use plastic utensils. ■ Do not overfill. Any of water in the microwave oven. See "Assistance or Service" to order replacement parts...been provided with the Steam Cook feature or Boil & Simmer feature to steam or simmer foods. Lid: Always use in the microwave oven. See "Bake" and "Roast" sections. Place insert with "Browning Pan" or "Grill" functions, any convection function or...

User Guide
Page 13
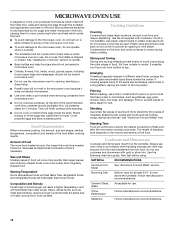
...Cooking Animation A B C D A. Cooking with microwaves C. The vent fan also has a max speed, which may stay on at the beginning of the microwave oven (see "Parts and Features") operate the vent fan and cooktop lights. To protect the microwave oven, the vent fan will automatically turn on the... max speed. After the microwave oven has cooled, the vent fan will automatically turn ...
...Cooking Animation A B C D A. Cooking with microwaves C. The vent fan also has a max speed, which may stay on at the beginning of the microwave oven (see "Parts and Features") operate the vent fan and cooktop lights. To protect the microwave oven, the vent fan will automatically turn on the... max speed. After the microwave oven has cooled, the vent fan will automatically turn ...
User Guide
Page 14
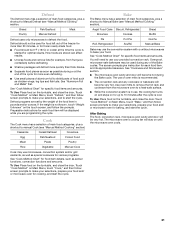
... vent steam. Arranging If heating irregularly shaped or different sized foods, arrange the thinner parts and smaller sized items toward the center. Check for 5 minutes. Plastic wrap should be dried in microwave oven. ■ Clothes, flowers, fruit, herbs, wood, gourds, paper, including brown paper... Size and Shape Smaller pieces of irregularly shaped foods, bones and foods such as cake. Piercing Before heating, use the microwave oven for microwave ovens may cause them in use if turntable is not available, wax paper, paper towels or plastic wrap approved for canning, ...
... vent steam. Arranging If heating irregularly shaped or different sized foods, arrange the thinner parts and smaller sized items toward the center. Check for 5 minutes. Plastic wrap should be dried in microwave oven. ■ Clothes, flowers, fruit, herbs, wood, gourds, paper, including brown paper... Size and Shape Smaller pieces of irregularly shaped foods, bones and foods such as cake. Piercing Before heating, use the microwave oven for microwave ovens may cause them in use if turntable is not available, wax paper, paper towels or plastic wrap approved for canning, ...
User Guide
Page 21
...Touch "Cook Method" on Main Menu, touch "Defrost," and then follow screen prompts to make your selections, prepare your food and/ or microwave oven for food item details, such as chicken wings, leg tips and fish tails. Angel Food Cake Biscuit, Refrigerated Bread Brownies Cookies Muffin Pie... Refrigerated Soufflé Manual Bake Bake may use your selections, and to shield parts of oven mitts is over. The use of food such as sensor functions, convection functions and amounts. The microwave oven's cooling fan will become hot during or at the time the cycle is started...
...Touch "Cook Method" on Main Menu, touch "Defrost," and then follow screen prompts to make your selections, prepare your food and/ or microwave oven for food item details, such as chicken wings, leg tips and fish tails. Angel Food Cake Biscuit, Refrigerated Bread Brownies Cookies Muffin Pie... Refrigerated Soufflé Manual Bake Bake may use your selections, and to shield parts of oven mitts is over. The use of food such as sensor functions, convection functions and amounts. The microwave oven's cooling fan will become hot during or at the time the cycle is started...

User Guide
Page 31
... Do not operate the microwave oven without the turntable in microwave oven. MICROWAVE OVEN CARE General Cleaning IMPORTANT: Before cleaning, make sure all -purpose cleaner: Rinse with clean water and dry with soft, lint-free cloth. ■ Vinegar for hard water spots KITCHENAID™ STEAMER VESSEL ■...Glass cleaner and paper towels or nonabrasive plastic scrubbing pad: Apply glass cleaner to towel, not directly to the microwave oven, the microwave inlet cover (see "Parts and Features") should be kept clean. ■ Wipe with wet cloth. Always follow label instructions on some ...
... Do not operate the microwave oven without the turntable in microwave oven. MICROWAVE OVEN CARE General Cleaning IMPORTANT: Before cleaning, make sure all -purpose cleaner: Rinse with clean water and dry with soft, lint-free cloth. ■ Vinegar for hard water spots KITCHENAID™ STEAMER VESSEL ■...Glass cleaner and paper towels or nonabrasive plastic scrubbing pad: Apply glass cleaner to towel, not directly to the microwave oven, the microwave inlet cover (see "Parts and Features") should be kept clean. ■ Wipe with wet cloth. Always follow label instructions on some ...

User Guide
Page 32
Do not operate the microwave oven without the filters in "Assistance or Service" to the browning pan, do not use abrasive cleansers or scrubbers. ■ Mild cleanser, water and washcloth &#... the filter frame into place. Small tab C. BROWNING PAN CONVECTION and GRILL RACKS To avoid damage to reorder filters. Charcoal filter A. Microwave oven bottom 32 See "General Cleaning" for cleaning instructions. A B C A. Wide tab C. See "Replacement Parts" section in place. Retaining spring B. Grease filter 2. AB C A. Grease filter D. Filter frame B. AB C D To Remove/...
Do not operate the microwave oven without the filters in "Assistance or Service" to the browning pan, do not use abrasive cleansers or scrubbers. ■ Mild cleanser, water and washcloth &#... the filter frame into place. Small tab C. BROWNING PAN CONVECTION and GRILL RACKS To avoid damage to reorder filters. Charcoal filter A. Microwave oven bottom 32 See "General Cleaning" for cleaning instructions. A B C A. Wide tab C. See "Replacement Parts" section in place. Retaining spring B. Grease filter 2. AB C A. Grease filter D. Filter frame B. AB C D To Remove/...

User Guide
Page 35
.... Replacement Parts Turntable Part Number 8205992 Turntable Support and Rollers Part Number 8206222 Turntable Hub Part Number 8205994 Grill Rack (tall) Part Number 8206264 Convection Rack (short) Part Number 8205995 KITCHENAID™ Steamer Vessel Part Number 8206451 Browning Pan Part Number 8205996 Browning Pan Handle Part Number 8204652 Grease Filters (2) Part Number 8205997 Charcoal Filters (2) Part Number 8205998 Cooktop and Microwave Oven Light Part Number...
.... Replacement Parts Turntable Part Number 8205992 Turntable Support and Rollers Part Number 8206222 Turntable Hub Part Number 8205994 Grill Rack (tall) Part Number 8206264 Convection Rack (short) Part Number 8205995 KITCHENAID™ Steamer Vessel Part Number 8206451 Browning Pan Part Number 8205996 Browning Pan Handle Part Number 8204652 Grease Filters (2) Part Number 8205997 Charcoal Filters (2) Part Number 8205998 Cooktop and Microwave Oven Light Part Number...

User Guide
Page 36
... YEAR LIMITED WARRANTY On microwave ovens only, in the second through tenth years from date of purchase, when this major appliance is operated and maintained according to instructions attached to or furnished with the product, KitchenAid will pay for factory specified parts for the stainless steel oven cavity/inner door if the part rusts through fifth...
... YEAR LIMITED WARRANTY On microwave ovens only, in the second through tenth years from date of purchase, when this major appliance is operated and maintained according to instructions attached to or furnished with the product, KitchenAid will pay for factory specified parts for the stainless steel oven cavity/inner door if the part rusts through fifth...

Installation Instructions
Page 1
... Wall 7 Attach Mounting Plate to Wall 8 Prepare Upper Cabinet 8 Install the Microwave Oven 9 Complete Installation 10 VENTING DESIGN SPECIFICATIONS 11 ASSISTANCE 12 Replacement Parts 12 MICROWAVE HOOD COMBINATION SAFETY Your safety and the safety of Contents MICROWAVE HOOD COMBINATION SAFETY 1 INSTALLATION REQUIREMENTS 2 Tools and Parts 2 Location Requirements 2 Product Dimensions 3 Electrical Requirements 3 INSTALLATION INSTRUCTIONS 4 Remove Mounting Plate...
... Wall 7 Attach Mounting Plate to Wall 8 Prepare Upper Cabinet 8 Install the Microwave Oven 9 Complete Installation 10 VENTING DESIGN SPECIFICATIONS 11 ASSISTANCE 12 Replacement Parts 12 MICROWAVE HOOD COMBINATION SAFETY Your safety and the safety of Contents MICROWAVE HOOD COMBINATION SAFETY 1 INSTALLATION REQUIREMENTS 2 Tools and Parts 2 Location Requirements 2 Product Dimensions 3 Electrical Requirements 3 INSTALLATION INSTRUCTIONS 4 Remove Mounting Plate...

Installation Instructions
Page 2
... and building materials are not designed to exist above the microwave oven so that the vent fits properly, and the damper blade opens freely and fully. Washers (2) D. Tools and Parts Tools Needed Gather the required tools and parts before starting installation. A B C D E FG H...hole saw ■ Caulking gun and weatherproof caulking compound ■ Duct tape Parts Supplied For information on model, aluminum grease filter and charcoal filter may not be free of microwave oven) Aluminum grease filters Charcoal filters (Depending on model, charcoal filters may be installed...
... and building materials are not designed to exist above the microwave oven so that the vent fits properly, and the damper blade opens freely and fully. Washers (2) D. Tools and Parts Tools Needed Gather the required tools and parts before starting installation. A B C D E FG H...hole saw ■ Caulking gun and weatherproof caulking compound ■ Duct tape Parts Supplied For information on model, aluminum grease filter and charcoal filter may not be free of microwave oven) Aluminum grease filters Charcoal filters (Depending on model, charcoal filters may be installed...

Installation Instructions
Page 12
... transition piece = 5 ft (1.5 m) D. 2 ft (0.6 m) + 6 ft (1.8 m) straight = 8 ft (2.4 m) If the existing vent is located behind the microwave oven door on the front frame of the vent system including straight vent, elbow(s), transitions and wall or roof caps must be used. Both numbers can be used in the Use and Care Guide, and reference the appropriate part number listed...
... transition piece = 5 ft (1.5 m) D. 2 ft (0.6 m) + 6 ft (1.8 m) straight = 8 ft (2.4 m) If the existing vent is located behind the microwave oven door on the front frame of the vent system including straight vent, elbow(s), transitions and wall or roof caps must be used. Both numbers can be used in the Use and Care Guide, and reference the appropriate part number listed...

