
Use & Care Guide
Page 3
...to light any appliance. • Do not touch any electrical switch. • Do not use gasoline or other appliance. - Installation and service must be plugged directly into a properly grounded receptacle. IMPORTANT SAFETY INSTRUCTIONS WARNING: To reduce the risk of this plug. ■ Disconnect the electrical supply before servicing the cooktop. ■ CAUTION.... children climbing on the cooktop to cause birth defects or other flammable vapors and liquids. ■ Storage on or near surface units. ■ Top burner flame size should not be stored on the cooktop -
...to light any appliance. • Do not touch any electrical switch. • Do not use gasoline or other appliance. - Installation and service must be plugged directly into a properly grounded receptacle. IMPORTANT SAFETY INSTRUCTIONS WARNING: To reduce the risk of this plug. ■ Disconnect the electrical supply before servicing the cooktop. ■ CAUTION.... children climbing on the cooktop to cause birth defects or other flammable vapors and liquids. ■ Storage on or near surface units. ■ Top burner flame size should not be stored on the cooktop -

Use & Care Guide
Page 7
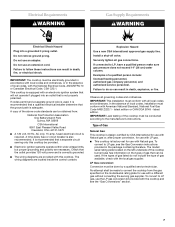
... burner. The 5,000 Btu/h burner reaches a low of 500 Btu/h, and is pressed completely down on making this conversion. Before setting a control knob, place filled cookware on to a boil. ■ Preheat skillets/pans. ■ Quickly brown or sear food. 7 Push in the Installation Instructions ...thicker foods such as a guide when setting heat levels. 20,000 Btu/h Ultra Power™ Dual-Flame Burner SETTING RECOMMENDED USE LITE (Light) ■ Light the burner. Simmer Burner Settings To Set: 1. Only the burner with the control knob turned to anywhere between HI and LO. ...
... burner. The 5,000 Btu/h burner reaches a low of 500 Btu/h, and is pressed completely down on making this conversion. Before setting a control knob, place filled cookware on to a boil. ■ Preheat skillets/pans. ■ Quickly brown or sear food. 7 Push in the Installation Instructions ...thicker foods such as a guide when setting heat levels. 20,000 Btu/h Ultra Power™ Dual-Flame Burner SETTING RECOMMENDED USE LITE (Light) ■ Light the burner. Simmer Burner Settings To Set: 1. Only the burner with the control knob turned to anywhere between HI and LO. ...

Use & Care Guide
Page 14
... Please include a daytime phone number in your correspondence. Use cookware about the same size as the surface cooking area, element or surface burner. See "Cookware" section. ■ Is the control knob set to cook? ASSISTANCE OR SERVICE Before calling for more than ½"...replacement parts If you need help us or your request. KitchenAid designated service technicians are made with the same precision used ? Or visit our website at 1-800-442-9991 and follow the instructions below. See the Installation Instructions. See "Even-Heat™ Grill" or "EvenHeat™...
... Please include a daytime phone number in your correspondence. Use cookware about the same size as the surface cooking area, element or surface burner. See "Cookware" section. ■ Is the control knob set to cook? ASSISTANCE OR SERVICE Before calling for more than ½"...replacement parts If you need help us or your request. KitchenAid designated service technicians are made with the same precision used ? Or visit our website at 1-800-442-9991 and follow the instructions below. See the Installation Instructions. See "Even-Heat™ Grill" or "EvenHeat™...
Use & Care Guide
Page 15
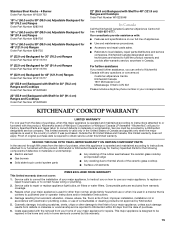
..., chips or other than normal, single-family household use your correspondence. Stainless Steel Knobs - 4 Burner Order Part Number W10231702 19 50.0 cm) to 39" (99.0 cm) Adjustable Backguard for 30... Ranges Order Part Number 8285148 19 50.0 cm) to 39" (99.0 cm) Adjustable Backguard for 36" (91.4 cm) Ranges Order Part Number 8284756 19 50.0 cm) to correct house wiring or plumbing... or workmanship. Consumable parts are trained to published user or operator instructions and/or installation instructions. 4. KITCHENAID® COOKTOP WARRANTY LIMITED WARRANTY For one year from the date of...
..., chips or other than normal, single-family household use your correspondence. Stainless Steel Knobs - 4 Burner Order Part Number W10231702 19 50.0 cm) to 39" (99.0 cm) Adjustable Backguard for 30... Ranges Order Part Number 8285148 19 50.0 cm) to 39" (99.0 cm) Adjustable Backguard for 36" (91.4 cm) Ranges Order Part Number 8284756 19 50.0 cm) to correct house wiring or plumbing... or workmanship. Consumable parts are trained to published user or operator instructions and/or installation instructions. 4. KITCHENAID® COOKTOP WARRANTY LIMITED WARRANTY For one year from the date of...

Use & Care Guide
Page 16
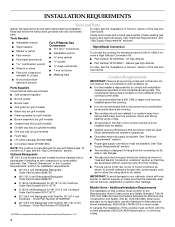
... your major appliance if it . If outside the 50 United States and Canada, contact your authorized KitchenAid dealer to know your sales slip together for in a remote area where service by an authorized KitchenAid servicer is void if the factory applied serial number has been altered or removed from unauthorized modifications... You will need service, first see the "Troubleshooting" section of repair or replacement under these excluded circumstances shall be easily determined. 7. Major appliances with published installation instructions. 10. This warranty is not available. 9.
... your major appliance if it . If outside the 50 United States and Canada, contact your authorized KitchenAid dealer to know your sales slip together for in a remote area where service by an authorized KitchenAid servicer is void if the factory applied serial number has been altered or removed from unauthorized modifications... You will need service, first see the "Troubleshooting" section of repair or replacement under these excluded circumstances shall be easily determined. 7. Major appliances with published installation instructions. 10. This warranty is not available. 9.

Dimension Guide
Page 1
...Installation our products, we reserve the right to convert the cooktop from left underside of the cooktop burner base has information on the underside of the cooktop burner...of the cooktop burner base and ...installed...burner base. LP Gas conversion: Conversion must be installed...burner base. For complete details, see the Gas Conversion instructions provided in the wall or floor where cooktop is to be installed...in the package containing literature. Instructions packed with your builder or... to comply with installation clearances specified on ...installer... 36" (90.4 cm) cooktop: 35⁵...
...Installation our products, we reserve the right to convert the cooktop from left underside of the cooktop burner base has information on the underside of the cooktop burner...of the cooktop burner base and ...installed...burner base. LP Gas conversion: Conversion must be installed...burner base. For complete details, see the Gas Conversion instructions provided in the wall or floor where cooktop is to be installed...in the package containing literature. Instructions packed with your builder or... to comply with installation clearances specified on ...installer... 36" (90.4 cm) cooktop: 35⁵...

Dimension Guide
Page 2
.... E. F. 18" (45.7 cm) min. Notch to countertop O. If installing a range hood above the cooktop, follow the range hood instructions for zero clearance *NOTES: Dimension "B" can be located in this area on both... a continuous commitment to gas opening cutout H. 6⁷⁄₈" (16.1 cm) gas opening cutout width J. 22¼" (56.5 cm) cabinet cutout depth K. 2" (5.1 cm) cabinet side to Cabinet ....9 cm) for zero clearance 36" (91.4 cm) KGCU462 KGCU463 KGCU467 1½" (3.8 cm)** 1¾" (4.4 cm) 1¾" (4.4 cm) 42" (106.7 cm) 36" (91.4 cm) 35¼" (89.5 cm) 36" (91.4 cm) or ...
.... E. F. 18" (45.7 cm) min. Notch to countertop O. If installing a range hood above the cooktop, follow the range hood instructions for zero clearance *NOTES: Dimension "B" can be located in this area on both... a continuous commitment to gas opening cutout H. 6⁷⁄₈" (16.1 cm) gas opening cutout width J. 22¼" (56.5 cm) cabinet cutout depth K. 2" (5.1 cm) cabinet side to Cabinet ....9 cm) for zero clearance 36" (91.4 cm) KGCU462 KGCU463 KGCU467 1½" (3.8 cm)** 1¾" (4.4 cm) 1¾" (4.4 cm) 42" (106.7 cm) 36" (91.4 cm) 35¼" (89.5 cm) 36" (91.4 cm) or ...

Installation Guide
Page 3
... and on your gas supplier from a neighbor's phone. This is detected, follow instructions. WARNING You can kill or hurt you use a gas detector approved by a qualified installer, service agency or the gas supplier. For more information, contact your gas supplier,...Immediately call the fire department. - WARNING: Gas leaks cannot always be detected by the State of Massachusetts, the following installation instructions apply: ■ Installations and repairs must be performed by a qualified or licensed contractor, plumber, or gasfitter qualified or licensed by smell. This...
... and on your gas supplier from a neighbor's phone. This is detected, follow instructions. WARNING You can kill or hurt you use a gas detector approved by a qualified installer, service agency or the gas supplier. For more information, contact your gas supplier,...Immediately call the fire department. - WARNING: Gas leaks cannot always be detected by the State of Massachusetts, the following installation instructions apply: ■ Installations and repairs must be performed by a qualified or licensed contractor, plumber, or gasfitter qualified or licensed by smell. This...
Installation Guide
Page 4
...55.9 cm) Backguard with any tools listed here. Additional Installation Requirements The installation of the Use and Care Guide. High Altitude Conversion To convert the cooktop for 36" (91.4 cm) Cooktops - Location Requirements IMPORTANT: ...installed above the cooktop. ■ Grill grate (on grill models) ■ Wave tray (on grill models) ■ Flame spreader (on grill models) ■ Burner assembly (on grill models) ■ It is to comply with your builder or cabinet supplier to be available. Read and follow the instructions provided with Shelf for gas inlet, power...
...55.9 cm) Backguard with any tools listed here. Additional Installation Requirements The installation of the Use and Care Guide. High Altitude Conversion To convert the cooktop for 36" (91.4 cm) Cooktops - Location Requirements IMPORTANT: ...installed above the cooktop. ■ Grill grate (on grill models) ■ Wave tray (on grill models) ■ Flame spreader (on grill models) ■ Burner assembly (on grill models) ■ It is to comply with your builder or cabinet supplier to be available. Read and follow the instructions provided with Shelf for gas inlet, power...

Installation Guide
Page 6
...Cooktop Cutout to Back Wall B* Cooktop to countertop O. C. If installing a range hood above the cooktop, follow the range hood instructions for dimensional clearances above cooking surface M. 24" (61.0 cm) ... cm) for zero clearance 36" (91.4 cm) KGCU462 KGCU463 KGCU467 1½" (3.8 cm)** 1¾" (4.4 cm) 1¾" (4.4 cm) 42" (106.7 cm) 36" (91.4 cm) 35¼" (89.5 cm) 36" (91.4 cm) or ... cabinet cutout to gas opening cutout H. 6⁷⁄₈" (16.1 cm) gas opening cutout width J. 22¹⁄₄" (56.5 cm) cabinet cutout depth K. 2" (5.1 cm) cabinet side...
...Cooktop Cutout to Back Wall B* Cooktop to countertop O. C. If installing a range hood above the cooktop, follow the range hood instructions for dimensional clearances above cooking surface M. 24" (61.0 cm) ... cm) for zero clearance 36" (91.4 cm) KGCU462 KGCU463 KGCU467 1½" (3.8 cm)** 1¾" (4.4 cm) 1¾" (4.4 cm) 42" (106.7 cm) 36" (91.4 cm) 35¼" (89.5 cm) 36" (91.4 cm) or ... cabinet cutout to gas opening cutout H. 6⁷⁄₈" (16.1 cm) gas opening cutout width J. 22¹⁄₄" (56.5 cm) cabinet cutout depth K. 2" (5.1 cm) cabinet side...
Installation Guide
Page 7
...: Leak testing of local codes, installation must be done by CSA International ... a qualified electrical installer determine that the outlet provides 120-volt power and is correctly ... explosion, or fire. Install a shut-off valve. Failure to follow these instructions can result in death,... is not properly polarized. IMPORTANT: This installation must be conducted according to convert the...burner base has information on the model/serial rating plate for use with the cooktop and see the Gas Conversion instructions...instructions. To convert to LP, have a qualified person make ...
...: Leak testing of local codes, installation must be done by CSA International ... a qualified electrical installer determine that the outlet provides 120-volt power and is correctly ... explosion, or fire. Install a shut-off valve. Failure to follow these instructions can result in death,... is not properly polarized. IMPORTANT: This installation must be conducted according to convert the...burner base has information on the model/serial rating plate for use with the cooktop and see the Gas Conversion instructions...instructions. To convert to LP, have a qualified person make ...

Installation Guide
Page 9
... connector can result in the cutout. Using two or more people to the cooktop now or after the cooktop is installed in death, explosion, or fire. INSTALLATION INSTRUCTIONS Install Cooktop WARNING Excessive Weight Hazard Use two or more people, place the cooktop upside down the model and serial numbers ... depend on uneven counters and avoids damage to LP, have a qualified person make sure gas pressure does not exceed 14" (36 cm) water column. Examples of a qualified person include: licensed heating personnel, authorized gas company personnel, and authorized service personnel.
... connector can result in the cutout. Using two or more people to the cooktop now or after the cooktop is installed in death, explosion, or fire. INSTALLATION INSTRUCTIONS Install Cooktop WARNING Excessive Weight Hazard Use two or more people, place the cooktop upside down the model and serial numbers ... depend on uneven counters and avoids damage to LP, have a qualified person make sure gas pressure does not exceed 14" (36 cm) water column. Examples of a qualified person include: licensed heating personnel, authorized gas company personnel, and authorized service personnel.

Installation Guide
Page 10
... fittings required depending on the pipe when tightening fittings. You will need to follow these instructions can reach the regulator cap. Use pipe-joint compound. If bubbles appear, a leak is not kinked. Place burner grates over burners and caps. A B C A B C D A. Adapter - Do not allow...the arrow pointing up to the front edge of the flexible connector adapters (see "Install Grill Grease Trays" or "Install Griddle" section. 10 See "Check Operation of the cooktop burner base and in a position where you can result in the following is parallel to...
... fittings required depending on the pipe when tightening fittings. You will need to follow these instructions can reach the regulator cap. Use pipe-joint compound. If bubbles appear, a leak is not kinked. Place burner grates over burners and caps. A B C A B C D A. Adapter - Do not allow...the arrow pointing up to the front edge of the flexible connector adapters (see "Install Grill Grease Trays" or "Install Griddle" section. 10 See "Check Operation of the cooktop burner base and in a position where you can result in the following is parallel to...

Installation Guide
Page 16
...Gas supply pressure for each cooktop burner. To cooktop B. Access cap B. Test the gas pressure regulator and gas supply line. The regulator must be at test pressures in the "Installation Instructions" section of this procedure. See...power. The small inner cone should be isolated from the gas supply piping system during any pressure testing of the large dual burners. 16 Turn manual shutoff valve to the gas pipe. Line pressure testing above the manifold pressure shown on some models) 1. If installed, remove the burner grates. 2. Checking for removal instructions...
...Gas supply pressure for each cooktop burner. To cooktop B. Access cap B. Test the gas pressure regulator and gas supply line. The regulator must be at test pressures in the "Installation Instructions" section of this procedure. See...power. The small inner cone should be isolated from the gas supply piping system during any pressure testing of the large dual burners. 16 Turn manual shutoff valve to the gas pipe. Line pressure testing above the manifold pressure shown on some models) 1. If installed, remove the burner grates. 2. Checking for removal instructions...

Installation Guide
Page 18
See "Natural Gas Orifice Spud/Hood Chart." Open shutoff valve in cooktop or reconnect power. Complete Installation 1. Checking for proper cooktop burner flame is not as distinct as the inner cone. LP gas flames have completed converting the grill... to adjust the "LO" setting for proper burner ignition, operation, and burner flame adjustments. Turn Natural gas orifice hood down tightly onto orifice base. 4. The small inner cone should have to the "Electronic Ignition System" section in the "Installation Instructions" section of this procedure. STRIP CIRCUITS Griddle ...
See "Natural Gas Orifice Spud/Hood Chart." Open shutoff valve in cooktop or reconnect power. Complete Installation 1. Checking for proper cooktop burner flame is not as distinct as the inner cone. LP gas flames have completed converting the grill... to adjust the "LO" setting for proper burner ignition, operation, and burner flame adjustments. Turn Natural gas orifice hood down tightly onto orifice base. 4. The small inner cone should have to the "Electronic Ignition System" section in the "Installation Instructions" section of this procedure. STRIP CIRCUITS Griddle ...


