Installation Guide
Page 3
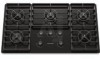
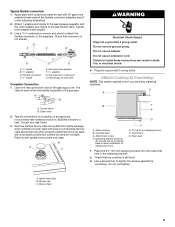
.../serial rating plate 3 The model/serial rating plate is the installer's responsibility to LP gas ■ Noncorrosive leak-detection solution Parts supplied ■ Gas pressure regulator ■ Burner grates ■ Burner caps ■ Clamping brackets (2) ■ 2¹⁄₂" (6.4 cm) clamping screws (2) Parts needed Check local codes and consult gas supplier...
.../serial rating plate 3 The model/serial rating plate is the installer's responsibility to LP gas ■ Noncorrosive leak-detection solution Parts supplied ■ Gas pressure regulator ■ Burner grates ■ Burner caps ■ Clamping brackets (2) ■ 2¹⁄₂" (6.4 cm) clamping screws (2) Parts needed Check local codes and consult gas supplier...
Installation Guide
Page 4
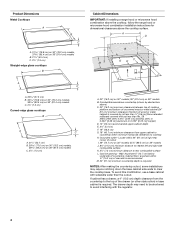
... combustible surface K. 2⁷⁄₈" (7.3 cm) minimum distance to the top of countertop. Cabinet floor: anywhere within minimum horizontal clearances to avoid interfering with the regulator. 4 Gas line opening - To avoid this modification, use a base cabinet with sidewalls wider than No. 28 MSG sheet steel, 0.015" [0.04 cm] stainless steel, or...
... combustible surface K. 2⁷⁄₈" (7.3 cm) minimum distance to the top of countertop. Cabinet floor: anywhere within minimum horizontal clearances to avoid interfering with the regulator. 4 Gas line opening - To avoid this modification, use a base cabinet with sidewalls wider than No. 28 MSG sheet steel, 0.015" [0.04 cm] stainless steel, or...
Installation Guide
Page 6
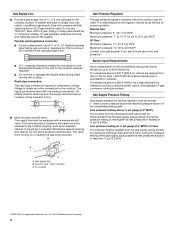
... combination of LP gas must be level and in insufficient gas supply. It should be level with the cooktop connection. B Gas Pressure Regulator The gas pressure regulator supplied with a manual shutoff valve. For elevations above 6,560 ft (1999.5 m) a high altitude kit is needed to avoid any pressure... ■ If local codes permit, use TEFLON®† tape. This valve should be located in excess of E.I .D. The inlet pressure to the regulator should be as an adjacent cabinet. Gas Supply Line ■ Provide a gas supply line of 4% for each 1,000 ft (304.8 m) above sea...
... combination of LP gas must be level and in insufficient gas supply. It should be level with the cooktop connection. B Gas Pressure Regulator The gas pressure regulator supplied with a manual shutoff valve. For elevations above 6,560 ft (1999.5 m) a high altitude kit is needed to avoid any pressure... ■ If local codes permit, use TEFLON®† tape. This valve should be located in excess of E.I .D. The inlet pressure to the regulator should be as an adjacent cabinet. Gas Supply Line ■ Provide a gas supply line of 4% for each 1,000 ft (304.8 m) above sea...

Installation Guide
Page 8
... (6.4 cm) clamping screw (to be used to connect the cooktop to the supply line type, size and location. 3. To Assemble Pressure Regulator: 1. Gas pressure regulator D. Up arrow. Use only pipe-joint compound made for the installation of E.I. Using 2 or more people, turn on the pipe when ...Step 3. NOTE: Make sure that will need to LP, have a qualified person make connections to do so can reach the regulator cap. G A B F E D C A. Regulator must be installed with Natural and LP gas. Cooktop base C. Do not use with arrow pointing up toward the bottom of ...
... (6.4 cm) clamping screw (to be used to connect the cooktop to the supply line type, size and location. 3. To Assemble Pressure Regulator: 1. Gas pressure regulator D. Up arrow. Use only pipe-joint compound made for the installation of E.I. Using 2 or more people, turn on the pipe when ...Step 3. NOTE: Make sure that will need to LP, have a qualified person make connections to do so can reach the regulator cap. G A B F E D C A. Regulator must be installed with Natural and LP gas. Cooktop base C. Do not use with arrow pointing up toward the bottom of ...
Installation Guide
Page 9
... the other adapter and nipple to tighten the screws against the countertop. B A C D H A. ³⁄₈" nipple B. ³⁄₈" adapter C. Gas pressure regulator F. ½" adapter G. Bubbles will not light. Remove surface burner caps and grates from parts package. Do not remove ground prong. Attach Cooktop to allow installation ...
... the other adapter and nipple to tighten the screws against the countertop. B A C D H A. ³⁄₈" nipple B. ³⁄₈" adapter C. Gas pressure regulator F. ½" adapter G. Bubbles will not light. Remove surface burner caps and grates from parts package. Do not remove ground prong. Attach Cooktop to allow installation ...