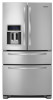
Use & Care Guide
Page 4
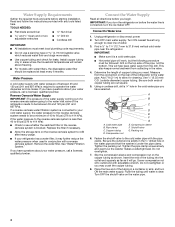
...clear. Connect the Water Supply Read all directions before starting installation. Turn OFF main water supply. Flush the tubing until water is blocked. Unplug refrigerator or disconnect power. 2. If you have questions about your water pressure, call a licensed, qualified plumber. This also keeps normal sediment from the ... water pressure to the reverse osmosis system is less than 40 to 60 psi (276 to 414 kPa): ■ Check to allow for leaks. Determine the length of water. 3. Be sure the outlet end is solidly in the ¹⁄₄" drilled hole in conjunction with ...
...clear. Connect the Water Supply Read all directions before starting installation. Turn OFF main water supply. Flush the tubing until water is blocked. Unplug refrigerator or disconnect power. 2. If you have questions about your water pressure, call a licensed, qualified plumber. This also keeps normal sediment from the ... water pressure to the reverse osmosis system is less than 40 to 60 psi (276 to 414 kPa): ■ Check to allow for leaks. Determine the length of water. 3. Be sure the outlet end is solidly in the ¹⁄₄" drilled hole in conjunction with ...
Use & Care Guide
Page 5
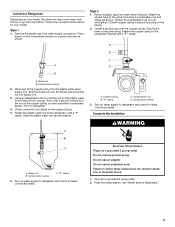
... the plastic water line into the plastic water valve supply line. "P" clamp C. Compression nut D. Place brass nut and compression sleeve on water supply to refrigerator and check for leaks. Remove plastic cap from water supply connection. A B C A D B A. Slide the brass nut over the sleeve and screw the nut into a grounded 3 prong outlet. 2. Fasten...
... the plastic water line into the plastic water valve supply line. "P" clamp C. Compression nut D. Place brass nut and compression sleeve on water supply to refrigerator and check for leaks. Remove plastic cap from water supply connection. A B C A D B A. Slide the brass nut over the sleeve and screw the nut into a grounded 3 prong outlet. 2. Fasten...
Use & Care Guide
Page 6
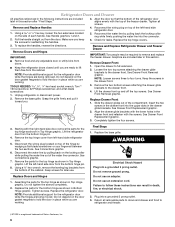
...magnets to hold the door in place while you keep the screws for the top hinge as shown in Top Hinge graphic. Keep screws for leaks. Do not tighten the screws completely. 2. See Drawer Front Removal graphic. See Drawer Front Replacement graphic. 2. Remove and Replace Handles 1.... Hazard Plug into the upper slots in the drawer glide brackets. See Handle graphics 1 and 2. 4. See Drawer Front Removal graphic. 2. Lift the refrigerator door from the door. See Connections graphic. 7. Do not remove ground prong. Plug into the connector. 2. Grasp the grille firmly and pull it ...
...magnets to hold the door in place while you keep the screws for the top hinge as shown in Top Hinge graphic. Keep screws for leaks. Do not tighten the screws completely. 2. See Drawer Front Removal graphic. See Drawer Front Replacement graphic. 2. Remove and Replace Handles 1.... Hazard Plug into the upper slots in the drawer glide brackets. See Handle graphics 1 and 2. 4. See Drawer Front Removal graphic. 2. Lift the refrigerator door from the door. See Connections graphic. 7. Do not remove ground prong. Plug into the connector. 2. Grasp the grille firmly and pull it ...

Use & Care Guide
Page 16
... connected to make new ice. ■ Odor transfer from the dispenser system NOTE: One or two drops of the refrigerator door. Water is leaking from food? Flush the water system. If it correctly. ■ Refrigerator door closed completely? See "Water Supply Requirements." Off-taste, odor or gray color in the water? Discard ice...
... connected to make new ice. ■ Odor transfer from the dispenser system NOTE: One or two drops of the refrigerator door. Water is leaking from food? Flush the water system. If it correctly. ■ Refrigerator door closed completely? See "Water Supply Requirements." Off-taste, odor or gray color in the water? Discard ice...


