Instructions and Recipes
Page 3
... Cover Product Registration Card Inside Front Cover Food Processor Safety 3 Important Safeguards 4 Electrical Requirements 5 FEATURES AND OPERATION Food Processor Features 6 Preparing the Food Processor for Use Before First Use 8 Work Bowl Assembly 9 Multipurpose Blade & Dough Blade Assembly 9 Slicing & Shredding Disc Assembly 9 Mini Bowl Assembly 9 Using the Food Processor Before Use 10 Maximum Liquid Level 10 Turning the Food Processor On and Off 10 Using the...
... Cover Product Registration Card Inside Front Cover Food Processor Safety 3 Important Safeguards 4 Electrical Requirements 5 FEATURES AND OPERATION Food Processor Features 6 Preparing the Food Processor for Use Before First Use 8 Work Bowl Assembly 9 Multipurpose Blade & Dough Blade Assembly 9 Slicing & Shredding Disc Assembly 9 Mini Bowl Assembly 9 Using the Food Processor Before Use 10 Maximum Liquid Level 10 Turning the Food Processor On and Off 10 Using the...
Instructions and Recipes
Page 4
Table of Contents FOOD PROCESSING TIPS Using the Multipurpose Blade 14 Using a Slicing or Shredding Disc 15 Using the Dough Blade 16 Helpful Hints 17 RECIPES Appetizers ...19 Salads and Dressings 24 Soups and Sandwiches 28 Vegetables and Side Dishes 33 Main Dishes...37 Breads ...42 ...
Table of Contents FOOD PROCESSING TIPS Using the Multipurpose Blade 14 Using a Slicing or Shredding Disc 15 Using the Dough Blade 16 Helpful Hints 17 RECIPES Appetizers ...19 Salads and Dressings 24 Soups and Sandwiches 28 Vegetables and Side Dishes 33 Main Dishes...37 Breads ...42 ...
Instructions and Recipes
Page 6
...food to reduce the risk of attachments not recommended or sold by hand. A scraper may cause fire, electric shock or injury. 8. Close supervision is designed for examination, repair, or electrical or mechanical adjustment. 7. Return appliance to the nearest Authorized Service Facility for household use , before putting on base without first putting bowl...safety precautions should always be used by or near children. 4. Do not use the food pusher. 15. Do not attempt to the Food Processor. Blades are sharp. Do not operate any appliance with a damaged cord or plug, or ...
...food to reduce the risk of attachments not recommended or sold by hand. A scraper may cause fire, electric shock or injury. 8. Close supervision is designed for examination, repair, or electrical or mechanical adjustment. 7. Return appliance to the nearest Authorized Service Facility for household use , before putting on base without first putting bowl...safety precautions should always be used by or near children. 4. Do not use the food pusher. 15. Do not attempt to the Food Processor. Blades are sharp. Do not operate any appliance with a damaged cord or plug, or ...
Instructions and Recipes
Page 7
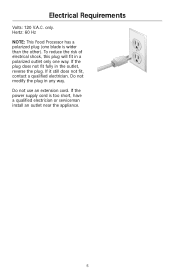
If the plug does not fit fully in any way. If it still does not fit, contact a qualified electrician. If the power supply cord is wider than the other). Hertz: 60 Hz NOTE: This Food Processor has a polarized plug (one way. Electrical Requirements Volts: 120 V.A.C. Do not modify the plug in the outlet, reverse the plug. Do not use an extension cord. only. To reduce the risk of electrical shock, this plug will fit in a polarized outlet only one blade is too short, have a qualified electrician or serviceman install an outlet near the appliance. 5
If the plug does not fit fully in any way. If it still does not fit, contact a qualified electrician. If the power supply cord is wider than the other). Hertz: 60 Hz NOTE: This Food Processor has a polarized plug (one way. Electrical Requirements Volts: 120 V.A.C. Do not modify the plug in the outlet, reverse the plug. Do not use an extension cord. only. To reduce the risk of electrical shock, this plug will fit in a polarized outlet only one blade is too short, have a qualified electrician or serviceman install an outlet near the appliance. 5
Instructions and Recipes
Page 8
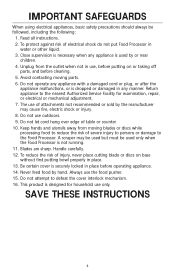
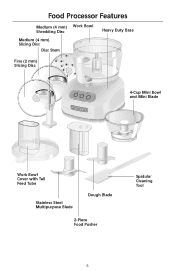
Food Processor Features Medium (4 mm) Work Bowl Shredding Disc Medium (4 mm) Slicing Disc Disc Stem Heavy Duty Base Fine (2 mm) Slicing Disc Off On Pulse 4-Cup Mini Bowl and Mini Blade Work Bowl Cover with Tall Feed Tube Stainless Steel Multipurpose Blade Dough Blade 2-Piece Food Pusher Spatula/ Cleaning Tool 6
Food Processor Features Medium (4 mm) Work Bowl Shredding Disc Medium (4 mm) Slicing Disc Disc Stem Heavy Duty Base Fine (2 mm) Slicing Disc Off On Pulse 4-Cup Mini Bowl and Mini Blade Work Bowl Cover with Tall Feed Tube Stainless Steel Multipurpose Blade Dough Blade 2-Piece Food Pusher Spatula/ Cleaning Tool 6
Instructions and Recipes
Page 9
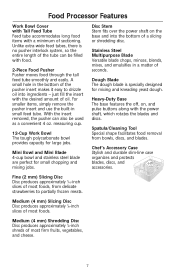
...-in a matter of the pusher insert makes it easy to partially frozen meats. Mini Bowl and Mini Blade 4-cup bowl and stainless steel blade are perfect for large jobs. Food Processor Features Work Bowl Cover with Tall Feed Tube Feed tube accommodates long food items with the desired amount of oil. With the insert removed, the pusher can be...
...-in a matter of the pusher insert makes it easy to partially frozen meats. Mini Bowl and Mini Blade 4-cup bowl and stainless steel blade are perfect for large jobs. Food Processor Features Work Bowl Cover with Tall Feed Tube Feed tube accommodates long food items with the desired amount of oil. With the insert removed, the pusher can be...

Instructions and Recipes
Page 10
... cuts. Before First Use Before using your Food Processor for the first time, wash the work bowl, work bowl may result. 8 Work Bowl Assembly 1. See pages 9-10 for Use WARNING Cut Hazard Handle blades carefully. NOTE: Your Food Processor will not operate unless the work bowl and work bowl handle. Grasp the work bowl is completely assembled. 2. Fit the 2-piece food pusher into a proper electrical outlet. Place the...
... cuts. Before First Use Before using your Food Processor for the first time, wash the work bowl, work bowl may result. 8 Work Bowl Assembly 1. See pages 9-10 for Use WARNING Cut Hazard Handle blades carefully. NOTE: Your Food Processor will not operate unless the work bowl and work bowl handle. Grasp the work bowl is completely assembled. 2. Fit the 2-piece food pusher into a proper electrical outlet. Place the...
Instructions and Recipes
Page 11
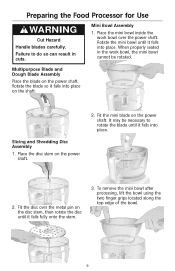
... place. 2. Mini Bowl Assembly 1. Place the mini bowl inside the work bowl, the mini bowl cannot be rotated. Place the disc stem on the shaft. Fit the disc over the power shaft. Failure to rotate the blade until it falls into place. Rotate the blade so it falls fully onto the stem. 3. Preparing the Food Processor for Use WARNING...
... place. 2. Mini Bowl Assembly 1. Place the mini bowl inside the work bowl, the mini bowl cannot be rotated. Place the disc stem on the shaft. Fit the disc over the power shaft. Failure to rotate the blade until it falls into place. Rotate the blade so it falls fully onto the stem. 3. Preparing the Food Processor for Use WARNING...
Instructions and Recipes
Page 12
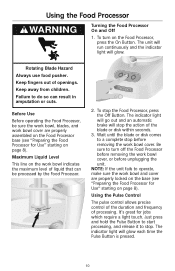
... out of processing. Be sure to do so can be sure the work bowl, blades, and work bowl cover are properly locked on the base (see "Preparing the Food Processor for Use" starting on the work bowl and cover are properly assembled on the Food Processor base (see "Preparing the Food Processor for jobs which require a light touch. Using the Pulse Control The...
... out of processing. Be sure to do so can be sure the work bowl, blades, and work bowl cover are properly locked on the base (see "Preparing the Food Processor for Use" starting on the work bowl and cover are properly assembled on the Food Processor base (see "Preparing the Food Processor for jobs which require a light touch. Using the Pulse Control The...

Instructions and Recipes
Page 13
... If using the finger grips located along the top edge of oil. Remove the disc stem. Using the Food Processor The 2-Piece Food Pusher To slice or shred small items, insert the 2-piece food pusher into the feed tube, turn the top of the pusher left to unlock it from the base. ...11 Use the small feed tube and pusher to the left and remove. 4. To slowly drizzle oil into place. Disassembling the Food Processor WARNING Cut Hazard Handle blades carefully. Turn the work bowl to the left or right to unlock the small pusher, and lift to remove. 2. Lift to remove. If using the mini...
... If using the finger grips located along the top edge of oil. Remove the disc stem. Using the Food Processor The 2-Piece Food Pusher To slice or shred small items, insert the 2-piece food pusher into the feed tube, turn the top of the pusher left to unlock it from the base. ...11 Use the small feed tube and pusher to the left and remove. 4. To slowly drizzle oil into place. Disassembling the Food Processor WARNING Cut Hazard Handle blades carefully. Turn the work bowl to the left or right to unlock the small pusher, and lift to remove. 2. Lift to remove. If using the mini...

Instructions and Recipes
Page 14
...in cuts. Wrap the power cord around the work bowl from the bowl and blade with a spatula. 5. Failure to do so can result in the dishwasher. The blade can be held in a location out of the reach of the Food Processor are emptied. Wipe the base and cord with...scouring pads. Disassembled discs, shafts, and blades should be stored in the provided storage case, and in place as you remove food: grasp the work bowl. Disassembling the Food Processor WARNING Cut Hazard Handle blades carefully. Then remove food from the bottom and Cleaning the Food Processor WARNING Cut Hazard Handle...
...in cuts. Wrap the power cord around the work bowl from the bowl and blade with a spatula. 5. Failure to do so can result in the dishwasher. The blade can be held in a location out of the reach of the Food Processor are emptied. Wipe the base and cord with...scouring pads. Disassembled discs, shafts, and blades should be stored in the provided storage case, and in place as you remove food: grasp the work bowl. Disassembling the Food Processor WARNING Cut Hazard Handle blades carefully. Then remove food from the bottom and Cleaning the Food Processor WARNING Cut Hazard Handle...
Instructions and Recipes
Page 16
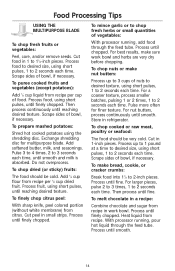
... blade. To chop cooked or raw meat, poultry or seafood: The food should be very cold. Scrape sides of food. Then process until finely chopped. Process until fine. Heat liquid from citrus. Cut food in refrigerator. Add 1⁄4 cup flour from recipe in work bowl and...⁄2 to 2 seconds each time. To make sure work bowl. To melt chocolate in a recipe: Combine chocolate and sugar from recipe per cup of bowl, if necessary. Process until reaching desired texture. Process until smooth. With processor running , add food through the feed tube. Pulse 3 to 4 times, ...
... blade. To chop cooked or raw meat, poultry or seafood: The food should be very cold. Scrape sides of food. Then process until finely chopped. Process until fine. Heat liquid from citrus. Cut food in refrigerator. Add 1⁄4 cup flour from recipe in work bowl and...⁄2 to 2 seconds each time. To make sure work bowl. To melt chocolate in a recipe: Combine chocolate and sugar from recipe per cup of bowl, if necessary. Process until reaching desired texture. Process until smooth. With processor running , add food through the feed tube. Pulse 3 to 4 times, ...
Instructions and Recipes
Page 17
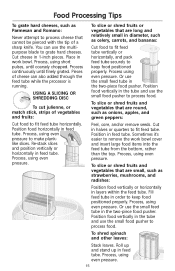
... tube while the processor is running. Position food vertically in feed tube. To slice or shred fruits and vegetables that are long and relatively small in feed tube. Process, using even pressure to make planklike slices. Sometimes it's easier to remove the work bowl. Roll up and...use the small feed tube in the two-piece food pusher. Position food vertically in work bowl cover and insert large food items into the feed tube from the bottom, rather than the top. Place in the tube and use the multipurpose blade to grate hard cheeses. Process continuously until coarsely...
... tube while the processor is running. Position food vertically in feed tube. To slice or shred fruits and vegetables that are long and relatively small in feed tube. Process, using even pressure to make planklike slices. Sometimes it's easier to remove the work bowl. Roll up and...use the small feed tube in the two-piece food pusher. Position food vertically in work bowl cover and insert large food items into the feed tube from the bottom, rather than the top. Place in the tube and use the multipurpose blade to grate hard cheeses. Process continuously until coarsely...

Instructions and Recipes
Page 18
..., even pressure. To shred firm and soft cheeses: Firm cheese should be very cold. If not, allow to fit feed tube. Process food using even pressure. Cut to fit feed tube. USING THE DOUGH BLADE The dough blade is specially designed for mixing and kneading yeast dough quickly and thoroughly. Wrap and freeze...
..., even pressure. To shred firm and soft cheeses: Firm cheese should be very cold. If not, allow to fit feed tube. Process food using even pressure. Cut to fit feed tube. USING THE DOUGH BLADE The dough blade is specially designed for mixing and kneading yeast dough quickly and thoroughly. Wrap and freeze...
Instructions and Recipes
Page 19
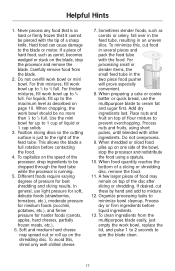
... feed tube, resulting in an uneven slice. When chopping, the work bowl should be no more than 1⁄3 to the maximum level as described on top of the feed tube. When food quantity reaches the bottom of the bowl, stop the processor and remove the blade. If a piece of liquid or 1⁄2 cup solids. 3. In general...
... feed tube, resulting in an uneven slice. When chopping, the work bowl should be no more than 1⁄3 to the maximum level as described on top of the feed tube. When food quantity reaches the bottom of the bowl, stop the processor and remove the blade. If a piece of liquid or 1⁄2 cup solids. 3. In general...
Instructions and Recipes
Page 20
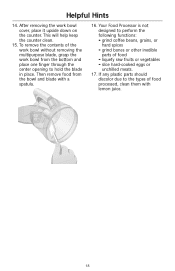
...help keep the counter clean. 15. To remove the contents of the work bowl without removing the multipurpose blade, grasp the work bowl cover, place it upside down on the counter. Helpful Hints 14. Then remove food from the bottom and place one finger through the center opening to hold ...8226; grind coffee beans, grains, or hard spices • grind bones or other inedible parts of food processed, clean them with a spatula. 16. Your Food Processor is not designed to the types of food • liquefy raw fruits or vegetables • slice hard-cooked eggs or unchilled meats. 17....
...help keep the counter clean. 15. To remove the contents of the work bowl without removing the multipurpose blade, grasp the work bowl cover, place it upside down on the counter. Helpful Hints 14. Then remove food from the bottom and place one finger through the center opening to hold ...8226; grind coffee beans, grains, or hard spices • grind bones or other inedible parts of food processed, clean them with a spatula. 16. Your Food Processor is not designed to the types of food • liquefy raw fruits or vegetables • slice hard-cooked eggs or unchilled meats. 17....

Instructions and Recipes
Page 21
... shredded Cheddar cheese 2 tablespoons snipped fresh chives, if desired Position mini bowl and mini blade in work bowl. In medium skillet over medium heat, cook sausage until tender, stirring often. Exchange mini bowl and mini blade for 15 to 20 minutes, or until mixed, 3 to 4 minutes..., or until thoroughly heated and no longer pink. Bake at 350°F for multipurpose blade in work bowl. refrigerate. Add mushroom mixture; Add sausage mixture, bread crumbs, Worcestershire sauce, mustard, pepper sauce, and cheese. APPETIZERS Sausage-Stuffed ...
... shredded Cheddar cheese 2 tablespoons snipped fresh chives, if desired Position mini bowl and mini blade in work bowl. In medium skillet over medium heat, cook sausage until tender, stirring often. Exchange mini bowl and mini blade for 15 to 20 minutes, or until mixed, 3 to 4 minutes..., or until thoroughly heated and no longer pink. Bake at 350°F for multipurpose blade in work bowl. refrigerate. Add mushroom mixture; Add sausage mixture, bread crumbs, Worcestershire sauce, mustard, pepper sauce, and cheese. APPETIZERS Sausage-Stuffed ...

Instructions and Recipes
Page 22
Pulse 2 to 3 times, about 2 seconds each time, or until mixed. With processor running, add buttermilk through the feed tube. Set aside. Place in center of bowl if necessary. Do not separate. Yield: 6 dozen (about 6 crackers per serving). *Other cracker toppings might include garlic... baking sheet. Remove dough to shred. roll 1 portion into a ball; Roll lightly with egg mixture. Bake at 350°F for multipurpose blade in work bowl. Remove and set aside. Add cheeses. Cover 1 portion; Remove to 5 times, about 2 seconds each time, or until mixed, 5 to...
Pulse 2 to 3 times, about 2 seconds each time, or until mixed. With processor running, add buttermilk through the feed tube. Set aside. Place in center of bowl if necessary. Do not separate. Yield: 6 dozen (about 6 crackers per serving). *Other cracker toppings might include garlic... baking sheet. Remove dough to shred. roll 1 portion into a ball; Roll lightly with egg mixture. Bake at 350°F for multipurpose blade in work bowl. Remove and set aside. Add cheeses. Cover 1 portion; Remove to 5 times, about 2 seconds each time, or until mixed, 5 to...
Instructions and Recipes
Page 24
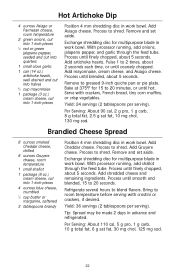
...5 seconds. Yield: 24 servings (2 tablespoons per serving). Process to shred. Exchange shredding disc for multipurpose blade in work bowl. Tip: Spread may be made 2 days in work bowl. Hot Artichoke Dip 4 ounces Asiago or Parmesan cheese, room temperature 2 green onions, cut into 1-inch... blue cheese, crumbled 1⁄2 cup butter or margarine, softened 3 tablespoons brandy Position 4 mm shredding disc in work bowl. Add Gruyere cheese. With processor running , add onions, jalapeno pepper, and garlic through the feed tube. Process until coarsely chopped. Process until hot...
...5 seconds. Yield: 24 servings (2 tablespoons per serving). Process to shred. Exchange shredding disc for multipurpose blade in work bowl. Tip: Spread may be made 2 days in work bowl. Hot Artichoke Dip 4 ounces Asiago or Parmesan cheese, room temperature 2 green onions, cut into 1-inch... blue cheese, crumbled 1⁄2 cup butter or margarine, softened 3 tablespoons brandy Position 4 mm shredding disc in work bowl. Add Gruyere cheese. With processor running , add onions, jalapeno pepper, and garlic through the feed tube. Process until coarsely chopped. Process until hot...

Instructions and Recipes
Page 25
Position multipurpose blade in advance, if desired. Add vegetable mixture with oil; Tip: May be made 1 to 3 times, about 1 second each time, or until tomatillos are blistered and garlic is tender, stirring once or twice. Drizzle with any accumulated juices, lime juice, sugar, and salt. Pulse 2 to 2 days in work bowl. Yield: 24 servings...
Position multipurpose blade in advance, if desired. Add vegetable mixture with oil; Tip: May be made 1 to 3 times, about 1 second each time, or until tomatillos are blistered and garlic is tender, stirring once or twice. Drizzle with any accumulated juices, lime juice, sugar, and salt. Pulse 2 to 2 days in work bowl. Yield: 24 servings...


