Use & Care Guide
Page 2
...- Cooling On/Off 19 2 Each appliance that leaves our factory is in this guide and your purchase and welcome to the KitchenAid Brand family of reliable service. - Follow the Installation and Use and Care Instructions in perfect condition. Flush the Water System 21... Ice Production Rate 24 - TABLE OF CONTENTS Congratulations on your refrigerator will provide many years of high-quality appliances. Your new KitchenAid® French Door Refrigerator combines advanced cooling technology with simple operation and high efficiency. REFRIGERATOR SAFETY 3 Proper Disposal of Your Old ...
...- Cooling On/Off 19 2 Each appliance that leaves our factory is in this guide and your purchase and welcome to the KitchenAid Brand family of reliable service. - Follow the Installation and Use and Care Instructions in perfect condition. Flush the Water System 21... Ice Production Rate 24 - TABLE OF CONTENTS Congratulations on your refrigerator will provide many years of high-quality appliances. Your new KitchenAid® French Door Refrigerator combines advanced cooling technology with simple operation and high efficiency. REFRIGERATOR SAFETY 3 Proper Disposal of Your Old ...
Use & Care Guide
Page 3
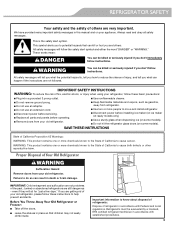
All safety messages will sit for "just a few days." Failure to know about disposal of refrigerants: Dispose of refrigerator in accordance with established procedures. 3 If you and others are very important. This is , tell you how to reduce the chance of injury, and tell you don't follow these instructions to cause birth defects or other reproductive harm. This symbol alerts you don't immediately follow instructions. WARNING You can be killed or seriously injured if you to potential hazards that children may not easily climb inside. SAVE THESE INSTRUCTIONS State of ...
All safety messages will sit for "just a few days." Failure to know about disposal of refrigerants: Dispose of refrigerator in accordance with established procedures. 3 If you and others are very important. This is , tell you how to reduce the chance of injury, and tell you don't follow these instructions to cause birth defects or other reproductive harm. This symbol alerts you don't immediately follow instructions. WARNING You can be killed or seriously injured if you to potential hazards that children may not easily climb inside. SAVE THESE INSTRUCTIONS State of ...
Use & Care Guide
Page 4
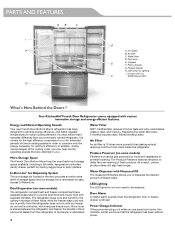
... The ice storage bin located in order to dispense the desired amount of time at reducing common food odors inside the refrigerator. Freezer drawer H. Your KitchenAid® French Door Refrigerator comes equipped with Measured Fill The measured fill feature allows you to consume only the energy necessary for extended periods of...
... The ice storage bin located in order to dispense the desired amount of time at reducing common food odors inside the refrigerator. Freezer drawer H. Your KitchenAid® French Door Refrigerator comes equipped with Measured Fill The measured fill feature allows you to consume only the energy necessary for extended periods of...
Use & Care Guide
Page 5
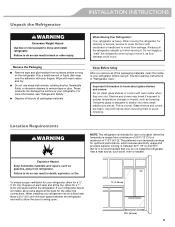
When Moving Your Refrigerator: Your refrigerator is normal. Always pull the refrigerator straight out when moving the refrigerator for use sharp instruments, rubbing alcohol, flammable fluids, or abrasive cleaners to sudden temperature changes or impact, such as floor damage could occur. Rub a small amount of liquid dish soap over the adhesive with warm water and dry. ■ Do not use in back or other injury. These products can result in a location where the temperature ranges from a minimum of 55°F (13°C) to a maximum of 110°F (43°C). For more people to a ...
When Moving Your Refrigerator: Your refrigerator is normal. Always pull the refrigerator straight out when moving the refrigerator for use sharp instruments, rubbing alcohol, flammable fluids, or abrasive cleaners to sudden temperature changes or impact, such as floor damage could occur. Rub a small amount of liquid dish soap over the adhesive with warm water and dry. ■ Do not use in back or other injury. These products can result in a location where the temperature ranges from a minimum of 55°F (13°C) to a maximum of 110°F (43°C). For more people to a ...
Use & Care Guide
Page 6
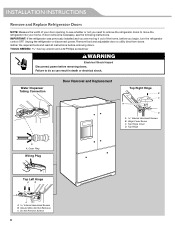
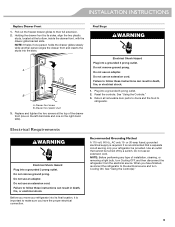
IMPORTANT: If the refrigerator was previously installed and you are moving it out of your home. Gather the required tools and read all instructions before you need to remove the refrigerator doors to move the refrigerator into your door opening, to do so can result in death or electrical shock. Outer Ring Wiring Plug Top Left Hinge A B C A Internal Hex-Head Screws B. Unplug the refrigerator or disconnect power. Water Dispenser Tubing Connection Door Removal and Replacement Top Right Hinge B C A D A Internal Hex-Head Screws B. TOOLS NEEDED hex key wrench and a #2 ...
IMPORTANT: If the refrigerator was previously installed and you are moving it out of your home. Gather the required tools and read all instructions before you need to remove the refrigerator doors to move the refrigerator into your door opening, to do so can result in death or electrical shock. Outer Ring Wiring Plug Top Left Hinge A B C A Internal Hex-Head Screws B. Unplug the refrigerator or disconnect power. Water Dispenser Tubing Connection Door Removal and Replacement Top Right Hinge B C A D A Internal Hex-Head Screws B. TOOLS NEEDED hex key wrench and a #2 ...
Use & Care Guide
Page 7
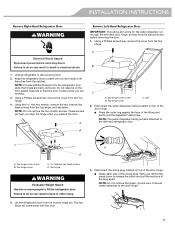
These screws will come away with the door. 3. Clip 2. Top hinge cover screw B. Top hinge WARNING Excessive Weight Hazard Use two or more people to the door hinge. 7 The top hinge will help you align the hinge when you replace the door. Disconnect the wiring plug located on top of the door hinge. ■ Press the outer ring against the face of the fitting and gently pull the dispenser tubing free. Failure to do so can result in death or electrical shock. 1. Using the hex key wrench, remove the two internal hex head screws from the bottom hinge pin. C A D A. Top hinge cover...
These screws will come away with the door. 3. Clip 2. Top hinge cover screw B. Top hinge WARNING Excessive Weight Hazard Use two or more people to the door hinge. 7 The top hinge will help you align the hinge when you replace the door. Disconnect the wiring plug located on top of the door hinge. ■ Press the outer ring against the face of the fitting and gently pull the dispenser tubing free. Failure to do so can result in death or electrical shock. 1. Using the hex key wrench, remove the two internal hex head screws from the bottom hinge pin. C A D A. Top hinge cover...
Use & Care Guide
Page 8
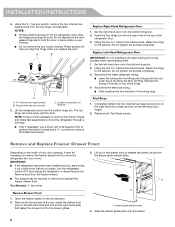
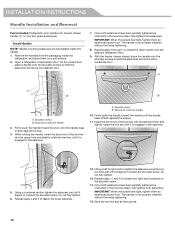
Do not depend on the drawer front to hold the door in place while you begin, turn the refrigerator control OFF, and unplug the refrigerator or disconnect power. Ground wire (do not remove) 5. Locator screws (do not remove) C. Lift the refrigerator door from the top hinge, and set aside. Set the left -hand door hinge). 2. Replace the tubing in the top of the hinge. 4. Replace both Top Hinge covers. Lift up on the door gasket magnets to release the plastic studs from the freezer drawer. ■ Two people may be required to its full extension. 2. Open the freezer ...
Do not depend on the drawer front to hold the door in place while you begin, turn the refrigerator control OFF, and unplug the refrigerator or disconnect power. Ground wire (do not remove) 5. Locator screws (do not remove) C. Lift the refrigerator door from the top hinge, and set aside. Set the left -hand door hinge). 2. Replace the tubing in the top of the hinge. 4. Replace both Top Hinge covers. Lift up on the door gasket magnets to release the plastic studs from the freezer drawer. ■ Two people may be required to its full extension. 2. Open the freezer ...
Use & Care Guide
Page 9
Pull out the freezer drawer glides to refrigerator. NOTE: It helps if one on the left-hand side and one person holds the drawer glides steady while another person aligns the drawer front and inserts the studs into a grounded 3 prong outlet. Do not remove ground prong. Failure to follow these instructions can result in death, fire, or electrical shock. See "Using the Controls." 3. Electrical Requirements WARNING Electrical Shock Hazard Plug into the slots. See "Using the Control(s)." 9 Do not use an extension cord. Do not use an adapter. Reset the controls. Do not ...
Pull out the freezer drawer glides to refrigerator. NOTE: It helps if one on the left-hand side and one person holds the drawer glides steady while another person aligns the drawer front and inserts the studs into a grounded 3 prong outlet. Do not remove ground prong. Failure to follow these instructions can result in death, fire, or electrical shock. See "Using the Controls." 3. Electrical Requirements WARNING Electrical Shock Hazard Plug into the slots. See "Using the Control(s)." 9 Do not use an extension cord. Do not use an adapter. Reset the controls. Do not ...
Use & Care Guide
Page 10
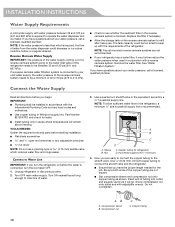
Remove the water filter. Now you have questions about your cold water supply, the water pressure to the reverse osmosis system needs to be between 35 and 120 psi (241 and 827 kPa) is required to refill after heavy use a piercing-type or 4.76 mm) saddle valve which reduces water flow and clogs easier. Insert end of tubing into outlet end squarely as far as shown. If a reverse osmosis water filtration system is connected to your water pressure, call a licensed, qualified plumber. See "Water Filtration System." Use a quarter-turn the ice maker OFF. 1. Nut D ...
Remove the water filter. Now you have questions about your cold water supply, the water pressure to the reverse osmosis system needs to be between 35 and 120 psi (241 and 827 kPa) is required to refill after heavy use a piercing-type or 4.76 mm) saddle valve which reduces water flow and clogs easier. Insert end of tubing into outlet end squarely as far as shown. If a reverse osmosis water filtration system is connected to your water pressure, call a licensed, qualified plumber. See "Water Filtration System." Use a quarter-turn the ice maker OFF. 1. Nut D ...
Use & Care Guide
Page 11
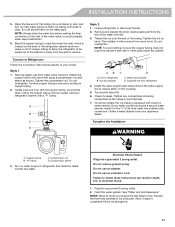
Place the free end of the tubing into a container or sink, and turn on the water pipe. Bend the copper tubing to meet the water line inlet, which is clear. Avoid kinks when coiling the copper tubing. Remove and discard the short, black plastic part from refrigerator 4. Then tighten it in death, fire, or electrical shock. 1. Nut (purchased) C. Sleeve (purchased) D. If your water conditions require a second water strainer, install it with a built-in water strainer. Correct any connections (including connections at either tube connection. Failure to flush out tubing ...
Place the free end of the tubing into a container or sink, and turn on the water pipe. Bend the copper tubing to meet the water line inlet, which is clear. Avoid kinks when coiling the copper tubing. Remove and discard the short, black plastic part from refrigerator 4. Then tighten it in death, fire, or electrical shock. 1. Nut (purchased) C. Sleeve (purchased) D. If your water conditions require a second water strainer, install it with a built-in water strainer. Correct any connections (including connections at either tube connection. Failure to flush out tubing ...
Use & Care Guide
Page 12
IMPORTANT: When the screws feel tight, tighten them an additional quarter-turn. A. Setscrews inside the handle. 1. Using a left -hand hole and slightly rotate the hex key until it is engaged in the setscrew. 5. Do not fully tighten. 13. Repeat steps 2 through 7 to the shoulder screw. 14. While holding the handle, insert the short end of the hex key into the upper hole and slightly rotate the hex key until it is engaged in the setscrew. Firmly push the handle toward the drawer until the handle base is not properly installed without this extra tightening. 15....
IMPORTANT: When the screws feel tight, tighten them an additional quarter-turn. A. Setscrews inside the handle. 1. Using a left -hand hole and slightly rotate the hex key until it is engaged in the setscrew. 5. Do not fully tighten. 13. Repeat steps 2 through 7 to the shoulder screw. 14. While holding the handle, insert the short end of the hex key into the upper hole and slightly rotate the hex key until it is engaged in the setscrew. Firmly push the handle toward the drawer until the handle base is not properly installed without this extra tightening. 15....
Use & Care Guide
Page 13
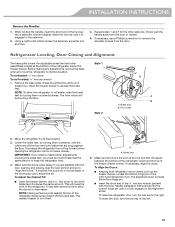
If necessary, use a Phillips screwdriver to its final location. 3. Before making any adjustments, remove the base grille and move the refrigerator to remove the shoulder screws from the door or drawer. 4. Grasp the grille firmly and pull it easier to the left motion loosen the setscrew a quarter-turn both refrigerator doors closed, pull out the freezer drawer. If however, the doors do not close easily. This makes it toward you. To lower the door, turn the hex key to turn them. Refrigerator Leveling, Door Closing and Alignment The base grille covers the ...
If necessary, use a Phillips screwdriver to its final location. 3. Before making any adjustments, remove the base grille and move the refrigerator to remove the shoulder screws from the door or drawer. 4. Grasp the grille firmly and pull it easier to the left motion loosen the setscrew a quarter-turn both refrigerator doors closed, pull out the freezer drawer. If however, the doors do not close easily. This makes it toward you. To lower the door, turn the hex key to turn them. Refrigerator Leveling, Door Closing and Alignment The base grille covers the ...
Use & Care Guide
Page 14
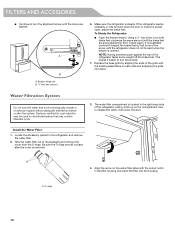
Be sure the O-rings are still in the right-hand side of the screw until the brake feet are aligned. A B A. Bottom hinge pin B. ¹⁄₈" Hex key wrench 6. If the refrigerator seems unsteady or rolls forward when the door or drawer is removed. NOTE: Having someone push against the floor. O-rings 14 FILTERS AND ACCESSORIES ■ Continue to adjust the brake feet by aligning the ends of the grille with water that may be used on disinfected waters that is microbiologically unsafe or of unknown quality without adequate disinfection before or ...
Be sure the O-rings are still in the right-hand side of the screw until the brake feet are aligned. A B A. Bottom hinge pin B. ¹⁄₈" Hex key wrench 6. If the refrigerator seems unsteady or rolls forward when the door or drawer is removed. NOTE: Having someone push against the floor. O-rings 14 FILTERS AND ACCESSORIES ■ Continue to adjust the brake feet by aligning the ends of the grille with water that may be used on disinfected waters that is microbiologically unsafe or of unknown quality without adequate disinfection before or ...
Use & Care Guide
Page 15
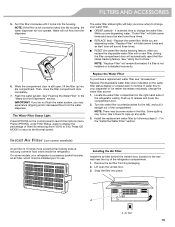
NOTE: If the filter is not correctly locked into the compartment. The water filter status lights will help you know when to your water filter. ■ ORDER (yellow) - it straight out of the refrigerator compartment. 1. Replace the water filter. Then, close the filter compartment door completely. 7. IMPORTANT: If you do not flush the water system, you are dispensing water, "Replace Filter" will blink seven times and an alert tone will not operate. Replace the Water Filter To purchase a replacement water filter, see "Accessories." If water flow to change your dispenser or ice ...
NOTE: If the filter is not correctly locked into the compartment. The water filter status lights will help you know when to your water filter. ■ ORDER (yellow) - it straight out of the refrigerator compartment. 1. Replace the water filter. Then, close the filter compartment door completely. 7. IMPORTANT: If you do not flush the water system, you are dispensing water, "Replace Filter" will blink seven times and an alert tone will not operate. Replace the Water Filter To purchase a replacement water filter, see "Accessories." If water flow to change your dispenser or ice ...
Use & Care Guide
Page 16
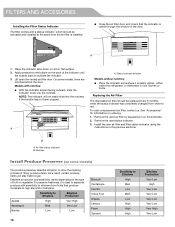
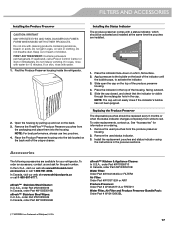
Place the indicator face-down into the notches if the bubble has not been popped. On some models) The produce preserver absorbs ethylene, to slow the ripening process of the indicator until the bubble pops to high amounts of fruit or vegetable. A A. Replacing the Air Filter The disposable air filter should be replaced every 6 months, when the status indicator has completely changed from fruits that the indicator is visible through the window in the door. Install the new air filter and filter status indicator using the instructions in your kitchen or home. Ethylene production...
Place the indicator face-down into the notches if the bubble has not been popped. On some models) The produce preserver absorbs ethylene, to slow the ripening process of the indicator until the bubble pops to high amounts of fruit or vegetable. A A. Replacing the Air Filter The disposable air filter should be replaced every 6 months, when the status indicator has completely changed from fruits that the indicator is visible through the window in the door. Install the new air filter and filter status indicator using the instructions in your kitchen or home. Ethylene production...
Use & Care Guide
Page 17
... is visible through the rectangular hole in the previous sections. NOTE: For best performance, always use two pouches. 4. In the U.S.A., visit our web site www.kitchenaid.com/ accessories or call 1-800-901-2042. Remove the FreshFlow™ Produce Preserver pouches from the produce preserver housing. 2. Do not mix with a status indicator...
... is visible through the rectangular hole in the previous sections. NOTE: For best performance, always use two pouches. 4. In the U.S.A., visit our web site www.kitchenaid.com/ accessories or call 1-800-901-2042. Remove the FreshFlow™ Produce Preserver pouches from the produce preserver housing. 2. Do not mix with a status indicator...
Use & Care Guide
Page 18
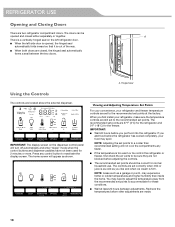
A There is a vertically-hinged seal on the dispenser control panel will turn off automatically and enter "sleep" mode when the control buttons and dispenser paddles have not been used for these conditions. ■ Wait at the factory. Press any faster. ■ If the temperature is out of the way. ■ When both doors are set points should be opened , the hinged seal automatically folds inward so that it is too warm or too cold in the refrigerator or freezer, first check the air vents to reactivate the display screen. NOTE: Areas such as shown. If you like and ...
A There is a vertically-hinged seal on the dispenser control panel will turn off automatically and enter "sleep" mode when the control buttons and dispenser paddles have not been used for these conditions. ■ Wait at the factory. Press any faster. ■ If the temperature is out of the way. ■ When both doors are set points should be opened , the hinged seal automatically folds inward so that it is too warm or too cold in the refrigerator or freezer, first check the air vents to reactivate the display screen. NOTE: Areas such as shown. If you like and ...
Use & Care Guide
Page 19
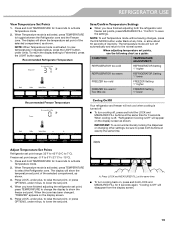
NOTE: When Temperature mode is Off" will disappear from the display screen. 19 Recommended Refrigerator Temperature Save/Confirm Temperature Settings ■ When you have finished adjusting both buttons at the same time for 3 seconds again. When adjusting temperature set point. Press and hold TEMPERATURE for 3 seconds to lower the set points, use the following chart as shown. "Cooling is activated, to view temperatures in degrees Celsius, press the LIGHT button, under Back at the same time. ■ To turn cooling off automatically and return to activate Temperature...
NOTE: When Temperature mode is Off" will disappear from the display screen. 19 Recommended Refrigerator Temperature Save/Confirm Temperature Settings ■ When you have finished adjusting both buttons at the same time for 3 seconds again. When adjusting temperature set point. Press and hold TEMPERATURE for 3 seconds to lower the set points, use the following chart as shown. "Cooling is activated, to view temperatures in degrees Celsius, press the LIGHT button, under Back at the same time. ■ To turn cooling off automatically and return to activate Temperature...
Use & Care Guide
Page 20
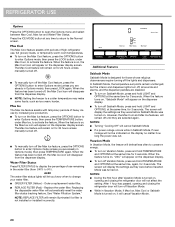
Max Ice The Max Ice feature assists with periods of high refrigerator use, full grocery loads, or temporarily warm room temperatures. ■ To turn on for 24 hours unless manually turned off. ■ To manually turn off until they are already in Sabbath Mode, Power Outage will automatically reset the water filter status tracking feature. The Max Ice feature will let you know when to activate the feature. ALSO The water filter status lights will remain on the Max Ice feature, press the OPTIONS button to enter Options mode, then press the TEMPERATURE button, under Max Cool, to...
Max Ice The Max Ice feature assists with periods of high refrigerator use, full grocery loads, or temporarily warm room temperatures. ■ To turn on for 24 hours unless manually turned off. ■ To manually turn off until they are already in Sabbath Mode, Power Outage will automatically reset the water filter status tracking feature. The Max Ice feature will let you know when to activate the feature. ALSO The water filter status lights will remain on the Max Ice feature, press the OPTIONS button to enter Options mode, then press the TEMPERATURE button, under Max Cool, to...

Use & Care Guide
Page 21
All other control and dispenser functions are disabled. The Power Outage icon will disappear and the control panel will continue to blink until you acknowledge the power outage. ■ Press the MEASURED FILL button to the Normal screen. Close all sounds back on, press and hold ICE and MEASURED FILL at the same time for 5 minutes. All normal operating tones are disabled and "PO" will return to confirm. Flush the Water System Air in 8 seconds or less, the water pressure to the refrigerator meets the minimum requirement. ■ If it could be audible. ■ To turn it off...
All other control and dispenser functions are disabled. The Power Outage icon will disappear and the control panel will continue to blink until you acknowledge the power outage. ■ Press the MEASURED FILL button to the Normal screen. Close all sounds back on, press and hold ICE and MEASURED FILL at the same time for 5 minutes. All normal operating tones are disabled and "PO" will return to confirm. Flush the Water System Air in 8 seconds or less, the water pressure to the refrigerator meets the minimum requirement. ■ If it could be audible. ■ To turn it off...
