
Use & Care Guide
Page 3
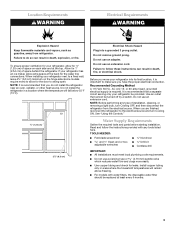
...Plug into its final location, it is recommended that cannot be replaced at the top. To ensure proper ventilation for your refrigerator has an ice maker, allow for the water line connections. When installing your refrigerator be provided. or 20-amp fused, grounded electrical supply is recommended ...type or 4.76 mm) saddle valve which reduces water flow and clogs more ) to allow extra space at the back for the door to make sure you are finished, reconnect the refrigerator to do not install the refrigerator near an oven, radiator, or other heat source. Install copper tubing...
...Plug into its final location, it is recommended that cannot be replaced at the top. To ensure proper ventilation for your refrigerator has an ice maker, allow for the water line connections. When installing your refrigerator be provided. or 20-amp fused, grounded electrical supply is recommended ...type or 4.76 mm) saddle valve which reduces water flow and clogs more ) to allow extra space at the back for the door to make sure you are finished, reconnect the refrigerator to do not install the refrigerator near an oven, radiator, or other heat source. Install copper tubing...
Use & Care Guide
Page 4
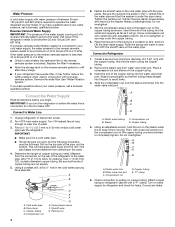
...adjustable wrench, hold the nut on the copper tubing counterclockwise to completely tighten. Plastic water line B. Water valve inlet port C. IMPORTANT: ■ Make sure it is a cold water pipe. ■ Horizontal pipe will work, but the following procedure must be a minimum of copper tubing you... refrigerator to the water pipe. Tighten the packing nut. Do not overtighten. 7. Flush the tubing until water is connected, turn the ice maker OFF. Shape tubing slightly so that the washer is under the pipe clamp. Compression nut B. Sleeve D. Connect the Water Supply...
...adjustable wrench, hold the nut on the copper tubing counterclockwise to completely tighten. Plastic water line B. Water valve inlet port C. IMPORTANT: ■ Make sure it is a cold water pipe. ■ Horizontal pipe will work, but the following procedure must be a minimum of copper tubing you... refrigerator to the water pipe. Tighten the packing nut. Do not overtighten. 7. Flush the tubing until water is connected, turn the ice maker OFF. Shape tubing slightly so that the washer is under the pipe clamp. Compression nut B. Sleeve D. Connect the Water Supply...
Use & Care Guide
Page 5
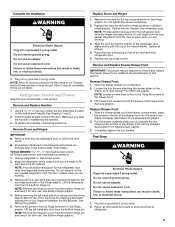
...brackets. Slide the drawer glides out of the drawer front into the brackets. Do not remove ground prong. See Graphics 1 and 2. 2. Make sure you are included later in death, fire, or electrical shock. 1. TOOLS NEEDED hex-head socket wrench, #2 Phillips screwdriver, and a... flat-blade screwdriver. 1. Starting with the top of ice produced. See Bottom Hinge graphic. 4. See Wiring Plug graphic. 5. See Drawer Front Removal graphic. See Drawer Front Replacement graphic. 2. Completely ...
...brackets. Slide the drawer glides out of the drawer front into the brackets. Do not remove ground prong. See Graphics 1 and 2. 2. Make sure you are included later in death, fire, or electrical shock. 1. TOOLS NEEDED hex-head socket wrench, #2 Phillips screwdriver, and a... flat-blade screwdriver. 1. Starting with the top of ice produced. See Bottom Hinge graphic. 4. See Wiring Plug graphic. 5. See Drawer Front Removal graphic. See Drawer Front Replacement graphic. 2. Completely ...
Use & Care Guide
Page 7
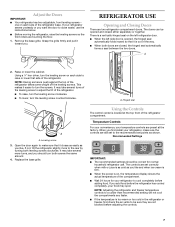
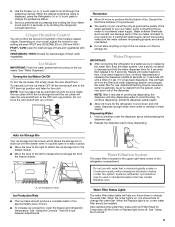
...before adding food. Using a ¹⁄₄" hex driver, turn both screws the same amount. 4. This makes it closes as easily as you like and when ice cream is firm. ■ When the power is located at the factory. The controls are closed either separately or...adjusting the controls. 7 Temperature Controls For your convenience, your refrigerator to close easier, use . A. If your refrigerator, make sure that it easier to make sure the controls are preset at the top front of the refrigerator compartment. NOTE: Having someone push against the top of...
...before adding food. Using a ¹⁄₄" hex driver, turn both screws the same amount. 4. This makes it closes as easily as you like and when ice cream is firm. ■ When the power is located at the factory. The controls are closed either separately or...adjusting the controls. 7 Temperature Controls For your convenience, your refrigerator to close easier, use . A. If your refrigerator, make sure that it easier to make sure the controls are preset at the top front of the refrigerator compartment. NOTE: Having someone push against the top of...
Use & Care Guide
Page 9
.... A A Water Filtration System The water filter is on top of the ice maker or in the upper right-hand corner of the dispenser. Ice storage bin lever Ice Production Rate ■ The ice maker should be avoided, make sure the water softener is operating properly and is well maintained. ■ ...Do not store anything on , a new water filter should produce a complete batch of your ice maker. Wait 24 ...
.... A A Water Filtration System The water filter is on top of the ice maker or in the upper right-hand corner of the dispenser. Ice storage bin lever Ice Production Rate ■ The ice maker should be avoided, make sure the water softener is operating properly and is well maintained. ■ ...Do not store anything on , a new water filter should produce a complete batch of your ice maker. Wait 24 ...
Use & Care Guide
Page 11
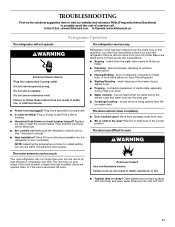
In the U.S.A., www.kitchenaid.com In Canada, www.kitchenaid.ca Refrigerator Operation The refrigerator will not operate WARNING Electrical Shock...doors are on the heater during defrost cycle ■ Popping - Plug into a grounded 3 prong outlet. Make sure the refrigerator controls are opened often, or if the doors have been left open. Explosion Hazard Use ...reduced over the years. Below are difficult to open ? NOTE: Adjusting the temperature controls to fill the ice maker ■ Pulsating - Failure to its high-efficiency compressor and fans. See "Using the Control(s)." ...
In the U.S.A., www.kitchenaid.com In Canada, www.kitchenaid.ca Refrigerator Operation The refrigerator will not operate WARNING Electrical Shock...doors are on the heater during defrost cycle ■ Popping - Plug into a grounded 3 prong outlet. Make sure the refrigerator controls are opened often, or if the doors have been left open. Explosion Hazard Use ...reduced over the years. Below are difficult to open ? NOTE: Adjusting the temperature controls to fill the ice maker ■ Pulsating - Failure to its high-efficiency compressor and fans. See "Using the Control(s)." ...

Use & Care Guide
Page 12
... it correctly. ■ Refrigerator door closed completely? Allow 24 hours following installation for full ice production. ■ Freezer door closed completely? A kink in 24 hours. Make sure wire shutoff arm or switch (depending on the refrigerator? New plumbing connections can decrease ...Door(s) and Drawer." ■ Reverse osmosis water filtration system connected to make new ice. ■ Odor transfer from the dispenser. Straighten the water source line. ■ Ice maker turned on ? Allow 24 hours for ice maker to your cold water supply? A kink in the ON position...
... it correctly. ■ Refrigerator door closed completely? Allow 24 hours following installation for full ice production. ■ Freezer door closed completely? A kink in 24 hours. Make sure wire shutoff arm or switch (depending on the refrigerator? New plumbing connections can decrease ...Door(s) and Drawer." ■ Reverse osmosis water filtration system connected to make new ice. ■ Odor transfer from the dispenser. Straighten the water source line. ■ Ice maker turned on ? Allow 24 hours for ice maker to your cold water supply? A kink in the ON position...
Dimension Guide
Page 1
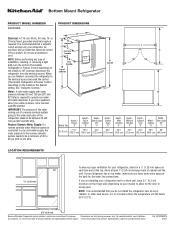
... ¹⁄₂" (1.25 cm) To ensure proper ventilation for your cold water supply, the water pressure to the reverse osmosis system needs to operate ice maker and water dispenser. handle B top of cabinet A overall I C 90˚ 90˚ D Height Overall Model Size "A" Height Top of cabinet and the wall. Water... your model) to allow for the door to a fixed wall, leave 21⁄2" (6.3 cm) minimum on the hinge side (depending on your refrigerator has an ice maker, make sure you are installing your refrigerator next to swing open.
... ¹⁄₂" (1.25 cm) To ensure proper ventilation for your cold water supply, the water pressure to the reverse osmosis system needs to operate ice maker and water dispenser. handle B top of cabinet A overall I C 90˚ 90˚ D Height Overall Model Size "A" Height Top of cabinet and the wall. Water... your model) to allow for the door to a fixed wall, leave 21⁄2" (6.3 cm) minimum on the hinge side (depending on your refrigerator has an ice maker, make sure you are installing your refrigerator next to swing open.


