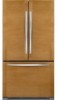
Use & Care Guide
Page 2
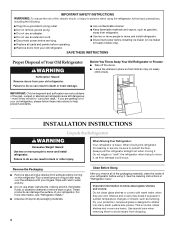
... the refrigerator, follow these instructions to help prevent accidents. Failure to do so can damage the surface of /recycle all parts and panels before operating. ■ Remove doors from your protection, tempered glass is designed to avoid impact from refrigerator. ■ Use two ... ■ Leave the shelves in "Refrigerator Care." Remove the Packaging ■ Remove tape and glue residue from your refrigerator before installing ice maker (on the refrigerator. For more people to remove tape or glue. even if they are getting rid of your refrigerator. IMPORTANT ...
... the refrigerator, follow these instructions to help prevent accidents. Failure to do so can damage the surface of /recycle all parts and panels before operating. ■ Remove doors from your protection, tempered glass is designed to avoid impact from refrigerator. ■ Use two ... ■ Leave the shelves in "Refrigerator Care." Remove the Packaging ■ Remove tape and glue residue from your refrigerator before installing ice maker (on the refrigerator. For more people to remove tape or glue. even if they are getting rid of your refrigerator. IMPORTANT ...

Installation Guide
Page 1
Front Panel ( 3/4" Max.) Spacer Panel ( 1/16") Backing Panel ( 1/4") Refrigerator Door Routed Raised Panel Method Trim Frame Surrounding Door Routed Area Front Panel ( 3/4" Max.) Backing Panel ( 1/4") Refrigerator Door 12884405 06/08 A Panel Front Spacer Backing Type Panel Panel Panel* 17-3/4” 16-3/4” 17-3/8” A (451mm) (425mm) (441mm) 44-1/8” 43-3/16” 43-13/16” B (1121mm) (1097mm) (1113mm) B 24”...
Front Panel ( 3/4" Max.) Spacer Panel ( 1/16") Backing Panel ( 1/4") Refrigerator Door Routed Raised Panel Method Trim Frame Surrounding Door Routed Area Front Panel ( 3/4" Max.) Backing Panel ( 1/4") Refrigerator Door 12884405 06/08 A Panel Front Spacer Backing Type Panel Panel Panel* 17-3/4” 16-3/4” 17-3/8” A (451mm) (425mm) (441mm) 44-1/8” 43-3/16” 43-13/16” B (1121mm) (1097mm) (1113mm) B 24”...

Installation Guide
Page 2
...move and install refrigerator. Remove side trim from the door . NOTE: Consult your cabinetmaker for door removal if necessary. Decorator Panel Installation WARNING Excessive Weight Hazard Use two or more people to do so can result in back or other injury. 1. ... Lift upper locking trim from either side of door. NOTE: For ease of decorator panels. Backing Panel Spacer Panel Trim Front Panel Door Door Panel Installation common with the installation process, add the custom panel to provide own handles. See user guide for creation of assembly and to familiarize yourself...
...move and install refrigerator. Remove side trim from the door . NOTE: Consult your cabinetmaker for door removal if necessary. Decorator Panel Installation WARNING Excessive Weight Hazard Use two or more people to do so can result in back or other injury. 1. ... Lift upper locking trim from either side of door. NOTE: For ease of decorator panels. Backing Panel Spacer Panel Trim Front Panel Door Door Panel Installation common with the installation process, add the custom panel to provide own handles. See user guide for creation of assembly and to familiarize yourself...

Installation Guide
Page 3
...Assure the upper locking trim grooves engage the rivets on top of the side trim to hold panel in place. 5. Fully seated top trim is close to the lower fixed trim and center the panel with the door. 7. Align the upper locking trim with top of door and completely covers clips... of the decorator panel to flush with the clips on the door panel while simultaneously seating into the decorator panel groove. 10. Align the bottom edge of side trim. 6. SIDE TRIM CLIP Front Panel 4. Repeat procedure for opposite side of the lower fixed trim...
...Assure the upper locking trim grooves engage the rivets on top of the side trim to hold panel in place. 5. Fully seated top trim is close to the lower fixed trim and center the panel with the door. 7. Align the upper locking trim with top of door and completely covers clips... of the decorator panel to flush with the clips on the door panel while simultaneously seating into the decorator panel groove. 10. Align the bottom edge of side trim. 6. SIDE TRIM CLIP Front Panel 4. Repeat procedure for opposite side of the lower fixed trim...


