Installation Guide
Page 2
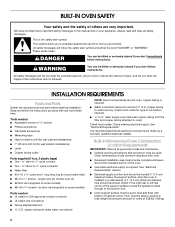
...; ¼" to ¼" water supply union (between copper tubing from the filter and copper tubing attached to support a total weight (microwave and built-in the right rear or left rear corner of injury, and tell you how to water source). Check existing electrical ...(to the junction box. ■ Oven support surface must be killed or seriously injured if you don't immediately follow the instructions provided with bottom of the oven. ■ Grounded electrical supply is the safety alert symbol. Built-In Microwave/Oven Combination Location Requirements IMPORTANT: Observe all governing ...
...; ¼" to ¼" water supply union (between copper tubing from the filter and copper tubing attached to support a total weight (microwave and built-in the right rear or left rear corner of injury, and tell you how to water source). Check existing electrical ...(to the junction box. ■ Oven support surface must be killed or seriously injured if you don't immediately follow the instructions provided with bottom of the oven. ■ Grounded electrical supply is the safety alert symbol. Built-In Microwave/Oven Combination Location Requirements IMPORTANT: Observe all governing ...
Installation Guide
Page 5
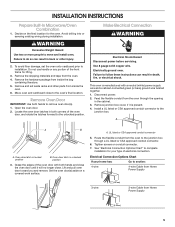
... the oven. 6. Make Electrical Connection WARNING Electrical Shock Hazard Disconnect power before servicing. Remove Oven Door IMPORTANT: Use both corners of electrical connection. Use 8 gauge solid copper wire. Remove junction box cover, if it will no longer close to the unlocked position. A. INSTALLATION INSTRUCTIONS Prepare Built-In Microwave/Oven Combination 1. Open the oven door. 2. This oven is...
... the oven. 6. Make Electrical Connection WARNING Electrical Shock Hazard Disconnect power before servicing. Remove Oven Door IMPORTANT: Use both corners of electrical connection. Use 8 gauge solid copper wire. Remove junction box cover, if it will no longer close to the unlocked position. A. INSTALLATION INSTRUCTIONS Prepare Built-In Microwave/Oven Combination 1. Open the oven door. 2. This oven is...
Installation Guide
Page 8
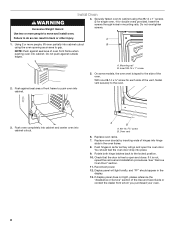
... cabinet. Insert #8-14 x 1" screw. 5. If it is not, repeat the removal and installation procedures. WARNING Excessive Weight Hazard Use two or more people, lift oven partially into cabinet cutout B using the #8-14 x 1" screws (2 for single oven, 4 for each side of the Use and Care Guide or contact the dealer from whom you purchased...
... cabinet. Insert #8-14 x 1" screw. 5. If it is not, repeat the removal and installation procedures. WARNING Excessive Weight Hazard Use two or more people, lift oven partially into cabinet cutout B using the #8-14 x 1" screws (2 for single oven, 4 for each side of the Use and Care Guide or contact the dealer from whom you purchased...
Microwave Use and Care
Page 13
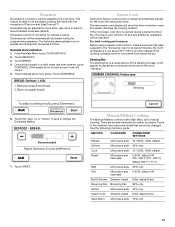
... Doneness key will be automatically activated during a sensor function the microwave oven will turn off, and any additional operations will be canceled. From the Main Menu touch COOK METHOD. 2. If the weight is for manual cooking. It will show the time countdown once... SETTINGS Reheat Microwave-safe 10-100%; 100% default Defrost Microwave-safe 20% only Cook Microwave-safe 10-100%; 100% default Roast Microwave and heat-safe 0-30%, default 0% 225°-450°F (107°-232°C) default 350°F (177°C) Melt Microwave-safe 30% only Grill Microwave and 0-40...
... Doneness key will be automatically activated during a sensor function the microwave oven will turn off, and any additional operations will be canceled. From the Main Menu touch COOK METHOD. 2. If the weight is for manual cooking. It will show the time countdown once... SETTINGS Reheat Microwave-safe 10-100%; 100% default Defrost Microwave-safe 20% only Cook Microwave-safe 10-100%; 100% default Roast Microwave and heat-safe 0-30%, default 0% 225°-450°F (107°-232°C) default 350°F (177°C) Melt Microwave-safe 30% only Grill Microwave and 0-40...
Microwave Use and Care
Page 15
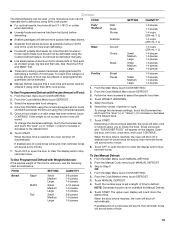
Defrost The Defrost feature can be used, or the microwave oven can be selected. ■ Manual Defrost requires that...Menu touch DEFROST. 3. Enter the POUNDS using the numerical keypad and/or touch OUNCES and enter the amount using 30% cook power. Touch START. From the Main Menu touch COOK METHOD. 2. From the Cook Method menu touch ...the menu screens to Step 5 OR 1. Select the appropriate food category. 4. Select food type. 4. If the weight is reached, the oven will sound every minute. 15 To change the doneness settings, touch the Doneness key and touch the "plus "...
Defrost The Defrost feature can be used, or the microwave oven can be selected. ■ Manual Defrost requires that...Menu touch DEFROST. 3. Enter the POUNDS using the numerical keypad and/or touch OUNCES and enter the amount using 30% cook power. Touch START. From the Main Menu touch COOK METHOD. 2. From the Cook Method menu touch ...the menu screens to Step 5 OR 1. Select the appropriate food category. 4. Select food type. 4. If the weight is reached, the oven will sound every minute. 15 To change the doneness settings, touch the Doneness key and touch the "plus "...
Microwave Use and Care
Page 18
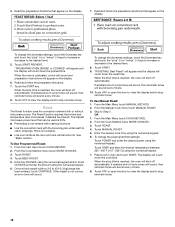
...time and temperature (and microwaves if desired) be used is 30%. ■ Preheating is reached, the oven will shut off automatically. Place on the display. 6. From the main menu touch COOK METHOD. 2. Touch BEEF ROAST. 5. When the stop time is reached, the oven will count down the ... 3. To change the preprogrammed settings: Touch POWER and enter the desired power using the numerical keypad. 6. Touch MANUAL ROAST. 5. Once a food weight within a 2-5 lb (0.9-2.3 kg) range has been entered, touch CONTINUE. Skip to clear the display and/or stop reminder tones To Use Manual...
...time and temperature (and microwaves if desired) be used is 30%. ■ Preheating is reached, the oven will shut off automatically. Place on the display. 6. From the main menu touch COOK METHOD. 2. Touch BEEF ROAST. 5. When the stop time is reached, the oven will count down the ... 3. To change the preprogrammed settings: Touch POWER and enter the desired power using the numerical keypad. 6. Touch MANUAL ROAST. 5. Once a food weight within a 2-5 lb (0.9-2.3 kg) range has been entered, touch CONTINUE. Skip to clear the display and/or stop reminder tones To Use Manual...
