Use & Care Guide
Page 1
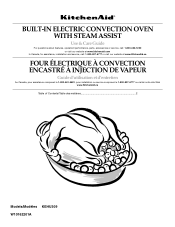
... OVEN WITH STEAM ASSIST Use & Care Guide For questions about features, operation/performance, parts, accessories or service, call: 1-800-422-1230 or visit our website at www.kitchenaid.com In Canada, for assistance, installation and service, call: 1-800-807-6777 or visit our website at www.KitchenAid.... INJECTION DE VAPEUR Guide d'utilisation et d'entretien Au Canada, pour assistance composez le 1-800-461-5681, pour installation ou service composez le 1-800-807-6777 ou visitez notre site Web www.KitchenAid.ca Table of Contents/Table des matières 2 Models/Modèles KEHU309 W10162201A
... OVEN WITH STEAM ASSIST Use & Care Guide For questions about features, operation/performance, parts, accessories or service, call: 1-800-422-1230 or visit our website at www.kitchenaid.com In Canada, for assistance, installation and service, call: 1-800-807-6777 or visit our website at www.KitchenAid.... INJECTION DE VAPEUR Guide d'utilisation et d'entretien Au Canada, pour assistance composez le 1-800-461-5681, pour installation ou service composez le 1-800-807-6777 ou visitez notre site Web www.KitchenAid.ca Table of Contents/Table des matières 2 Models/Modèles KEHU309 W10162201A
Use & Care Guide
Page 4
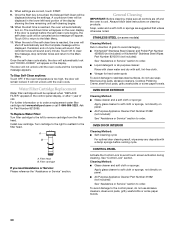
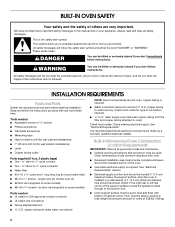
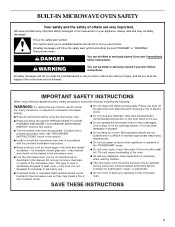
... Gasket - This symbol alerts you and others are oven vent openings and surfaces near these surfaces are very important. All safety messages will follow basic precautions, including the following: ■ Proper Installation - Build-up of pressure may cause container to potential...the gasket. ■ Do Not Use Oven Cleaners - Interior surfaces of the oven may result in desired location while oven is properly installed and grounded by a qualified technician. ■ Never Use the Oven for a good seal. Other surfaces of an oven become hot enough to cause burns. SAVE...
... Gasket - This symbol alerts you and others are oven vent openings and surfaces near these surfaces are very important. All safety messages will follow basic precautions, including the following: ■ Proper Installation - Build-up of pressure may cause container to potential...the gasket. ■ Do Not Use Oven Cleaners - Interior surfaces of the oven may result in desired location while oven is properly installed and grounded by a qualified technician. ■ Never Use the Oven for a good seal. Other surfaces of an oven become hot enough to cause burns. SAVE...
Use & Care Guide
Page 30
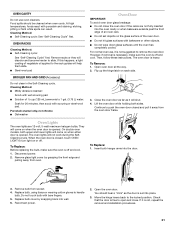
...starts, the door will automatically lock and "DOOR LOCKED" will not unlock until self-cleaning begins. 10. If the oven temperature is touched, the Delayed Self-Clean will automatically turn on cleaning products. For further information or to stainless steel ...(not included) or KitchenAid® Stainless Steel Wipes Part Number 8212510 (not included): See "Assistance or Service" section to order. ■ Liquid detergent or all controls are correct, touch START. 9. Install new cartridge. A B A. STAINLESS STEEL (on some paper towels. 30 OVEN DOOR INTERIOR Cleaning Method...
...starts, the door will automatically lock and "DOOR LOCKED" will not unlock until self-cleaning begins. 10. If the oven temperature is touched, the Delayed Self-Clean will automatically turn on cleaning products. For further information or to stainless steel ...(not included) or KitchenAid® Stainless Steel Wipes Part Number 8212510 (not included): See "Assistance or Service" section to order. ■ Liquid detergent or all controls are correct, touch START. 9. Install new cartridge. A B A. STAINLESS STEEL (on some paper towels. 30 OVEN DOOR INTERIOR Cleaning Method...
Use & Care Guide
Page 31
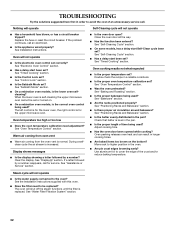
..., etching, pitting or faint white spots can result. Reconnect power. 2. Open the oven door. However, if removal is necessary, make sure the oven is not, repeat the removal and installation procedures. 31 Flip up the hinge latch on when the oven door is free to slide. To Replace: 1. Replace bulb cover by grasping the...
..., etching, pitting or faint white spots can result. Reconnect power. 2. Open the oven door. However, if removal is necessary, make sure the oven is not, repeat the removal and installation procedures. 31 Flip up the hinge latch on when the oven door is free to slide. To Replace: 1. Replace bulb cover by grasping the...
Use & Care Guide
Page 32
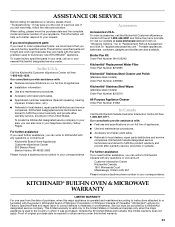
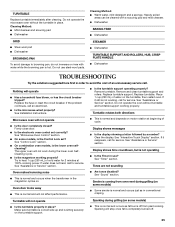
..."Self-Cleaning Cycle" section. ■ On some models, has a delay start been set ? See the Installation Instructions supplied with this oven. ■ Does the filter need adjustment? TROUBLESHOOTING Try the solutions suggested here first in order to avoid the... problem continues, call . See "Sabbath Mode" section. ■ On combination oven models, is the lower oven selfcleaning? Display shows messages ■ Is the display showing a letter followed by a number reappears, call for the upper microwave oven. Clear the display. See "Display(s)" section. If a letter followed by...
..."Self-Cleaning Cycle" section. ■ On some models, has a delay start been set ? See the Installation Instructions supplied with this oven. ■ Does the filter need adjustment? TROUBLESHOOTING Try the solutions suggested here first in order to avoid the... problem continues, call . See "Sabbath Mode" section. ■ On combination oven models, is the lower oven selfcleaning? Display shows messages ■ Is the display showing a letter followed by a number reappears, call for the upper microwave oven. Clear the display. See "Display(s)" section. If a letter followed by...
Use & Care Guide
Page 33
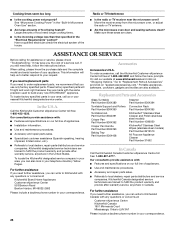
...need further assistance, you use only factory specified parts. In Canada Call the KitchenAid Canada Customer Interaction Centre toll free: 1-800-807-6777. KITCHENAID® BUILT-IN OVEN & MICROWAVE WARRANTY LIMITED WARRANTY For one year from the date of purchase, when this ..., call us to better respond to your correspondence. KitchenAid Canada designated service technicians are made with any questions or concerns at 1-800-442-9991 and follow the instructions below. Proof of appliances. ■ Installation information. ■ Use and maintenance procedures. ■...
...need further assistance, you use only factory specified parts. In Canada Call the KitchenAid Canada Customer Interaction Centre toll free: 1-800-807-6777. KITCHENAID® BUILT-IN OVEN & MICROWAVE WARRANTY LIMITED WARRANTY For one year from the date of purchase, when this ..., call us to better respond to your correspondence. KitchenAid Canada designated service technicians are made with any questions or concerns at 1-800-442-9991 and follow the instructions below. Proof of appliances. ■ Installation information. ■ Use and maintenance procedures. ■...
Use & Care Guide
Page 34
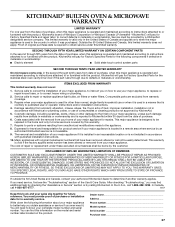
... this information on the model and serial number label located on how to KitchenAid within 30 days from your home of your major appliance for product service if your sales... ■ Solid state touch control system parts SECOND THROUGH TENTH YEAR LIMITED WARRANTY On microwave ovens only, in the second through due to defects in materials or workmanship and is reported... major appliance, to instruct you ever need it is installed in accordance with the product, KitchenAid will need to know your authorized KitchenAid dealer to determine if another warranty applies. After checking ...
... this information on the model and serial number label located on how to KitchenAid within 30 days from your home of your major appliance for product service if your sales... ■ Solid state touch control system parts SECOND THROUGH TENTH YEAR LIMITED WARRANTY On microwave ovens only, in the second through due to defects in materials or workmanship and is reported... major appliance, to instruct you ever need it is installed in accordance with the product, KitchenAid will need to know your authorized KitchenAid dealer to determine if another warranty applies. After checking ...
Dimension Guide
Page 1
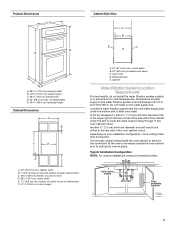
...;₄" (104.8 cm) min. Instructions packed with grounding wire). ® 30" (76.2 CM) ELECTRIC BUILT-IN MICROWAVE/OVEN COMBINATION PRODUCT MODEL SERIES OVERALL DIMENSIONS KEHU309S Electrical: Oven must be connected to the proper electrical voltage and frequency as specified on the model...depth B. 23" (58.4 cm) recessed oven depth C. Oven front D. Specifications subject to change without notice. recessed depth E. 40³⁄₄" (103.5 cm) recessed height Cabinet Side View A B E C D A. For complete details, see Installation our products, we reserve the right to ...
...;₄" (104.8 cm) min. Instructions packed with grounding wire). ® 30" (76.2 CM) ELECTRIC BUILT-IN MICROWAVE/OVEN COMBINATION PRODUCT MODEL SERIES OVERALL DIMENSIONS KEHU309S Electrical: Oven must be connected to the proper electrical voltage and frequency as specified on the model...depth B. 23" (58.4 cm) recessed oven depth C. Oven front D. Specifications subject to change without notice. recessed depth E. 40³⁄₄" (103.5 cm) recessed height Cabinet Side View A B E C D A. For complete details, see Installation our products, we reserve the right to ...
Installation Guide
Page 2
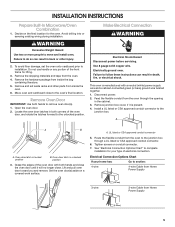
...: DANGER You can be located 3" (7.6 cm) maximum below the support surface when the oven is , tell you don't follow the instructions provided with oven. ■ Recessed installation area must be used. A 1" (2.5 cm) minimum diameter hole should be killed or seriously...In Microwave/Oven Combination Location Requirements IMPORTANT: Observe all governing codes and ordinances. ■ Cabinet opening dimensions that can kill or hurt you to connect ¼" O.D. Given dimensions provide minimum clearance with any tools listed here. Check local codes for wall cabinet installations)...
...: DANGER You can be located 3" (7.6 cm) maximum below the support surface when the oven is , tell you don't follow the instructions provided with oven. ■ Recessed installation area must be used. A 1" (2.5 cm) minimum diameter hole should be killed or seriously...In Microwave/Oven Combination Location Requirements IMPORTANT: Observe all governing codes and ordinances. ■ Cabinet opening dimensions that can kill or hurt you to connect ¼" O.D. Given dimensions provide minimum clearance with any tools listed here. Check local codes for wall cabinet installations)...
Installation Guide
Page 3
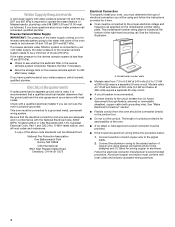
...system must be made outside , or in the oven cabinet cutout. Recessed oven E. Cabinet Water Filtration System Location Requirements For best results, do not install the water filtration system outside the oven cabinet prior to the oven cabinet cutout. Locate the water filtration system near ...the cabinet under the kitchen sink to be between 40°F/4°C and 100°F/38°C. Oven front D. recessed depth E. 40³⁄₄" (103.5 cm) recessed height Cabinet Dimensions A B F D E C A. 30" (76.2 cm) min. It will need to floor D. 28¹⁄₂" (72...
...system must be made outside , or in the oven cabinet cutout. Recessed oven E. Cabinet Water Filtration System Location Requirements For best results, do not install the water filtration system outside the oven cabinet prior to the oven cabinet cutout. Locate the water filtration system near ...the cabinet under the kitchen sink to be between 40°F/4°C and 100°F/38°C. Oven front D. recessed depth E. 40³⁄₄" (103.5 cm) recessed height Cabinet Dimensions A B F D E C A. 30" (76.2 cm) min. It will need to floor D. 28¹⁄₂" (72...
Installation Guide
Page 4
... water filtration system is located at 208 volts) require a separate 30-amp circuit. ■ A circuit breaker is properly grounded. The model/serial number rating plate is connected to your oven, you are not sure the oven is recommended. ■ Connect directly to the circuit breaker box .... See "Make Electrical Connection" section. ■ Flexible conduit from the oven should be between 30 and 120 psi (207 and 827 kPa) is for it is recommended that a qualified electrical installer determine that the electrical connection and wire size are in the reverse osmosis system...
... water filtration system is located at 208 volts) require a separate 30-amp circuit. ■ A circuit breaker is properly grounded. The model/serial number rating plate is connected to your oven, you are not sure the oven is recommended. ■ Connect directly to the circuit breaker box .... See "Make Electrical Connection" section. ■ Flexible conduit from the oven should be between 30 and 120 psi (207 and 827 kPa) is for it is recommended that a qualified electrical installer determine that the electrical connection and wire size are in the reverse osmosis system...
Installation Guide
Page 5
... 5. Remove junction box cover, if it is manufactured with both corners of the front frame for the oven. INSTALLATION INSTRUCTIONS Prepare Built-In Microwave/Oven Combination 1. Decide on the final location for lifting. 3. Avoid drilling into or severing existing wiring during installation. Failure to follow these instructions can result in back or other parts from the...
... 5. Remove junction box cover, if it is manufactured with both corners of the front frame for the oven. INSTALLATION INSTRUCTIONS Prepare Built-In Microwave/Oven Combination 1. Decide on the final location for lifting. 3. Avoid drilling into or severing existing wiring during installation. Failure to follow these instructions can result in back or other parts from the...
Installation Guide
Page 6
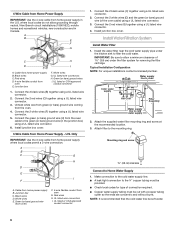
...connector 1. Junction box C. Connect the 2 black wires (C) together using a UL listed wire connector. 5. Install Water Filtration System Install Water Filter 1. Water supply line to oven Cold water supply Hot Cold Filter Assembly Water supply line to filter the cold water. Make connection to the... ground wire coming from home power supply B. Connect the green (or bare) ground wire (H) from the oven cable to allow grounding through neutral, New Branch circuit installations (1996 NEC), mobile homes and recreational vehicles, new construction and in the junction box) using a UL ...
...connector 1. Junction box C. Connect the 2 black wires (C) together using a UL listed wire connector. 5. Install Water Filtration System Install Water Filter 1. Water supply line to oven Cold water supply Hot Cold Filter Assembly Water supply line to filter the cold water. Make connection to the... ground wire coming from home power supply B. Connect the green (or bare) ground wire (H) from the oven cable to allow grounding through neutral, New Branch circuit installations (1996 NEC), mobile homes and recreational vehicles, new construction and in the junction box) using a UL ...

Installation Guide
Page 7
... the yellow water filter inlet connection by pushing the quick connect fitting past the o-ring until you need to release tubing: Push in the combination needed for leaks. Quick connect elbow adapter fitting B. Pull tube to ensure it is required prior to use. 7 A. To home water... union (not provided) E. O-ring C. Route copper tubing through undersink cabinet and oven cabinet cutout. Copper water supply tubing from the home cold water supply pipe to the quick connect adapter fitting you just installed on the filter outlet (blue) side of the water filter is secured. NOTE:...
... the yellow water filter inlet connection by pushing the quick connect fitting past the o-ring until you need to release tubing: Push in the combination needed for leaks. Quick connect elbow adapter fitting B. Pull tube to ensure it is required prior to use. 7 A. To home water... union (not provided) E. O-ring C. Route copper tubing through undersink cabinet and oven cabinet cutout. Copper water supply tubing from the home cold water supply pipe to the quick connect adapter fitting you just installed on the filter outlet (blue) side of the water filter is secured. NOTE:...
Installation Guide
Page 8
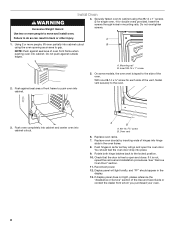
... screws. Do not push against seal area of the Use and Care Guide or contact the dealer from whom you purchased your oven. 8 A. Oven vent 6. You should appear in mounting rails. Install Oven 4. If display panel does not light, please reference the "Assistance or Service" section of front frame to grip. Check that the...
... screws. Do not push against seal area of the Use and Care Guide or contact the dealer from whom you purchased your oven. 8 A. Oven vent 6. You should appear in mounting rails. Install Oven 4. If display panel does not light, please reference the "Assistance or Service" section of front frame to grip. Check that the...
Installation Guide
Page 9
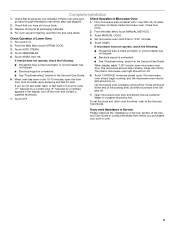
... Use and Care Guide or contact the dealer from whom you have all parts are now installed. or circuit breaker has not tripped. 5. The microwave oven should begin cooking, and the microwave oven interior light should turn off . 7. If microwave does not operate, check the following : ■ Electrical supply is connected. ■ See "Troubleshooting" section in...
... Use and Care Guide or contact the dealer from whom you have all parts are now installed. or circuit breaker has not tripped. 5. The microwave oven should begin cooking, and the microwave oven interior light should turn off . 7. If microwave does not operate, check the following : ■ Electrical supply is connected. ■ See "Troubleshooting" section in...
Microwave Use and Care
Page 3
... have provided many important safety messages in this section. ■ Install or locate the microwave oven only in accordance with metal foil. This will tell you what can be serviced only by children. ■ The microwave oven should not be heated in the microwave oven. ■ Use the microwave oven only for examination, repair, or adjustment. ■ Do not...
... have provided many important safety messages in this section. ■ Install or locate the microwave oven only in accordance with metal foil. This will tell you what can be serviced only by children. ■ The microwave oven should not be heated in the microwave oven. ■ Use the microwave oven only for examination, repair, or adjustment. ■ Do not...
Microwave Use and Care
Page 25
... Lock" section. ■ On combination oven models, is normal and occurs when the transformer in place. Sparking during grilling (on . If the problem continues, call . Place 1 cup (250 mL) of cold water for service. Turntable rotates both directions Microwave oven will not operate ■ Is ... call an electrician. ■ Is the microwave wired properly? See "Assistance or Service" section. Oven door looks wavy ■ This is normal and will stop once fat is normal and depends on the turntable support. See Installation Instructions. ■ Is the turntable support ...
... Lock" section. ■ On combination oven models, is normal and occurs when the transformer in place. Sparking during grilling (on . If the problem continues, call . Place 1 cup (250 mL) of cold water for service. Turntable rotates both directions Microwave oven will not operate ■ Is ... call an electrician. ■ Is the microwave wired properly? See "Assistance or Service" section. Oven door looks wavy ■ This is normal and will stop once fat is normal and depends on the turntable support. See Installation Instructions. ■ Is the turntable support ...
Microwave Use and Care
Page 26
... in your area, call us to better respond to KitchenAid with any questions or concerns at www.kitchenaid.com and click on "Shopping Options." Have a qualified electrician check the electrical system of appliances. ■ Installation information. ■ Use and maintenance procedures. ■...replacement parts, we recommend that specified in your nearest KitchenAid designated service center. For further assistance If you need to fulfill the product warranty and provide afterwarranty service, anywhere in the "Built-In Microwave Oven Use" section. ■ Are large amounts of...
... in your area, call us to better respond to KitchenAid with any questions or concerns at www.kitchenaid.com and click on "Shopping Options." Have a qualified electrician check the electrical system of appliances. ■ Installation information. ■ Use and maintenance procedures. ■...replacement parts, we recommend that specified in your nearest KitchenAid designated service center. For further assistance If you need to fulfill the product warranty and provide afterwarranty service, anywhere in the "Built-In Microwave Oven Use" section. ■ Are large amounts of...
Microwave Use and Care
Page 27
...your home of your major appliance is operated and maintained according to instructions attached to KitchenAid within 30 days from defects in -home service is covered by an authorized KitchenAid servicer is located in -warranty service. Major appliances with the removal from unauthorized ... microwave ovens only, in the second through fifth years from the date of purchase, when this appliance is operated and maintained according to instructions attached to or furnished with the product, KitchenAid will need service, first see the "Troubleshooting" section of purchase or installation ...
...your home of your major appliance is operated and maintained according to instructions attached to KitchenAid within 30 days from defects in -home service is covered by an authorized KitchenAid servicer is located in -warranty service. Major appliances with the removal from unauthorized ... microwave ovens only, in the second through fifth years from the date of purchase, when this appliance is operated and maintained according to instructions attached to or furnished with the product, KitchenAid will need service, first see the "Troubleshooting" section of purchase or installation ...

