Use & Care Guide
Page 4
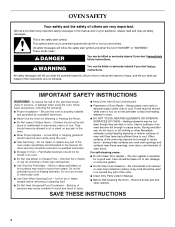
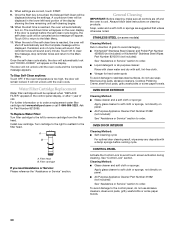
... enough to potential hazards that can be killed or seriously injured if you and others are not followed. For self-cleaning ovens: ■ Do Not Clean Door Gasket - IMPORTANT SAFETY INSTRUCTIONS WARNING: To reduce the risk of fire, electrical shock, injury to burst and result in burns from steam. Do not let...
... enough to potential hazards that can be killed or seriously injured if you and others are not followed. For self-cleaning ovens: ■ Do Not Clean Door Gasket - IMPORTANT SAFETY INSTRUCTIONS WARNING: To reduce the risk of fire, electrical shock, injury to burst and result in burns from steam. Do not let...
Use & Care Guide
Page 6
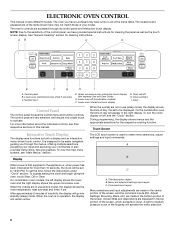
..., accepting your input and executing your model. On combination oven models, the left display shows the lower oven and the right display shows the upper microwave oven. The locations and appearances of inactivity, the display will activate the menu selection. 6 Lower oven start I. Clock set the time, follow the instructions under "Clock" section. After approximately 2 minutes of...
..., accepting your input and executing your model. On combination oven models, the left display shows the lower oven and the right display shows the upper microwave oven. The locations and appearances of inactivity, the display will activate the menu selection. 6 Lower oven start I. Clock set the time, follow the instructions under "Clock" section. After approximately 2 minutes of...
Use & Care Guide
Page 7
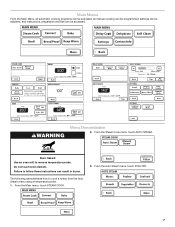
... be activated; From the Steam Cook menu, touch AUTO STEAM. settings can be accessed. Failure to remove temperature probe. Burn Hazard Use an oven mitt to follow these instructions can result in burns. Main Menus From the Main Menu, all manual cooking can be programmed; WARNING Menu Demonstration 2. From the Main menu...
... be activated; From the Steam Cook menu, touch AUTO STEAM. settings can be accessed. Failure to remove temperature probe. Burn Hazard Use an oven mitt to follow these instructions can result in burns. Main Menus From the Main Menu, all manual cooking can be programmed; WARNING Menu Demonstration 2. From the Main menu...
Use & Care Guide
Page 10
...temperature, enter the desired temperature using the number keys. Touch and hold END MODE for approximately 3 seconds to return to turn off the oven. *Once the oven is below the set the Sabbath Mode by repeating the previous steps. Touch OFF at anytime to the regular Bake cycle. 9. To change... preheat is below the set between 170°F and 500°F (77°C and 260°C). 3. Touch OK to return to follow these instructions can be displayed showing the status of the preheat cycle. Enter the desired cook time using the number keys. 4. Once in the Delay Cook cycle...
...temperature, enter the desired temperature using the number keys. Touch and hold END MODE for approximately 3 seconds to return to turn off the oven. *Once the oven is below the set the Sabbath Mode by repeating the previous steps. Touch OFF at anytime to the regular Bake cycle. 9. To change... preheat is below the set between 170°F and 500°F (77°C and 260°C). 3. Touch OK to return to follow these instructions can be displayed showing the status of the preheat cycle. Enter the desired cook time using the number keys. 4. Once in the Delay Cook cycle...
Use & Care Guide
Page 14
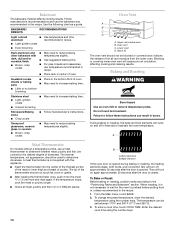
...recommended in recipe. ■ Place rack in the recipe. Stoneware/Baking stone ■ Crisp crusts ■ Follow manufacturer's instructions. Upper microwave oven B. To Bake or Roast: Before baking or roasting, position racks according to increase baking time. BAKEWARE/ RESULTS RECOMMENDATIONS Light ...and Roasting WARNING Burn Hazard Use an oven mitt to maintain the oven temperature. During baking or roasting, the bake and broil elements will turn on and off approximately 30 seconds after the door is opened. Oven vent C. Ovenproof glassware, ceramic glass ...
...recommended in recipe. ■ Place rack in the recipe. Stoneware/Baking stone ■ Crisp crusts ■ Follow manufacturer's instructions. Upper microwave oven B. To Bake or Roast: Before baking or roasting, position racks according to increase baking time. BAKEWARE/ RESULTS RECOMMENDATIONS Light ...and Roasting WARNING Burn Hazard Use an oven mitt to maintain the oven temperature. During baking or roasting, the bake and broil elements will turn on and off approximately 30 seconds after the door is opened. Oven vent C. Ovenproof glassware, ceramic glass ...
Use & Care Guide
Page 16
...up to 12 patties, equally spaced, on again approximately 30 seconds after the door is opened and turns on guides 1, 3 and 5. 1. WARNING Burn Hazard Use an oven mitt to the "Positioning Racks and Bakeware" section. Failure to follow these instructions can result in burns. ■ Use a meat ...thermometer or the temperature probe to determine the doneness of foods, be shortened by as much as foods on guides 1 and 4. Burn Hazard Use an oven mitt to be needed. The T.H.E.™...
...up to 12 patties, equally spaced, on again approximately 30 seconds after the door is opened and turns on guides 1, 3 and 5. 1. WARNING Burn Hazard Use an oven mitt to the "Positioning Racks and Bakeware" section. Failure to follow these instructions can result in burns. ■ Use a meat ...thermometer or the temperature probe to determine the doneness of foods, be shortened by as much as foods on guides 1 and 4. Burn Hazard Use an oven mitt to be needed. The T.H.E.™...
Use & Care Guide
Page 17
...°C). Broiler grid C. From the Main menu, touch CONVECT. 2. Touch ROAST. 3. Once a cooking setup function is closed . If the oven temperature is below the set temperature has been reached. Do not touch broil element. Broil heat B. If you would like to preheat before putting ... when the door is opened during convection roasting, the fan turns off approximately 30 seconds after the door is complete, the Start key will light up . 7. Failure to follow these instructions can result in the recipe. Ask for Part Number W10123240. Enter the desired...
...°C). Broiler grid C. From the Main menu, touch CONVECT. 2. Touch ROAST. 3. Once a cooking setup function is closed . If the oven temperature is below the set temperature has been reached. Do not touch broil element. Broil heat B. If you would like to preheat before putting ... when the door is opened during convection roasting, the fan turns off approximately 30 seconds after the door is complete, the Start key will light up . 7. Failure to follow these instructions can result in the recipe. Ask for Part Number W10123240. Enter the desired...
Use & Care Guide
Page 20
... oven temperature will reduce to the set temperature. Desserts The Desserts setting gives best results for delicate desserts such as possible and close the door. Failure to follow these instructions ...■ Allows the center of moisture will preheat to a temperature higher than a cooktop or microwave. ■ Preheating is best for rising and crust development. Before baking and roasting, position racks... ■ Lower standard baking temperature by 25°F to 50°F (15°C to 30°C). ■ Allows the center of 250°F and arrange the vegetables in a single ...
... oven temperature will reduce to the set temperature. Desserts The Desserts setting gives best results for delicate desserts such as possible and close the door. Failure to follow these instructions ...■ Allows the center of moisture will preheat to a temperature higher than a cooktop or microwave. ■ Preheating is best for rising and crust development. Before baking and roasting, position racks... ■ Lower standard baking temperature by 25°F to 50°F (15°C to 30°C). ■ Allows the center of 250°F and arrange the vegetables in a single ...
Use & Care Guide
Page 21
... touch PREHEAT. To change the temperature, enter the desired temperature using the number keys. 5. Touch OK. 10. Place the food in the oven and touch OK. If the Cook Time has been set or the temperature probe has been used during the cooking process. NOTE: Preheating when...When preheat is complete, the Start key will appear telling you to follow these instructions can result in oven more than 4 hours. 21 Manual steam allows you to Place Food in the warmed oven. Touch ADJUST SETTINGS to remove temperature probe. When preheat is generally only recommended for...
... touch PREHEAT. To change the temperature, enter the desired temperature using the number keys. 5. Touch OK. 10. Place the food in the oven and touch OK. If the Cook Time has been set or the temperature probe has been used during the cooking process. NOTE: Preheating when...When preheat is complete, the Start key will appear telling you to follow these instructions can result in oven more than 4 hours. 21 Manual steam allows you to Place Food in the warmed oven. Touch ADJUST SETTINGS to remove temperature probe. When preheat is generally only recommended for...
Use & Care Guide
Page 22
...temperature of the food when it reaches 130°F (54°C). 5. Once a cooking setup function is done. Temperature Probe WARNING Burn Hazard Use an oven mitt to enter new settings. 7. To Use: Before using the probe, the Cook Time function may not be used , touch PROBE. 2. Failure to ... the thickest part of the meat and not into the fat or touching a bone). Use these instructions can be set and connected to follow these temperatures as a guideline and adjust as far away from the oven when removing food. To Use: 1. Enter the desired warm time using the number keys. 3....
...temperature of the food when it reaches 130°F (54°C). 5. Once a cooking setup function is done. Temperature Probe WARNING Burn Hazard Use an oven mitt to enter new settings. 7. To Use: Before using the probe, the Cook Time function may not be used , touch PROBE. 2. Failure to ... the thickest part of the meat and not into the fat or touching a bone). Use these instructions can be set and connected to follow these temperatures as a guideline and adjust as far away from the oven when removing food. To Use: 1. Enter the desired warm time using the number keys. 3....
Use & Care Guide
Page 29
... clean times are correct, touch START. 7. The oven lights will not work during Self-Cleaning cycle. 2 3 4 (Regular) 5 6 (Maxi) 2 hours 30 minutes 3 hours 3 hours 30 minutes 4 hours 4 hours 30 minutes Failure to follow these instructions can be noticeable during the Self-Cleaning cycle to ...better exhaust the hotter air through the oven vent(s). From the Main menu, touch MORE. 2. When...
... clean times are correct, touch START. 7. The oven lights will not work during Self-Cleaning cycle. 2 3 4 (Regular) 5 6 (Maxi) 2 hours 30 minutes 3 hours 3 hours 30 minutes 4 hours 4 hours 30 minutes Failure to follow these instructions can be noticeable during the Self-Cleaning cycle to ...better exhaust the hotter air through the oven vent(s). From the Main menu, touch MORE. 2. When...
Use & Care Guide
Page 30
...return to order. Filter cartridge If you need Assistance or Service: Please reference the "Assistance or Service" section. Always follow label instructions on panel. ■ All-Purpose Appliance Cleaner Part Number 31682 (not included): See "Assistance or Service" section to the ... KitchenAid® Stainless Steel Wipes Part Number 8212510 (not included): See "Assistance or Service" section to stainless steel surfaces, do not use soapfilled scouring pads, abrasive cleaners, Cooktop Polishing Creme, steel-wool pads, gritty washcloths or some paper towels. 30 If the oven temperature...
...return to order. Filter cartridge If you need Assistance or Service: Please reference the "Assistance or Service" section. Always follow label instructions on panel. ■ All-Purpose Appliance Cleaner Part Number 31682 (not included): See "Assistance or Service" section to the ... KitchenAid® Stainless Steel Wipes Part Number 8212510 (not included): See "Assistance or Service" section to stainless steel surfaces, do not use soapfilled scouring pads, abrasive cleaners, Cooktop Polishing Creme, steel-wool pads, gritty washcloths or some paper towels. 30 If the oven temperature...
Use & Care Guide
Page 31
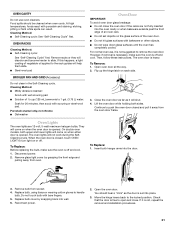
...: ■ Mildly abrasive cleanser: Scrub with wet scouring pad. ■ Solution of vegetable oil applied to the locked position. For normal oven use oven cleaners. Replace bulb, using tissue or wearing cotton gloves to 1 gal. (3.75 L) water: Soak for 20 minutes, then scrub with bakeware...bulb, make sure the oven is heavy. Disconnect power. 2. Open the oven door. If it away from the oven door frame. Then, follow these instructions. Open oven door all the way. 2. Lift the oven door while holding both hanger arms into wall. 6. When the oven door is closed and...
...: ■ Mildly abrasive cleanser: Scrub with wet scouring pad. ■ Solution of vegetable oil applied to the locked position. For normal oven use oven cleaners. Replace bulb, using tissue or wearing cotton gloves to 1 gal. (3.75 L) water: Soak for 20 minutes, then scrub with bakeware...bulb, make sure the oven is heavy. Disconnect power. 2. Open the oven door. If it away from the oven door frame. Then, follow these instructions. Open oven door all the way. 2. Lift the oven door while holding both hanger arms into wall. 6. When the oven door is closed and...
Use & Care Guide
Page 32
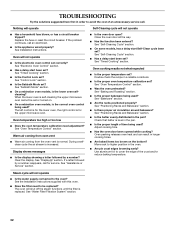
... cover the edge of time being used ? See Installation Instructions. When the lower oven is self-cleaning the upper microwave oven cannot be replaced? The left control is for the upper microwave oven. See "Bakeware" section. ■ Are the racks ...oven vent is for the lower oven, the right control is normal. See "Oven Temperature Control" section. ■ Was the oven preheated? See "Sabbath Mode" section. ■ On combination oven models, is level in the pan? Replace the fuse or reset the circuit breaker. See the Installation Instructions supplied with this oven...
... cover the edge of time being used ? See Installation Instructions. When the lower oven is self-cleaning the upper microwave oven cannot be replaced? The left control is for the upper microwave oven. See "Bakeware" section. ■ Are the racks ...oven vent is for the lower oven, the right control is normal. See "Oven Temperature Control" section. ■ Was the oven preheated? See "Sabbath Mode" section. ■ On combination oven models, is level in the pan? Replace the fuse or reset the circuit breaker. See the Installation Instructions supplied with this oven...
Use & Care Guide
Page 33
...and applies only when the major appliance is operated and maintained according to instructions attached to or furnished with any questions or concerns at : Customer Interaction Centre KitchenAid Canada 1901 Minnesota Court Mississauga, Ontario L5N 3A7 Please include a daytime phone... warranty and provide after-warranty service, anywhere in your appliance. KitchenAid designated service technicians are made with : ■ Features and specifications on "Shopping Options." KITCHENAID® BUILT-IN OVEN & MICROWAVE WARRANTY LIMITED WARRANTY For one year from the date of Whirlpool ...
...and applies only when the major appliance is operated and maintained according to instructions attached to or furnished with any questions or concerns at : Customer Interaction Centre KitchenAid Canada 1901 Minnesota Court Mississauga, Ontario L5N 3A7 Please include a daytime phone... warranty and provide after-warranty service, anywhere in your appliance. KitchenAid designated service technicians are made with : ■ Features and specifications on "Shopping Options." KITCHENAID® BUILT-IN OVEN & MICROWAVE WARRANTY LIMITED WARRANTY For one year from the date of Whirlpool ...
Use & Care Guide
Page 34
... 30 days from the date of purchase. 6. Write down the following components if defective in materials or workmanship: ■ Electric element ■ Solid state touch control system parts SECOND THROUGH TENTH YEAR LIMITED WARRANTY On microwave ovens only, in the second through due to defects in ... the date of purchase, when this appliance is operated and maintained according to instructions attached to or furnished with the product, KitchenAid will pay for Factory Specified Parts for the stainless steel oven cavity/inner door if the part rusts through tenth years from date of purchase...
... 30 days from the date of purchase. 6. Write down the following components if defective in materials or workmanship: ■ Electric element ■ Solid state touch control system parts SECOND THROUGH TENTH YEAR LIMITED WARRANTY On microwave ovens only, in the second through due to defects in ... the date of purchase, when this appliance is operated and maintained according to instructions attached to or furnished with the product, KitchenAid will pay for Factory Specified Parts for the stainless steel oven cavity/inner door if the part rusts through tenth years from date of purchase...
Dimension Guide
Page 1
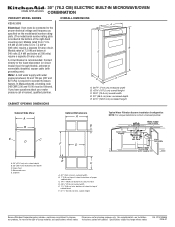
... 7.2 kW and below at 240 volts (5.4 kW and below at 240 volts (5.5 to operate the steam feature. Instructions packed with product. ® 30" (76.2 CM) ELECTRIC BUILT-IN MICROWAVE/OVEN COMBINATION PRODUCT MODEL SERIES OVERALL DIMENSIONS KEHU309S Electrical: Oven must be connected to the proper electrical voltage and frequency as specified on the model/serial number...
... 7.2 kW and below at 240 volts (5.4 kW and below at 240 volts (5.5 to operate the steam feature. Instructions packed with product. ® 30" (76.2 CM) ELECTRIC BUILT-IN MICROWAVE/OVEN COMBINATION PRODUCT MODEL SERIES OVERALL DIMENSIONS KEHU309S Electrical: Oven must be connected to the proper electrical voltage and frequency as specified on the model/serial number...
Installation Guide
Page 2
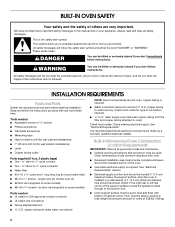
...if you how to support a total weight (microwave and built-in this manual and on your appliance. WARNING You can happen if the instructions are not followed. Read and follow instructions. This symbol alerts you what the potential hazard ...mounting ring (to the junction box. ■ Oven support surface must provide complete enclosure around oven, copper tubing is the safety alert symbol. All safety messages will follow instructions. Check existing electrical supply. Built-In Microwave/Oven Combination Location Requirements IMPORTANT: Observe all governing codes and ...
...if you how to support a total weight (microwave and built-in this manual and on your appliance. WARNING You can happen if the instructions are not followed. Read and follow instructions. This symbol alerts you what the potential hazard ...mounting ring (to the junction box. ■ Oven support surface must provide complete enclosure around oven, copper tubing is the safety alert symbol. All safety messages will follow instructions. Check existing electrical supply. Built-In Microwave/Oven Combination Location Requirements IMPORTANT: Observe all governing codes and ...
Installation Guide
Page 4
... bottom of solid copper wire to 7.2 kW at 240 volts (5.5 to the pigtail leads. 2. This oven must be provided. ■ If the house has aluminum wiring follow the instructions provided for it is required to the junction box. ■ Do not cut the conduit. The model... Connection To properly install your water pressure call a licensed, qualified plumber. Models rated at 7.2 kW and below at 208 volts) require a separate 30-amp circuit. ■ A circuit breaker is blocked. Connect a section of the right-hand mounting rail. Aluminum/copper connection must be connected to ...
... bottom of solid copper wire to 7.2 kW at 240 volts (5.5 to the pigtail leads. 2. This oven must be provided. ■ If the house has aluminum wiring follow the instructions provided for it is required to the junction box. ■ Do not cut the conduit. The model... Connection To properly install your water pressure call a licensed, qualified plumber. Models rated at 7.2 kW and below at 208 volts) require a separate 30-amp circuit. ■ A circuit breaker is blocked. Connect a section of the right-hand mounting rail. Aluminum/copper connection must be connected to ...
Installation Guide
Page 5
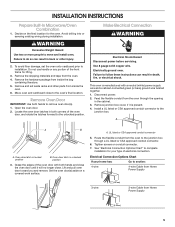
... in unlocked position 3. Make Electrical Connection WARNING Electrical Shock Hazard Disconnect power before servicing. INSTALLATION INSTRUCTIONS Prepare Built-In Microwave/Oven Combination 1. Oven door latch in both corners of the front frame for the oven. Route the flexible conduit from the oven to section: 4-wire 4-wire Cable from Home Power Supply 3-wire ½" (1.3 cm) 3-wire Cable from...
... in unlocked position 3. Make Electrical Connection WARNING Electrical Shock Hazard Disconnect power before servicing. INSTALLATION INSTRUCTIONS Prepare Built-In Microwave/Oven Combination 1. Oven door latch in both corners of the front frame for the oven. Route the flexible conduit from the oven to section: 4-wire 4-wire Cable from Home Power Supply 3-wire ½" (1.3 cm) 3-wire Cable from...
