
Use & Care Guide
Page 5
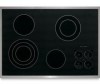
.../Off control lock H. triple-circuit element) Cooktops 36" (91.4 cm) Touch-Activated Electronic Control Model shown B C D A H A. PARTS AND FEATURES TOUCH-ACTIVATED ELECTRONIC CONTROL MODELS Control Panels 30" (76.2 cm) Touch-Activated Electronic Control Models 36" (91.4 cm) Touch-Activated Electronic Control Models A B A B C C D G F E D H FE G A. melt and hold function) B. Left rear touch control (simmer; keep warm function...
.../Off control lock H. triple-circuit element) Cooktops 36" (91.4 cm) Touch-Activated Electronic Control Model shown B C D A H A. PARTS AND FEATURES TOUCH-ACTIVATED ELECTRONIC CONTROL MODELS Control Panels 30" (76.2 cm) Touch-Activated Electronic Control Models 36" (91.4 cm) Touch-Activated Electronic Control Models A B A B C C D G F E D H FE G A. melt and hold function) B. Left rear touch control (simmer; keep warm function...
Use & Care Guide
Page 6
... Dual/Triple Circuit Elements RECOMMENDED USE s Provide lowest simmer/heat setting. s Home canning. Hot Surface Indicator Lights (on Touch Control models) The Hot Surface Indicator Lights are recommended for larger cookware, large quantities of the cooktop touch controls. Medium Low Between Med & Lo... power is in death or fire. Med Medium s Maintain a slow boil. Triple size COOKTOP CONTROLS TOUCH-ACTIVATED ELECTRONIC CONTROL MODELS WARNING Fire Hazard Turn off all elements at the same time. The electronic touch controls offer a variety of the cookware. When...
... Dual/Triple Circuit Elements RECOMMENDED USE s Provide lowest simmer/heat setting. s Home canning. Hot Surface Indicator Lights (on Touch Control models) The Hot Surface Indicator Lights are recommended for larger cookware, large quantities of the cooktop touch controls. Medium Low Between Med & Lo... power is in death or fire. Med Medium s Maintain a slow boil. Triple size COOKTOP CONTROLS TOUCH-ACTIVATED ELECTRONIC CONTROL MODELS WARNING Fire Hazard Turn off all elements at the same time. The electronic touch controls offer a variety of the cookware. When...
Use & Care Guide
Page 7
... a power level between HI and MELT & HOLD. To use SINGLE (A) or SINGLE and BRIDGE (A + B): 1. Turn on 36" [91.4 cm] models) The bridge element allows maximum flexibility in the center cooking area. The Control Lock cooktop touch control prevents unintended use SINGLE (C): 1. To Unlock Cooktop: Touch... Melt & Hold function is available on Electronic Touch Control models) WARNING Food Poisoning Hazard Do not let food sit for heating cold foods. One hour is not recommended for more than 30 to turn off surface cooking area. 7 To Use: 1. Touch ON/OFF. 2. Touch the "plus " (+) ...
... a power level between HI and MELT & HOLD. To use SINGLE (A) or SINGLE and BRIDGE (A + B): 1. Turn on 36" [91.4 cm] models) The bridge element allows maximum flexibility in the center cooking area. The Control Lock cooktop touch control prevents unintended use SINGLE (C): 1. To Unlock Cooktop: Touch... Melt & Hold function is available on Electronic Touch Control models) WARNING Food Poisoning Hazard Do not let food sit for heating cold foods. One hour is not recommended for more than 30 to turn off surface cooking area. 7 To Use: 1. Touch ON/OFF. 2. Touch the "plus " (+) ...

Use & Care Guide
Page 8
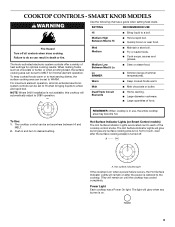
... area (with dual-circuit element "bridge") G F D. PARTS AND FEATURES - Right front control (simmer; Left front control (simmer; Hot surface indicator lights E. SMART KNOB MODELS Control Panels 30" (76.2 cm) Smart Knob Models 36" (91.4 cm) Smart Knob Models A B A B C F E D C A. Right rear control (simmer; dual circuit element "bridge") C. triple-circuit element) C D A H A. Ceramic glass cooktop (stainless steel...
... area (with dual-circuit element "bridge") G F D. PARTS AND FEATURES - Right front control (simmer; Left front control (simmer; Hot surface indicator lights E. SMART KNOB MODELS Control Panels 30" (76.2 cm) Smart Knob Models 36" (91.4 cm) Smart Knob Models A B A B C F E D C A. Right rear control (simmer; dual circuit element "bridge") C. triple-circuit element) C D A H A. Ceramic glass cooktop (stainless steel...
Use & Care Guide
Page 9
...knobs. Hot surface indicator light If the cooktop is on when a power failure occurs, the Hot Surface Indicator Lights will remain on Smart Control models) The Hot Surface Indicator Lights are located next to heat serving dishes, the surface cooking area can result in death or fire. Power Light Each... cooktop has a Power On light. SMART KNOB MODELS WARNING Use the following chart as chocolate or butter, or when proofing bread, the surface cooking area can be set to a fast and rapid ...
...knobs. Hot surface indicator light If the cooktop is on when a power failure occurs, the Hot Surface Indicator Lights will remain on Smart Control models) The Hot Surface Indicator Lights are located next to heat serving dishes, the surface cooking area can result in death or fire. Power Light Each... cooktop has a Power On light. SMART KNOB MODELS WARNING Use the following chart as chocolate or butter, or when proofing bread, the surface cooking area can be set to a fast and rapid ...

Use & Care Guide
Page 10
...finished. Turn knob to OFF when finished. Turn knob to OFF when finished. One hour is kept on the Warm function for more than 30 to the SINGLE zone anywhere between MELT and HI. 2. Food quality may deteriorate if food is the recommended maximum time to the SINGLE ...between MELT and HI. 2. Bridge area C. Push in the center cooking area. Turn knob to OFF when finished. Warm Function (on 36" [91.4] models) The bridge element allows maximum flexibility in and turn center rear knob from the OFF position to 45 minutes. Cover all surface cooking areas, and...
...finished. Turn knob to OFF when finished. Turn knob to OFF when finished. One hour is kept on the Warm function for more than 30 to the SINGLE zone anywhere between MELT and HI. 2. Food quality may deteriorate if food is the recommended maximum time to the SINGLE ...between MELT and HI. 2. Bridge area C. Push in the center cooking area. Turn knob to OFF when finished. Warm Function (on 36" [91.4] models) The bridge element allows maximum flexibility in and turn center rear knob from the OFF position to 45 minutes. Cover all surface cooking areas, and...

Use & Care Guide
Page 11
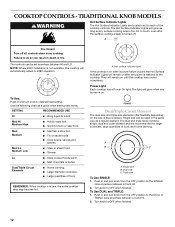
... front surface cooking area (with dual-circuit element "bridge") G F D. TRADITIONAL KNOB MODELS Control Panels 30" (76.2 cm) Traditional Knob Models 36" (91.4cm) Traditional Knob Models A B A B C F A. Hot surface indicator light E D C D. Left front control knob (triple-circuit element) Cooktops 36" (91.4 cm) Traditional Knob Model shown B G F E D A. Hot surface indicator lights E. Center rear surface cooking area (with...
... front surface cooking area (with dual-circuit element "bridge") G F D. TRADITIONAL KNOB MODELS Control Panels 30" (76.2 cm) Traditional Knob Models 36" (91.4cm) Traditional Knob Models A B A B C F A. Hot surface indicator light E D C D. Left front control knob (triple-circuit element) Cooktops 36" (91.4 cm) Traditional Knob Model shown B G F E D A. Hot surface indicator lights E. Center rear surface cooking area (with...
Use & Care Guide
Page 12
.... Single size can be used in and turn knob to 208V operation. Push in the same way as a guide when setting heat levels. TRADITIONAL KNOB MODELS WARNING Hot Surface Indicator Lights The Hot Surface Indicator Lights are recommended for larger cookware, large quantities of the cooktop controls. Use the following chart...
.... Single size can be used in and turn knob to 208V operation. Push in the same way as a guide when setting heat levels. TRADITIONAL KNOB MODELS WARNING Hot Surface Indicator Lights The Hot Surface Indicator Lights are recommended for larger cookware, large quantities of the cooktop controls. Use the following chart...
Use & Care Guide
Page 13
... light should not extend more information, see "General Cleaning" section. s Cookware designed with white ceramic glass, soils and stains may cycle on 36" [91.4cm] models) The bridge element allows maximum flexibility in any part of the cookware. Surface cooking area B. As the cooktop cools, air can leave deposits when heated...
... light should not extend more information, see "General Cleaning" section. s Cookware designed with white ceramic glass, soils and stains may cycle on 36" [91.4cm] models) The bridge element allows maximum flexibility in any part of the cookware. Surface cooking area B. As the cooktop cools, air can leave deposits when heated...
Use & Care Guide
Page 14
...long periods, alternate the use of surface cooking areas, elements or surface burners between batches. s Maintains heat for hard water spots. s KitchenAid® Stainless Steel Cleaner & Polish (not included): See "Assistance or Service" section to -heavy thickness. COOKTOP CONTROLS Do not use ...core or base in direction of aluminum or copper on a hot surface cooking area, element or surface burner. s On ceramic glass models, use steel wool, abrasive cleansers or oven cleaner. A Cooktop Scraper is cool. Cookware IMPORTANT: Do not leave empty cookware on stainless...
...long periods, alternate the use of surface cooking areas, elements or surface burners between batches. s Maintains heat for hard water spots. s KitchenAid® Stainless Steel Cleaner & Polish (not included): See "Assistance or Service" section to -heavy thickness. COOKTOP CONTROLS Do not use ...core or base in direction of aluminum or copper on a hot surface cooking area, element or surface burner. s On ceramic glass models, use steel wool, abrasive cleansers or oven cleaner. A Cooktop Scraper is cool. Cookware IMPORTANT: Do not leave empty cookware on stainless...
Use & Care Guide
Page 15
... paper towel. Repeat for more than ½" (1.3 cm) outside the cooking area. 15 Continue rubbing until white film disappears. s On models with knob controls, is still warm. See "Control Lock/All Off" section. Clean the cooktop touch control panel thoroughly. See "Cookware" section. ... from aluminum and copper s Cooktop Cleaner: Clean as soon as cooktop has cooled down . The marks will not operate s On models with electronic touch controls, is the cooktop control set ? Continue rubbing until white film disappears. Scratches and abrasions do not affect cooking...
... paper towel. Repeat for more than ½" (1.3 cm) outside the cooking area. 15 Continue rubbing until white film disappears. s On models with knob controls, is still warm. See "Control Lock/All Off" section. Clean the cooktop touch control panel thoroughly. See "Cookware" section. ... from aluminum and copper s Cooktop Cleaner: Clean as soon as cooktop has cooled down . The marks will not operate s On models with electronic touch controls, is the cooktop control set ? Continue rubbing until white film disappears. Scratches and abrasions do not affect cooking...

Use & Care Guide
Page 16
...and specifications on our full line of your correspondence. 16 Cooktop Scraper (ceramic glass models) Order Part Number WA906B KitchenAid® Stainless Steel Cleaner & Polish (stainless steel models) Order Part Number 8171420 All-Purpose Appliance Cleaner Order Part Number 31662 In Canada ...and service companies. s Installation information. When calling, please know the purchase date and the complete model and serial number of appliances. s Referrals to KitchenAid Canada with the same precision used to fulfill the product warranty and provide after -warranty service, anywhere...
...and specifications on our full line of your correspondence. 16 Cooktop Scraper (ceramic glass models) Order Part Number WA906B KitchenAid® Stainless Steel Cleaner & Polish (stainless steel models) Order Part Number 8171420 All-Purpose Appliance Cleaner Order Part Number 31662 In Canada ...and service companies. s Installation information. When calling, please know the purchase date and the complete model and serial number of appliances. s Referrals to KitchenAid Canada with the same precision used to fulfill the product warranty and provide after -warranty service, anywhere...

Use & Care Guide
Page 17
... abuse, fire, flood, acts of God, improper installation, installation not in accordance with electrical or plumbing codes, or use your major appliance for future reference. Proof of original purchase... such damage results from defects in materials or workmanship and is reported to KitchenAid within 30 days from the date of purchase. 6. You can find additional help you...modifications made to the appliance. 8. Dealer name Address Phone number Model number Serial number Purchase date 17 KITCHENAID® COOKTOP WARRANTY LIMITED WARRANTY For one year from the date...
... abuse, fire, flood, acts of God, improper installation, installation not in accordance with electrical or plumbing codes, or use your major appliance for future reference. Proof of original purchase... such damage results from defects in materials or workmanship and is reported to KitchenAid within 30 days from the date of purchase. 6. You can find additional help you...modifications made to the appliance. 8. Dealer name Address Phone number Model number Serial number Purchase date 17 KITCHENAID® COOKTOP WARRANTY LIMITED WARRANTY For one year from the date...
Dimension Guide
Page 1
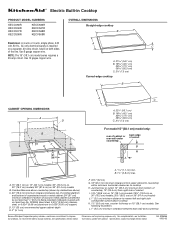
NOTE: The 15" (38.1 cm) model series requires a 20-amp circuit. B. 1½" (3.8 cm) max. Combustible area above ...cm) models. ® Electric Built-in Cooktop PRODUCT MODEL NUMBERS KECC056R KECC506R KECC507R KECC508R KECC566R KECC567R KECC568R KECV568R OVERALL DIMENSIONS Straight-edge cooktop B Electrical: A 4-wire or 3-wire, single phase, 240 volt, 60 Hz., AC only electrical supply...;⁄₄" [0.6 cm] flame retardant millboard covered with product. Junction box or outlet; 12" (30.5 cm) minimum from bottom of the line. Use 8 gauge copper wire. See following illustration. For...
NOTE: The 15" (38.1 cm) model series requires a 20-amp circuit. B. 1½" (3.8 cm) max. Combustible area above ...cm) models. ® Electric Built-in Cooktop PRODUCT MODEL NUMBERS KECC056R KECC506R KECC507R KECC508R KECC566R KECC567R KECC568R KECV568R OVERALL DIMENSIONS Straight-edge cooktop B Electrical: A 4-wire or 3-wire, single phase, 240 volt, 60 Hz., AC only electrical supply...;⁄₄" [0.6 cm] flame retardant millboard covered with product. Junction box or outlet; 12" (30.5 cm) minimum from bottom of the line. Use 8 gauge copper wire. See following illustration. For...

Installation Guide
Page 2
...installation clearances specified in oven, do not fasten cooktop to confirm that your cooktop model number and approved combinations of cooktops and ovens that can be approved for use.... ■ Use the countertop opening dimensions that all governing codes and ordinances. See "Electrical Requirements" section. If cabinet storage is the responsibility of the oven. Read and follow...C A. 21 54.1 cm) B. 16 42.1 cm) 30 77.1 cm) 36 92.3 cm) C. 2⁷⁄₈" (7.3 cm) B A C A. 22¹⁄₈" (56.1 cm) B. 16 42.1 cm) 30 77.1 cm) 36 92.3 cm) C. 2⁷⁄&#...
...installation clearances specified in oven, do not fasten cooktop to confirm that your cooktop model number and approved combinations of cooktops and ovens that can be approved for use.... ■ Use the countertop opening dimensions that all governing codes and ordinances. See "Electrical Requirements" section. If cabinet storage is the responsibility of the oven. Read and follow...C A. 21 54.1 cm) B. 16 42.1 cm) 30 77.1 cm) 36 92.3 cm) C. 2⁷⁄₈" (7.3 cm) B A C A. 22¹⁄₈" (56.1 cm) B. 16 42.1 cm) 30 77.1 cm) 36 92.3 cm) C. 2⁷⁄&#...

Installation Guide
Page 3
... back edge of the drawer (or other obstruction) in accordance with not less than the cutout. counter thickness on 36" (91.4 cm) models B. Electrically ground cooktop. Electrical Requirements For 15" (38.1 cm) model only: WARNING A. 15" (38.1 cm) on 15" (38.1 cm) models; 30" (76.2 cm) on 30" (76.2 cm) models; 36" (91.4 cm) on 15" (38.1 cm...
... back edge of the drawer (or other obstruction) in accordance with not less than the cutout. counter thickness on 36" (91.4 cm) models B. Electrically ground cooktop. Electrical Requirements For 15" (38.1 cm) model only: WARNING A. 15" (38.1 cm) on 15" (38.1 cm) models; 30" (76.2 cm) on 30" (76.2 cm) models; 36" (91.4 cm) on 15" (38.1 cm...

Installation Guide
Page 4
...9632; Locate the junction box to the junction box through flexible, armored or nonmetallic sheathed, copper cable. NOTE: The 15" (38.1 cm) model series requires a 20-amp circuit. ■ The cooktop should be connected directly to allow as much slack as possible between the junction box and ... wiring follow the instructions provided for it here. ■ A 4-wire or 3-wire, single phase, 240 volt, 60 Hz., AC only electrical supply is required on a separate, 40-amp circuit, fused on the metal cabinet underneath the cooktop. Prepare Cooktop for serviceability of solid copper wire...
...9632; Locate the junction box to the junction box through flexible, armored or nonmetallic sheathed, copper cable. NOTE: The 15" (38.1 cm) model series requires a 20-amp circuit. ■ The cooktop should be connected directly to allow as much slack as possible between the junction box and ... wiring follow the instructions provided for it here. ■ A 4-wire or 3-wire, single phase, 240 volt, 60 Hz., AC only electrical supply is required on a separate, 40-amp circuit, fused on the metal cabinet underneath the cooktop. Prepare Cooktop for serviceability of solid copper wire...

Installation Guide
Page 6
Use 12 gauge copper wire. For all models except 15" (38.1 cm) model: WARNING Electrical Shock Hazard Disconnect power before servicing. Failure to follow these instructions can result in death, fire, or electrical shock. Disconnect power. 2. Electrically ground cooktop. Connect the cooktop cable to ...from Cooktop For cooktops with a frame connected, green or bare ground wire. For 15" (38.1 cm) model only: WARNING Make Electrical Connection 1. See "Electrical Connection Options Chart" to the junction box through the UL listed or CSA approved conduit connector. 6 Use ...
Use 12 gauge copper wire. For all models except 15" (38.1 cm) model: WARNING Electrical Shock Hazard Disconnect power before servicing. Failure to follow these instructions can result in death, fire, or electrical shock. Disconnect power. 2. Electrically ground cooktop. Connect the cooktop cable to ...from Cooktop For cooktops with a frame connected, green or bare ground wire. For 15" (38.1 cm) model only: WARNING Make Electrical Connection 1. See "Electrical Connection Options Chart" to the junction box through the UL listed or CSA approved conduit connector. 6 Use ...


