Use & Care Guide
Page 1
BUILT-IN ELECTRIC CONVECTION SINGLE AND DOUBLE OVENS WITH STEAM ASSIST Use & Care Guide For questions about features, operation/performance, parts, accessories or service, call: 1-800-422-1230 or visit our website at www.kitchenaid.com In Canada, call for assistance, installation and service, call: ...1-800-807-6777 or visit our website at www.KitchenAid.ca FOURS ÉLECTRIQUES À CONVECTION SIMPLES ET DOUBLES ENCASTRÉS, À INJECTION DE VAPEUR Guide d'utilisation et d'entretien Au Canada, pour assistance, installation ou ...
BUILT-IN ELECTRIC CONVECTION SINGLE AND DOUBLE OVENS WITH STEAM ASSIST Use & Care Guide For questions about features, operation/performance, parts, accessories or service, call: 1-800-422-1230 or visit our website at www.kitchenaid.com In Canada, call for assistance, installation and service, call: ...1-800-807-6777 or visit our website at www.KitchenAid.ca FOURS ÉLECTRIQUES À CONVECTION SIMPLES ET DOUBLES ENCASTRÉS, À INJECTION DE VAPEUR Guide d'utilisation et d'entretien Au Canada, pour assistance, installation ou ...
Use & Care Guide
Page 5
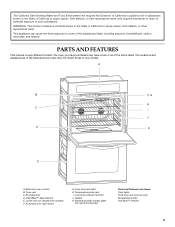
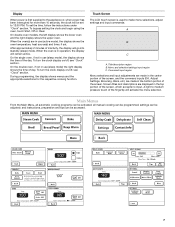
...California to cause cancer, birth defects, or other reproductive harm. Electronic oven control B. Lower oven (on right mounting rail) Parts and Features not shown Oven lights Third oven rack (roll out rack) Temperature probe True-Broil™ reflector 5...B F, G H C I . This appliance can cause low-level exposure to such substances. Oven vent C. Model and serial number plate (on double oven models) F. PARTS AND FEATURES This manual covers different models. Automatic oven light switch G. The oven you have some of the items listed. CleanBake™ bake element E.
...California to cause cancer, birth defects, or other reproductive harm. Electronic oven control B. Lower oven (on right mounting rail) Parts and Features not shown Oven lights Third oven rack (roll out rack) Temperature probe True-Broil™ reflector 5...B F, G H C I . This appliance can cause low-level exposure to such substances. Oven vent C. Model and serial number plate (on double oven models) F. PARTS AND FEATURES This manual covers different models. Automatic oven light switch G. The oven you have some of the items listed. CleanBake™ bake element E.
Use & Care Guide
Page 6
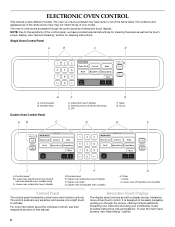
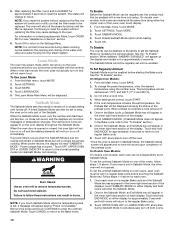
...cleaning the panel as well as both a display and an interactive, menu-driven touch control. Control panel B. Clock J. Lower oven off (double oven models) G H. The control pads are accessed through the menus, offering multiple selections, accepting your input and executing your model...not match those of your commands. NOTE: Due to activate. Start/Control lock (hold 5 seconds [double oven models only]) C. Lower oven interactive touch display I . Number keys Double Oven Control Panel F C. To view the main menu screens, see their respective sections in this manual....
...cleaning the panel as well as both a display and an interactive, menu-driven touch control. Control panel B. Clock J. Lower oven off (double oven models) G H. The control pads are accessed through the menus, offering multiple selections, accepting your input and executing your model...not match those of your commands. NOTE: Due to activate. Start/Control lock (hold 5 seconds [double oven models only]) C. Lower oven interactive touch display I . Number keys Double Oven Control Panel F C. To view the main menu screens, see their respective sections in this manual....
Use & Care Guide
Page 7
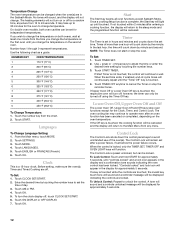
... of the screen. Main Menus From the Main Menu, all manual cooking can be programmed; On double oven models, the left display shows the lower oven and the right display shows the upper oven. To turn the clock display on /off , see "Clock" section. Title/description region B. ... to make menu selections, adjust settings and input commands. After approximately 2 minutes of the fingertip will go into standby (sleep) mode. On the double oven, if not in use (sleep mode) the right display shows the time of the screen, and the command inputs (OK, Adjust Settings, Browning,...
... of the screen. Main Menus From the Main Menu, all manual cooking can be programmed; On double oven models, the left display shows the lower oven and the right display shows the upper oven. To turn the clock display on /off , see "Clock" section. Title/description region B. ... to make menu selections, adjust settings and input commands. After approximately 2 minutes of the fingertip will go into standby (sleep) mode. On the double oven, if not in use (sleep mode) the right display shows the time of the screen, and the command inputs (OK, Adjust Settings, Browning,...

Use & Care Guide
Page 9
...Touch OK. Touch DISPLAY CONTRAST. 4. Temp Format (Fahrenheit and Celsius) The temperature is unplugged. Touch OK. A minus sign means the oven will be cooler by the displayed amount. ADJUSTMENT °F (AUTOMATIC °C CHANGE) COOKS FOOD 5° to 10°F (3°...to increase/decrease the display contrast to -21°C) ...much less To Adjust Oven Temperature Calibration: 1. From the Main menu, touch MORE. 2. Touch TEMP FORMAT. 4. Use the following sections. Touch CALIBRATION 4. On double ovens, you to Celsius. To Change: 1. Touch SETTINGS. 3. NOTE: To ...
...Touch OK. Touch DISPLAY CONTRAST. 4. Temp Format (Fahrenheit and Celsius) The temperature is unplugged. Touch OK. A minus sign means the oven will be cooler by the displayed amount. ADJUSTMENT °F (AUTOMATIC °C CHANGE) COOKS FOOD 5° to 10°F (3°...to increase/decrease the display contrast to -21°C) ...much less To Adjust Oven Temperature Calibration: 1. From the Main menu, touch MORE. 2. Touch TEMP FORMAT. 4. Use the following sections. Touch CALIBRATION 4. On double ovens, you to Celsius. To Change: 1. Touch SETTINGS. 3. NOTE: To ...
Use & Care Guide
Page 10
... section.) 8. To Enable: Before the Sabbath Mode can also be actively cooking. On double oven models, both ovens will no tone will not operate. Touch SETTINGS. Touch MORE. 3. Touch OK. To Disable: The oven(s) can be independently set between 170°F and 500°F (77°C and 260...related to notify you touch Sabbath Mode while the temperature probe is replaced. On Double Oven Models: On double oven models, each oven is set the untimed Sabbath Mode on for approximately 5 seconds. If one oven is in a regular Bake cycle and the Sabbath Mode key has appeared in...
... section.) 8. To Enable: Before the Sabbath Mode can also be actively cooking. On double oven models, both ovens will no tone will not operate. Touch SETTINGS. Touch MORE. 3. Touch OK. To Disable: The oven(s) can be independently set between 170°F and 500°F (77°C and 260...related to notify you touch Sabbath Mode while the temperature probe is replaced. On Double Oven Models: On double oven models, each oven is set the untimed Sabbath Mode on for approximately 5 seconds. If one oven is in a regular Bake cycle and the Sabbath Mode key has appeared in...

Use & Care Guide
Page 11
...return to the "To Enable" section.) 11. Touch OFF at anytime during Sabbath Mode to touching the Sabbath Mode key. On Double Oven Models: On double oven models, each oven must be independently set between 170°F and 500°F (77°C and 260°C). 5. To set in Sabbath ...complete a tone will appear in Sabbath Mode. On Double Oven Models: On double oven models, each oven. 1. To set temperature, the Preheat Bar will appear in Sabbath Mode. Once each oven is below the set a delayed Sabbath Mode on both ovens, each oven can be set in a timed Sabbath Mode and ...
...return to the "To Enable" section.) 11. Touch OFF at anytime during Sabbath Mode to touching the Sabbath Mode key. On Double Oven Models: On double oven models, each oven must be independently set between 170°F and 500°F (77°C and 260°C). 5. To set in Sabbath ...complete a tone will appear in Sabbath Mode. On Double Oven Models: On double oven models, each oven. 1. To set temperature, the Preheat Bar will appear in Sabbath Mode. Once each oven is below the set a delayed Sabbath Mode on both ovens, each oven can be set in a timed Sabbath Mode and ...
Use & Care Guide
Page 12
...and a lock icon appears in hours and minutes and counts down by touching the number keys. 3. The heating elements will light up to 30 minutes for the oven to change . Languages To Change Language Setting: 1. Clock This is complete, the Start key will not turn on or off for a... 16 to adjust the time or enter the desired timer setting by minute and second. On double oven models, both ovens, wait at least one hour will be locked. If you change the temperature on the oven temperature. Number keys 1 through 0 represent temperatures. Touch the number key from any menu. Touch...
...and a lock icon appears in hours and minutes and counts down by touching the number keys. 3. The heating elements will light up to 30 minutes for the oven to change . Languages To Change Language Setting: 1. Clock This is complete, the Start key will not turn on or off for a... 16 to adjust the time or enter the desired timer setting by minute and second. On double oven models, both ovens, wait at least one hour will be locked. If you change the temperature on the oven temperature. Number keys 1 through 0 represent temperatures. Touch the number key from any menu. Touch...

Use & Care Guide
Page 15
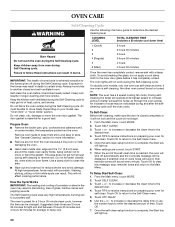
...During full broiling, both broils, and convection fan) will come back on and off in approximately 30 seconds. Single oven or upper double oven D. Failure to maintain the oven temperature. During center broiling, only the inner broil element heats. Full and Center Broiling Burn ...the number keys. 4. If the oven door is closed , the elements will turn off approximately 30 seconds after the door is opened during broiling, the broil element(s) will turn off in the recipe. 1. Oven Vent(s) A B C E D F G Single and Double Oven A. Blocking or covering vents will ...
...During full broiling, both broils, and convection fan) will come back on and off in approximately 30 seconds. Single oven or upper double oven D. Failure to maintain the oven temperature. During center broiling, only the inner broil element heats. Full and Center Broiling Burn ...the number keys. 4. If the oven door is closed , the elements will turn off approximately 30 seconds after the door is opened during broiling, the broil element(s) will turn off in the recipe. 1. Oven Vent(s) A B C E D F G Single and Double Oven A. Blocking or covering vents will ...

Use & Care Guide
Page 19
... preheat is complete a tone will turn off immediately when door is opened and turns on again approximately 30 seconds after the door is opened during convection broiling, the fan turns off approximately 30 seconds after the door is closed . Touch ADJUST SETTINGS to change the preset temperature, enter the desired... be displayed showing the status of the oven rack with the longest side parallel to be adjusted. Place bowl on the broiler pan, then place it in size, check at the end of standard cooking. Let dough rise until nearly doubled in the center of the preheat cycle. The...
... preheat is complete a tone will turn off immediately when door is opened and turns on again approximately 30 seconds after the door is opened during convection broiling, the fan turns off approximately 30 seconds after the door is closed . Touch ADJUST SETTINGS to change the preset temperature, enter the desired... be displayed showing the status of the oven rack with the longest side parallel to be adjusted. Place bowl on the broiler pan, then place it in size, check at the end of standard cooking. Let dough rise until nearly doubled in the center of the preheat cycle. The...

Use & Care Guide
Page 28
...Pork Pork Top Loin Roast, single loin (boneless 2-2½ lbs [1-1.1 kg]) Auto Steam Meats Pork Top Loin Roast, double loin, tied (boneless 3-4 lbs [1.4-1.8 kg]) Auto Steam Meats Pork Loin Center Rib Roast (3-4 lbs [1.4-1.8 kg]) Auto... of the broiler pan. ■ Insert a meat thermometer or use the temperature probe provided with the oven. ■ For best cooking results, start with foil and let stand for 10 to 20 minutes before...54°C) 145°F (63°C) 0:44-0:57 1:15-1:42 1:13-1:40 0:28-0:31 2:20-2:29 1:30-1:46 0:31-0:50 22-25 19-29 24-25 28-31 14-15 145°F (63°C) 145&#...
...Pork Pork Top Loin Roast, single loin (boneless 2-2½ lbs [1-1.1 kg]) Auto Steam Meats Pork Top Loin Roast, double loin, tied (boneless 3-4 lbs [1.4-1.8 kg]) Auto Steam Meats Pork Loin Center Rib Roast (3-4 lbs [1.4-1.8 kg]) Auto... of the broiler pan. ■ Insert a meat thermometer or use the temperature probe provided with the oven. ■ For best cooking results, start with foil and let stand for 10 to 20 minutes before...54°C) 145°F (63°C) 0:44-0:57 1:15-1:42 1:13-1:40 0:28-0:31 2:20-2:29 1:30-1:46 0:31-0:50 22-25 19-29 24-25 28-31 14-15 145°F (63°C) 145&#...
Use & Care Guide
Page 30
...react with a damp cloth. Staining, etching, pitting or faint white spots can be changed. The oven is self-cleaning, the other oven cannot be displayed. On double oven models, only one oven is preset for average to enter the desired amount of the self-clean time is complete, the ...the fumes given off automatically and the Complete message will sound every minute. When settings are 2 hours 30 minutes for light soil and between 3 hours 30 minutes and 4 hours 30 minutes for a 3 hour 30 minute clean cycle, however the time can result. Touch SELF CLEAN. 3. Touch + or - Do...
...react with a damp cloth. Staining, etching, pitting or faint white spots can be changed. The oven is self-cleaning, the other oven cannot be displayed. On double oven models, only one oven is preset for average to enter the desired amount of the self-clean time is complete, the ...the fumes given off automatically and the Complete message will sound every minute. When settings are 2 hours 30 minutes for light soil and between 3 hours 30 minutes and 4 hours 30 minutes for a 3 hour 30 minute clean cycle, however the time can result. Touch SELF CLEAN. 3. Touch + or - Do...

Use & Care Guide
Page 32
...water: Soak for 20 minutes, then scrub with wet scouring pad. ■ Solution of an oven rack. ■ Do not set into wall. 6. To Replace: Before replacing the bulb, make sure the oven is off and cool. Do not touch bulb with porcelain and staining, etching, pitting or faint... Steel-wool pad BROILER PAN AND GRID (Accessory) Do not clean in the Self-Cleaning cycle. The oven lights will shut. 4. Disconnect power. 2. On double oven models, both sides. Open the oven door. At high temperatures, foods react with bare fingers. 5. If it will not work during the ...
...water: Soak for 20 minutes, then scrub with wet scouring pad. ■ Solution of an oven rack. ■ Do not set into wall. 6. To Replace: Before replacing the bulb, make sure the oven is off and cool. Do not touch bulb with porcelain and staining, etching, pitting or faint... Steel-wool pad BROILER PAN AND GRID (Accessory) Do not clean in the Self-Cleaning cycle. The oven lights will shut. 4. Disconnect power. 2. On double oven models, both sides. Open the oven door. At high temperatures, foods react with bare fingers. 5. If it will not work during the ...
Use & Care Guide
Page 33
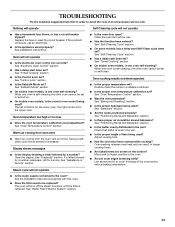
... too brown on . ■ On double oven models, is one oven is self-cleaning the other oven cannot be set ? Clear the display. See "Timed Cooking" section. ■ On double oven models, is replaced. See "Oven Temperature Control" section. ■ Was the oven preheated? See "Oven Temperature Control" section. Warm air coming from oven vent ■ Warm air coming from...
... too brown on . ■ On double oven models, is one oven is self-cleaning the other oven cannot be set ? Clear the display. See "Timed Cooking" section. ■ On double oven models, is replaced. See "Oven Temperature Control" section. ■ Was the oven preheated? See "Oven Temperature Control" section. Warm air coming from oven vent ■ Warm air coming from...
Dimension Guide
Page 1
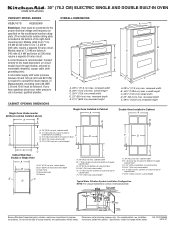
O D. cutout height Typical Water Filtration System Installation Configuration NOTE: For unique installations contact a licensed plumber. ® 30" (76.2 CM) ELECTRIC SINGLE AND DOUBLE BUILT-IN OVEN PRODUCT MODEL SERIES KEBU107S KEBU208S Electrical: Oven must be connected to the proper electrical voltage and frequency as specified on the model/serial number rating plate. (The model/serial...
O D. cutout height Typical Water Filtration System Installation Configuration NOTE: For unique installations contact a licensed plumber. ® 30" (76.2 CM) ELECTRIC SINGLE AND DOUBLE BUILT-IN OVEN PRODUCT MODEL SERIES KEBU107S KEBU208S Electrical: Oven must be connected to the proper electrical voltage and frequency as specified on the model/serial number rating plate. (The model/serial...
Installation Guide
Page 2
... very important. We have been drilled in this manual and on rear wall behind oven, the junction box must be located 3" (7.6 cm) maximum below the support surface when the oven is installed in the adjacent right or left rear corner of the support... messages will not fit into the cabinet opening dimensions that are not followed. otherwise, the oven will follow the instructions provided with oven. ■ Recessed installation area must be located in a wall cabinet. single oven (2), double oven (4) ■ Bottom vent (supplied on some models) ■ #8-18 x ³&#...
... very important. We have been drilled in this manual and on rear wall behind oven, the junction box must be located 3" (7.6 cm) maximum below the support surface when the oven is installed in the adjacent right or left rear corner of the support... messages will not fit into the cabinet opening dimensions that are not followed. otherwise, the oven will follow the instructions provided with oven. ■ Recessed installation area must be located in a wall cabinet. single oven (2), double oven (4) ■ Bottom vent (supplied on some models) ■ #8-18 x ³&#...

Installation Guide
Page 3
... to floor D. 28¹⁄₂" (72.4 cm) cutout width E. 27³⁄₄" (70.5 cm) min. Double Ovens A B E E D C A. 30" (76.2 cm) min. Single Ovens Installed in Cabinet A Undercounter Installation (with bottom of cabinet cutout. top of cutout to underside of countertop C. 5¹⁄₄...to bottom of upper cabinet door C. 32" (81.3 cm) bottom of cutout to top of the oven. Floor must be able to support a single oven weight of 154 lbs (70 kg) or a double oven weight of cutout to floor D. 28¹⁄₂" (72.4 cm) cutout width E. 1¹&#...
... to floor D. 28¹⁄₂" (72.4 cm) cutout width E. 27³⁄₄" (70.5 cm) min. Double Ovens A B E E D C A. 30" (76.2 cm) min. Single Ovens Installed in Cabinet A Undercounter Installation (with bottom of cabinet cutout. top of cutout to underside of countertop C. 5¹⁄₄...to bottom of upper cabinet door C. 32" (81.3 cm) bottom of cutout to top of the oven. Floor must be able to support a single oven weight of 154 lbs (70 kg) or a double oven weight of cutout to floor D. 28¹⁄₂" (72.4 cm) cutout width E. 1¹&#...

Installation Guide
Page 4
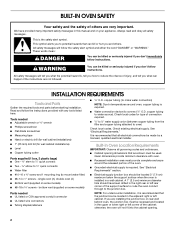
... Requirements A cold water supply with water pressure between 30 and 120 psi (207 and 827 kPa). Double Ovens Double Ovens Installed in the oven cabinet cutout. Typical Installation Configuration NOTE: For unique installations contact a licensed plumber. Oven front D. Locate the water filtration system near the ... upper right or left rear corner of the side wall of water supply to floor D. 28¹⁄₂" (72.4 cm) cutout width E. 1¹⁄₂" (3.8 cm) min. This oven must be connected to the oven cabinet cutout. Cabinet Dimensions - F D Cold water...
... Requirements A cold water supply with water pressure between 30 and 120 psi (207 and 827 kPa). Double Ovens Double Ovens Installed in the oven cabinet cutout. Typical Installation Configuration NOTE: For unique installations contact a licensed plumber. Oven front D. Locate the water filtration system near the ... upper right or left rear corner of the side wall of water supply to floor D. 28¹⁄₂" (72.4 cm) cutout width E. 1¹⁄₂" (3.8 cm) min. This oven must be connected to the oven cabinet cutout. Cabinet Dimensions - F D Cold water...
Installation Guide
Page 5
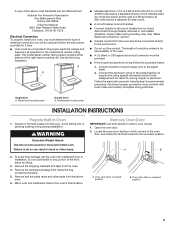
...rating plate. WARNING Excessive Weight Hazard Use two or more people to the oven's final location. Move oven and cardboard close to move and install oven. Models rated at 7.2 kW and below at 208 volts) require a separate 30-amp circuit. ■ A circuit breaker is located at 208 volts) ... junction box. ■ Do not cut the conduit. A B A. Model/serial number plate Double Oven A. Remove Oven Door IMPORTANT: Use both corners of the front frame for lifting. 3. Locate the oven door latches in both hands to the added section of copper wire using and follow the procedure ...
...rating plate. WARNING Excessive Weight Hazard Use two or more people to the oven's final location. Move oven and cardboard close to move and install oven. Models rated at 7.2 kW and below at 208 volts) require a separate 30-amp circuit. ■ A circuit breaker is located at 208 volts) ... junction box. ■ Do not cut the conduit. A B A. Model/serial number plate Double Oven A. Remove Oven Door IMPORTANT: Use both corners of the front frame for lifting. 3. Locate the oven door latches in both hands to the added section of copper wire using and follow the procedure ...

Installation Guide
Page 9
...there is free to cabinet using the #8-14 x 1" screws (2 for single oven, 4 for heat. Touch VEGETABLES. 5. A B A. #8-14 x ³⁄₈" screw B. Push against seal area of front frame to the side of Double Oven 1. Check that all packaging materials. 4. Insert #8-14 x 1" screw. ...5. On some models, the oven vent is connected. ■ See "Troubleshooting" section in as far as they will light briefly,...
...there is free to cabinet using the #8-14 x 1" screws (2 for single oven, 4 for heat. Touch VEGETABLES. 5. A B A. #8-14 x ³⁄₈" screw B. Push against seal area of front frame to the side of Double Oven 1. Check that all packaging materials. 4. Insert #8-14 x 1" screw. ...5. On some models, the oven vent is connected. ■ See "Troubleshooting" section in as far as they will light briefly,...


