
Use & Care Guide
Page 1
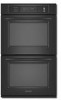
... KEBS207 KEBS277 KEBS208 KEBS278 W10162180A SUPERBA® BUILT-IN ELECTRIC CONVECTION SINGLE AND DOUBLE OVENS Use & Care Guide For questions about features, operation/performance, parts, accessories or service, call: 1-800-422-1230 or visit our website at www.kitchenaid.com In Canada, call for assistance, installation and service, call: 1-800-807-6777 or visit our...
... KEBS207 KEBS277 KEBS208 KEBS278 W10162180A SUPERBA® BUILT-IN ELECTRIC CONVECTION SINGLE AND DOUBLE OVENS Use & Care Guide For questions about features, operation/performance, parts, accessories or service, call: 1-800-422-1230 or visit our website at www.kitchenaid.com In Canada, call for assistance, installation and service, call: 1-800-807-6777 or visit our...

Use & Care Guide
Page 3
... Storage in color. These words mean: DANGER You can happen if the instructions are dark in Oven - All safety messages will follow basic precautions, including the following: ■ Proper Installation - Do not repair or replace any kind should be referred to cool. Remove broiler pan and... , do not let potholder contact hot heating element in injury. ■ Keep Oven Vent Ducts Unobstructed. ■ Placement of Oven Racks - IMPORTANT SAFETY INSTRUCTIONS WARNING: To reduce the risk of fire, electrical shock, injury to sit or stand on Grease Fires - Smother fire or flame...
... Storage in color. These words mean: DANGER You can happen if the instructions are dark in Oven - All safety messages will follow basic precautions, including the following: ■ Proper Installation - Do not repair or replace any kind should be referred to cool. Remove broiler pan and... , do not let potholder contact hot heating element in injury. ■ Keep Oven Vent Ducts Unobstructed. ■ Placement of Oven Racks - IMPORTANT SAFETY INSTRUCTIONS WARNING: To reduce the risk of fire, electrical shock, injury to sit or stand on Grease Fires - Smother fire or flame...

Use & Care Guide
Page 19
...-Cleaning cycle. Insert both hanger arms into wall. 6. The oven lights will come on when either door is not, repeat the removal and installation procedures. 19 IMPORTANT: Oven Door To avoid oven door glass breakage: ■ Do not close . Remove bulb from oven. Check that the door is off and ... while holding both upper and lower lights will not work during the SelfCleaning cycle. On double oven models, both sides. Open the oven door. When the oven door is opened . Close the oven door as far as the door is not suggested to turn light on the glass surface of &#...
...-Cleaning cycle. Insert both hanger arms into wall. 6. The oven lights will come on when either door is not, repeat the removal and installation procedures. 19 IMPORTANT: Oven Door To avoid oven door glass breakage: ■ Do not close . Remove bulb from oven. Check that the door is off and ... while holding both upper and lower lights will not work during the SelfCleaning cycle. On double oven models, both sides. Open the oven door. When the oven door is opened . Close the oven door as far as the door is not suggested to turn light on the glass surface of &#...

Use & Care Guide
Page 20
... blown, or has a circuit breaker tripped? Clear the display. When one oven is one oven self-cleaning? Check that batter is one oven self-cleaning? See Installation Instructions. See "Control Lock" section. ■ Is the Sabbath Mode set... ? See "Bakeware" section. ■ Are the racks positioned properly? See "Display(s)" section. See "Baking and Roasting" section. ■ Is the proper bakeware being used ? See "Sabbath Mode" section. ■ On double oven...
... blown, or has a circuit breaker tripped? Clear the display. When one oven is one oven self-cleaning? Check that batter is one oven self-cleaning? See Installation Instructions. See "Control Lock" section. ■ Is the Sabbath Mode set... ? See "Bakeware" section. ■ Are the racks positioned properly? See "Display(s)" section. See "Baking and Roasting" section. ■ Is the proper bakeware being used ? See "Sabbath Mode" section. ■ On double oven...

Use & Care Guide
Page 21
...assistance If you need further assistance, you can write to KitchenAid with : ■ Features and specifications on our full line of original purchase date is valid only in Canada. Proof of appliances. ■ Installation information. ■ Use and maintenance procedures. ■ ... 1-800-807-6777. KitchenAid Canada designated service technicians are trained to your nearest KitchenAid designated service center. To locate factory specified parts in your area, call . If you use only factory specified parts. KITCHENAID® BUILT-IN OVEN & MICROWAVE WARRANTY LIMITED ...
...assistance If you need further assistance, you can write to KitchenAid with : ■ Features and specifications on our full line of original purchase date is valid only in Canada. Proof of appliances. ■ Installation information. ■ Use and maintenance procedures. ■ ... 1-800-807-6777. KitchenAid Canada designated service technicians are trained to your nearest KitchenAid designated service center. To locate factory specified parts in your area, call . If you use only factory specified parts. KITCHENAID® BUILT-IN OVEN & MICROWAVE WARRANTY LIMITED ...

Use & Care Guide
Page 22
...of God, improper installation, installation not in accordance with electrical or plumbing codes, or use of consumables or cleaning products not approved by KitchenAid. 5. Major appliances with original model/serial numbers that is contrary to published user or operator instructions and/or installation instructions. 4. ... the following components if defective in materials or workmanship: ■ Electric element ■ Solid state touch control system parts SECOND THROUGH TENTH YEAR LIMITED WARRANTY On microwave ovens only, in the second through due to defects in materials or...
...of God, improper installation, installation not in accordance with electrical or plumbing codes, or use of consumables or cleaning products not approved by KitchenAid. 5. Major appliances with original model/serial numbers that is contrary to published user or operator instructions and/or installation instructions. 4. ... the following components if defective in materials or workmanship: ■ Electric element ■ Solid state touch control system parts SECOND THROUGH TENTH YEAR LIMITED WARRANTY On microwave ovens only, in the second through due to defects in materials or...

Installation Guide
Page 2
... the support surface when the oven is , tell you how to support a single oven weight of 154 lbs (70 kg) or a double oven weight of 287 lbs (130 kg). 2 Location Requirements IMPORTANT: Observe all governing codes and ordinances. ■ Cabinet opening . ■ Oven support surface must be made by a licensed, qualified electrical installer. We have been drilled...
... the support surface when the oven is , tell you how to support a single oven weight of 154 lbs (70 kg) or a double oven weight of 287 lbs (130 kg). 2 Location Requirements IMPORTANT: Observe all governing codes and ordinances. ■ Cabinet opening . ■ Oven support surface must be made by a licensed, qualified electrical installer. We have been drilled...

Installation Guide
Page 3
....5 cm) min. Double Ovens A B E E D C 27" (68.6 cm) models A. 27" (68.6 cm) min. cutout height 30" (76.2 cm) models A. 30" (76.2 cm) min. cabinet width B. 1¹⁄₂" (3.8 cm) min. overall height C. 26³⁄₄" (67.9 cm) overall width D. 23" (58.4 cm) max. Single Oven Single Oven Undercounter (without cooktop installed above ): Single Ovens Installed in Cabinet Ovens approved for...
....5 cm) min. Double Ovens A B E E D C 27" (68.6 cm) models A. 27" (68.6 cm) min. cutout height 30" (76.2 cm) models A. 30" (76.2 cm) min. cabinet width B. 1¹⁄₂" (3.8 cm) min. overall height C. 26³⁄₄" (67.9 cm) overall width D. 23" (58.4 cm) max. Single Oven Single Oven Undercounter (without cooktop installed above ): Single Ovens Installed in Cabinet Ovens approved for...

Installation Guide
Page 4
...Double Ovens Double Ovens Installed in accordance with local codes. cutout height A. 23¹⁄₄" (59.1 cm) min. Recessed oven E. The model/serial number rating plate is recommended that a qualified electrical installer determine that the electrical connection and wire size are adequate and in conformance with a qualified electrical installer... to top of cabinet door F. 49³⁄₄" (126.4 cm) min. Single or Double Ovens A B E C D E C 27" (68.6 cm) models A. 27" (68.6 cm) min. bottom of cutout to top of cabinet door F. 49³⁄&#...
...Double Ovens Double Ovens Installed in accordance with local codes. cutout height A. 23¹⁄₄" (59.1 cm) min. Recessed oven E. The model/serial number rating plate is recommended that a qualified electrical installer determine that the electrical connection and wire size are adequate and in conformance with a qualified electrical installer... to top of cabinet door F. 49³⁄₄" (126.4 cm) min. Single or Double Ovens A B E C D E C 27" (68.6 cm) models A. 27" (68.6 cm) min. bottom of cutout to top of cabinet door F. 49³⁄&#...

Installation Guide
Page 5
... Weight Hazard Use two or more people to remove oven door(s). 1. Remove the shipping materials and tape from inside the oven. 6. Remove and set the oven onto cardboard prior to installation. Move oven and cardboard close . Remove Oven Door IMPORTANT: Use both hands to move and install oven. Electrically ground oven. Oven door latch in unlocked position 3. Feed the flexible cable...
... Weight Hazard Use two or more people to remove oven door(s). 1. Remove the shipping materials and tape from inside the oven. 6. Remove and set the oven onto cardboard prior to installation. Move oven and cardboard close . Remove Oven Door IMPORTANT: Use both hands to move and install oven. Electrically ground oven. Oven door latch in unlocked position 3. Feed the flexible cable...
Installation Guide
Page 6
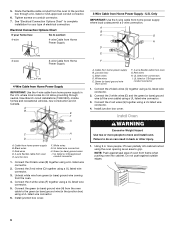
...wire Cable from Home Power Supply ½" (1.3 cm) 4-Wire Cable from Home Power Supply IMPORTANT: Use the 4-wire cable from the oven to complete installation for your type of electrical connection. A B E F G C H D I . Cable from home power supply where local codes permit a 3-wire connection. White... not push against seal area of the oven cable) using a UL listed wire connector. 3. Tighten screws on conduit connector. 7. See "Electrical Connection Options Chart" to the junction box through neutral, New Branch circuit installations (1996 NEC), mobile homes and recreational vehicles...
...wire Cable from Home Power Supply ½" (1.3 cm) 4-Wire Cable from Home Power Supply IMPORTANT: Use the 4-wire cable from the oven to complete installation for your type of electrical connection. A B E F G C H D I . Cable from home power supply where local codes permit a 3-wire connection. White... not push against seal area of the oven cable) using a UL listed wire connector. 3. Tighten screws on conduit connector. 7. See "Electrical Connection Options Chart" to the junction box through neutral, New Branch circuit installations (1996 NEC), mobile homes and recreational vehicles...

Installation Guide
Page 7
... of the Use and Care Guide or contact the dealer from whom you purchased your oven. Dispose of Single Oven" steps 2-6. or circuit breaker has not tripped. ■ Electrical supply is an extra part, go and open and close. If there is connected.... cabinet using the #8-14 x 1" screws (2 for single oven, 4 for heat. A B A. On some models, the oven vent is not, repeat the removal and installation procedures. Check Operation of Single Oven 1. Securely fasten oven to push oven into cabinet cutout. 4. Check Operation of Double Oven 1. A B A. #8-14 x ³⁄₈" ...
... of the Use and Care Guide or contact the dealer from whom you purchased your oven. Dispose of Single Oven" steps 2-6. or circuit breaker has not tripped. ■ Electrical supply is an extra part, go and open and close. If there is connected.... cabinet using the #8-14 x 1" screws (2 for single oven, 4 for heat. A B A. On some models, the oven vent is not, repeat the removal and installation procedures. Check Operation of Single Oven 1. Securely fasten oven to push oven into cabinet cutout. 4. Check Operation of Double Oven 1. A B A. #8-14 x ³⁄₈" ...


