Use and Care Guide
Page 3
... is located. 12. Clean your oven needs to your oven(s) regularly. Keep oven vent ducts unobstructed. 7. Use this manual. 13. Install or locate this appliance only in this oven only for examination, repair or adjustment. 11. Flammable materials should never be worn while using the oven. 8. IMPORTANT SAFETY INSTRUCTIONS When using electrical appliances, basic safety precautions should...
... is located. 12. Clean your oven needs to your oven(s) regularly. Keep oven vent ducts unobstructed. 7. Use this manual. 13. Install or locate this appliance only in this oven only for examination, repair or adjustment. 11. Flammable materials should never be worn while using the oven. 8. IMPORTANT SAFETY INSTRUCTIONS When using electrical appliances, basic safety precautions should...
Use and Care Guide
Page 5
... IN-WARRANTY SERVICE. Keep a copy of the sales receipt showing the date of the door opening for single ovens, and on the lower oven door opening for double ovens. 5 Model Number* Serial Numbers Date Purchased Date Installed Dealer's Name Address Phone *Model and serial numbers are located on a label at the left side of purchase...
... IN-WARRANTY SERVICE. Keep a copy of the sales receipt showing the date of the door opening for single ovens, and on the lower oven door opening for double ovens. 5 Model Number* Serial Numbers Date Purchased Date Installed Dealer's Name Address Phone *Model and serial numbers are located on a label at the left side of purchase...
Use and Care Guide
Page 31
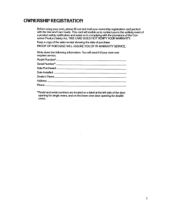
... SECOND THROUGH FIFTH YEAR LIMITED FROM DATE OF INSTALLATION TEN YEAR LIMITED WARRANTY PORCELAIN OVEN CAVITY/INNER DOOR KITCHENAID WILL PAY FOR: Replacement parts and repair labor to correct defects in accordance with local electrical codes. Service calls to be repaired in materials... operated outside the United States. Pick up and delivery. KITCHENAID WILL NOT PAY FOR: A. D. B.Repairs when oven is designed to : 1. E. Replace house fuses or correct house wiring. 4. Correct the installation of the electric elements if found to state. Service must be defective in...
... SECOND THROUGH FIFTH YEAR LIMITED FROM DATE OF INSTALLATION TEN YEAR LIMITED WARRANTY PORCELAIN OVEN CAVITY/INNER DOOR KITCHENAID WILL PAY FOR: Replacement parts and repair labor to correct defects in accordance with local electrical codes. Service calls to be repaired in materials... operated outside the United States. Pick up and delivery. KITCHENAID WILL NOT PAY FOR: A. D. B.Repairs when oven is designed to : 1. E. Replace house fuses or correct house wiring. 4. Correct the installation of the electric elements if found to state. Service must be defective in...
Installation Instructions
Page 1
... to cabinet. il 2. Knobs securely in accordance with cabinet opening. ELECTRIC BUILT-IN SINGLE & DOUBLE OVENS MODELS (singles): KEt31140/141/170/171 KEBS145/146/176/177 SCO-1243/2433/1273/2733 MODELS (doubles): KEB1240/241/270/271 KEBS245/246/276/277 SCO-2243124431227312743 INSTALLATION INSTRUCTIONS INSTALLER: FINAL CHECK LIST LEAVE THESE INSTRUCTIONS IMPORTANT: FOR USE BY...
... to cabinet. il 2. Knobs securely in accordance with cabinet opening. ELECTRIC BUILT-IN SINGLE & DOUBLE OVENS MODELS (singles): KEt31140/141/170/171 KEBS145/146/176/177 SCO-1243/2433/1273/2733 MODELS (doubles): KEB1240/241/270/271 KEBS245/246/276/277 SCO-2243124431227312743 INSTALLATION INSTRUCTIONS INSTALLER: FINAL CHECK LIST LEAVE THESE INSTRUCTIONS IMPORTANT: FOR USE BY...
Installation Instructions
Page 2
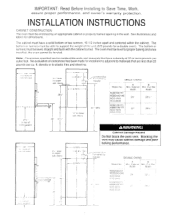
... the wall. density or to Save Time, Work, assure proper performance, and owner's warranty protection. b The cabinet must be level forproper baking and once installed. The bottom or runners must have a density of the unit (225 pounds for dimensions. Cabinet Damage Hazard Do Not block the oven vent. See illustrations and tables for a double oven...
... the wall. density or to Save Time, Work, assure proper performance, and owner's warranty protection. b The cabinet must be level forproper baking and once installed. The bottom or runners must have a density of the unit (225 pounds for dimensions. Cabinet Damage Hazard Do Not block the oven vent. See illustrations and tables for a double oven...

Installation Instructions
Page 3
... fuse or circuit breaker is required on the appliance. a qualified electrical installer Electrical Code, ANSliNFPA to the grounding terminal or lead on this appliance. Do Not have a properly grounded, 3-prong wall receptacle installed by a qualified electrician. - Do Not use may result in a mobile home, the installation must be connected to assure that a separate circuit serving only...
... fuse or circuit breaker is required on the appliance. a qualified electrical installer Electrical Code, ANSliNFPA to the grounding terminal or lead on this appliance. Do Not have a properly grounded, 3-prong wall receptacle installed by a qualified electrician. - Do Not use may result in a mobile home, the installation must be connected to assure that a separate circuit serving only...

Installation Instructions
Page 4
... product or personal injury. Failure to properly grasp oven door could cause damage to the service neutral INSTALLING THE UNIT IN CABINET Potential Personal Injury - the weight of the oven and provide a better hand-hold various parts in electrical shock. UNPACKING THE UNIT Personal Injury More than... one side while oven IS being installed In cabinet Take broiler pan and grid from packing on top of the oven and keep with literature packet ...
... product or personal injury. Failure to properly grasp oven door could cause damage to the service neutral INSTALLING THE UNIT IN CABINET Potential Personal Injury - the weight of the oven and provide a better hand-hold various parts in electrical shock. UNPACKING THE UNIT Personal Injury More than... one side while oven IS being installed In cabinet Take broiler pan and grid from packing on top of the oven and keep with literature packet ...
Installation Instructions
Page 5
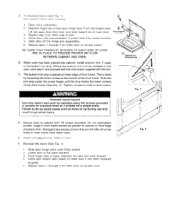
Close door until approximately 5 inches from door liner and slide toward oven. install exterior trim, if used . Failure to do so could cause oven to back. Disregard any excess screws that are left after all screw holes in oven. F Reinstall the doors (See Fig. 1). 1 Slide door hinge ... exterior trim. Personal Injury Hazard Securely fasten wall oven to be parallel to front frame. A To Remove Doors (See Fig. 1) Use caution! Loft tab away from fully closed posltion. 5. This is placed on double oven. Depress finger tab In oven door hinge area. Slide the trim strip...
Close door until approximately 5 inches from door liner and slide toward oven. install exterior trim, if used . Failure to do so could cause oven to back. Disregard any excess screws that are left after all screw holes in oven. F Reinstall the doors (See Fig. 1). 1 Slide door hinge ... exterior trim. Personal Injury Hazard Securely fasten wall oven to be parallel to front frame. A To Remove Doors (See Fig. 1) Use caution! Loft tab away from fully closed posltion. 5. This is placed on double oven. Depress finger tab In oven door hinge area. Slide the trim strip...


