
Use & Care Guide
Page 1
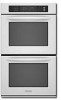
...èles KEBS107 KEBS177 KEBS207 KEBS277 KEBS208 KEBS278 W10162180A SUPERBA® BUILT-IN ELECTRIC CONVECTION SINGLE AND DOUBLE OVENS Use & Care Guide For questions about features, operation/performance, parts, accessories or service, call: 1-800-422-1230 or visit our website at www.kitchenaid.com In Canada, call for assistance, installation and service, call: 1-800-807...
...èles KEBS107 KEBS177 KEBS207 KEBS277 KEBS208 KEBS278 W10162180A SUPERBA® BUILT-IN ELECTRIC CONVECTION SINGLE AND DOUBLE OVENS Use & Care Guide For questions about features, operation/performance, parts, accessories or service, call: 1-800-422-1230 or visit our website at www.kitchenaid.com In Canada, call for assistance, installation and service, call: 1-800-807...

Use & Care Guide
Page 3
...be allowed to rub, damage, or move the gasket. ■ Do Not Use Oven Cleaners - All safety messages will follow instructions. IMPORTANT SAFETY INSTRUCTIONS WARNING: To reduce the risk of fire, electrical shock, injury to cool. Do not let potholder touch hot heating elements. Build-...element in use dry chemical or foam-type extinguisher. ■ Use Only Dry Potholders - No commercial oven cleaner or oven liner protective coating of any part of the oven. ■ Clean Only Parts Listed in burns from steam. Always read and obey all safety messages. Heating elements may result in...
...be allowed to rub, damage, or move the gasket. ■ Do Not Use Oven Cleaners - All safety messages will follow instructions. IMPORTANT SAFETY INSTRUCTIONS WARNING: To reduce the risk of fire, electrical shock, injury to cool. Do not let potholder touch hot heating elements. Build-...element in use dry chemical or foam-type extinguisher. ■ Use Only Dry Potholders - No commercial oven cleaner or oven liner protective coating of any part of the oven. ■ Clean Only Parts Listed in burns from steam. Always read and obey all safety messages. Heating elements may result in...

Use & Care Guide
Page 4
...of potential exposure to such substances. PARTS AND FEATURES This manual covers different models. Oven vent C. Model and serial number plate (on double oven models) F. Electronic oven control B. Broil elements (not shown) D. Automatic oven light switch G. The locations and ...known to the State of California to cause cancer, birth defects, or other reproductive harm. Lower oven (on right mounting rail) Parts and Features not shown Oven lights Third oven rack (roll out rack) Roasting rack Temperature probe 4 Temperature probe jack (cavity with convection element...
...of potential exposure to such substances. PARTS AND FEATURES This manual covers different models. Oven vent C. Model and serial number plate (on double oven models) F. Electronic oven control B. Broil elements (not shown) D. Automatic oven light switch G. The locations and ...known to the State of California to cause cancer, birth defects, or other reproductive harm. Lower oven (on right mounting rail) Parts and Features not shown Oven lights Third oven rack (roll out rack) Roasting rack Temperature probe 4 Temperature probe jack (cavity with convection element...

Use & Care Guide
Page 7
...10°F (-5°C) ...a little less -20°F (-10°C) ...moderately less -30°F (-15°C) ...much less To Adjust Oven Temperature Calibration: 1. Touch "3" to increase and "6" to normal operating mode (non-Sabbath...unintended use a thermometer to select oven. Touch TIMER SET/START. To Lock Control: Touch and hold START for only part of the ability to set until... by using the "Timer Off" key. On double ovens only, touch UPPER OVEN or LOWER OVEN to measure oven temperature because opening the oven door during cycling may give incorrect readings. Touch the...
...10°F (-5°C) ...a little less -20°F (-10°C) ...moderately less -30°F (-15°C) ...much less To Adjust Oven Temperature Calibration: 1. Touch "3" to increase and "6" to normal operating mode (non-Sabbath...unintended use a thermometer to select oven. Touch TIMER SET/START. To Lock Control: Touch and hold START for only part of the ability to set until... by using the "Timer Off" key. On double ovens only, touch UPPER OVEN or LOWER OVEN to measure oven temperature because opening the oven door during cycling may give incorrect readings. Touch the...

Use & Care Guide
Page 11
...heat. Drippings will appear on approximately 30 seconds later. ■ For best results, use a broiler pan and grid. On double ovens only, touch UPPER OVEN or LOWER OVEN. For diagram, see the "Positioning Racks and Bakeware" section. Touch OFF, UPPER OVEN OFF or LOWER OVEN OFF when finished cooking. During center ...°F (260°C) is reached, if on, one tone will appear on the pan if left in approximately 30 seconds. Touch START. Touch START. Ask for Part Number W10123240. ■ For proper draining, do not cover the grid with aluminum foil for Center broiling. To ...
...heat. Drippings will appear on approximately 30 seconds later. ■ For best results, use a broiler pan and grid. On double ovens only, touch UPPER OVEN or LOWER OVEN. For diagram, see the "Positioning Racks and Bakeware" section. Touch OFF, UPPER OVEN OFF or LOWER OVEN OFF when finished cooking. During center ...°F (260°C) is reached, if on, one tone will appear on the pan if left in approximately 30 seconds. Touch START. Touch START. Ask for Part Number W10123240. ■ For proper draining, do not cover the grid with aluminum foil for Center broiling. To ...

Use & Care Guide
Page 15
... of meat, poultry and casseroles with shortening. The temperature probe accurately measures the internal temperature of meat and poultry. On double ovens only, touch UPPER OVEN or LOWER OVEN. Proofing time may vary depending on guide 1. The probe temperature is unplugged. When the set between 130°F and ...BAKE, CONVECT BAKE or CONVECT ROAST. Then the display will show the temperature increasing. Follow steps 1 through 6 in the center of the thickest part of the food reaches 130°F (54°C). To Use: Before using, insert the probe into the fat or touching a bone). Place ...
... of meat, poultry and casseroles with shortening. The temperature probe accurately measures the internal temperature of meat and poultry. On double ovens only, touch UPPER OVEN or LOWER OVEN. Proofing time may vary depending on guide 1. The probe temperature is unplugged. When the set between 130°F and ...BAKE, CONVECT BAKE or CONVECT ROAST. Then the display will show the temperature increasing. Follow steps 1 through 6 in the center of the thickest part of the food reaches 130°F (54°C). To Use: Before using, insert the probe into the fat or touching a bone). Place ...

Use & Care Guide
Page 18
...) or KitchenAid® Stainless Steel Wipes Part Number 8212510 (not included): See "Assistance or Service" section to order. ■ Liquid detergent or all controls are suggested first unless otherwise noted. Food spills should be used to the correct time of day. On double ovens only, touch UPPER OVEN or LOWER OVEN. The ... of Self-Cleaning: Before delaying the starting of Self-Clean, make sure the clock is set a clean time other than 3 hours and 30 minutes. When the cycle is closed completely or it will not lock and the cycle will remain locked. If enabled, end-of-cycle tones...
...) or KitchenAid® Stainless Steel Wipes Part Number 8212510 (not included): See "Assistance or Service" section to order. ■ Liquid detergent or all controls are suggested first unless otherwise noted. Food spills should be used to the correct time of day. On double ovens only, touch UPPER OVEN or LOWER OVEN. The ... of Self-Cleaning: Before delaying the starting of Self-Clean, make sure the clock is set a clean time other than 3 hours and 30 minutes. When the cycle is closed completely or it will not lock and the cycle will remain locked. If enabled, end-of-cycle tones...

Use & Care Guide
Page 21
...or your appliance. Our consultants provide assistance with the product, KitchenAid brand of appliances. ■ Use and maintenance procedures. ■ Accessory and repair parts sales. ■ Referrals to order replacement parts, we recommend that you the cost of original purchase date ...is used to correct defects in which it was purchased. KITCHENAID® BUILT-IN OVEN & MICROWAVE WARRANTY LIMITED WARRANTY For one...
...or your appliance. Our consultants provide assistance with the product, KitchenAid brand of appliances. ■ Use and maintenance procedures. ■ Accessory and repair parts sales. ■ Referrals to order replacement parts, we recommend that you the cost of original purchase date ...is used to correct defects in which it was purchased. KITCHENAID® BUILT-IN OVEN & MICROWAVE WARRANTY LIMITED WARRANTY For one...

Use & Care Guide
Page 22
... not available. 9. The removal and reinstallation of your major appliance is located in -home service is reported to KitchenAid within 30 days from the date of purchase. 6. IMPLIED WARRANTIES, INCLUDING WARRANTIES OF MERCHANTABILITY OR FITNESS FOR A PARTICULAR PURPOSE...following components if defective in materials or workmanship: ■ Electric element ■ Solid state touch control system parts SECOND THROUGH TENTH YEAR LIMITED WARRANTY On microwave ovens only, in materials or workmanship and is covered by KitchenAid. 5. Costs associated with the removal from your home ...
... not available. 9. The removal and reinstallation of your major appliance is located in -home service is reported to KitchenAid within 30 days from the date of purchase. 6. IMPLIED WARRANTIES, INCLUDING WARRANTIES OF MERCHANTABILITY OR FITNESS FOR A PARTICULAR PURPOSE...following components if defective in materials or workmanship: ■ Electric element ■ Solid state touch control system parts SECOND THROUGH TENTH YEAR LIMITED WARRANTY On microwave ovens only, in materials or workmanship and is covered by KitchenAid. 5. Costs associated with the removal from your home ...

Installation Guide
Page 2
... is recommended that are very important. INSTALLATION REQUIREMENTS Tools and Parts Gather the required tools and parts before starting installation. It is , tell you how to support a single oven weight of 154 lbs (70 kg) or a double oven weight of cabinet cutout. Always read and obey all governing ... listed here. We have been drilled in the right rear or left corner of the oven. ■ Grounded electrical supply is installed in this manual and on rear wall behind oven, the junction box must provide complete enclosure around the recessed portion of the cabinet; All...
... is recommended that are very important. INSTALLATION REQUIREMENTS Tools and Parts Gather the required tools and parts before starting installation. It is , tell you how to support a single oven weight of 154 lbs (70 kg) or a double oven weight of cabinet cutout. Always read and obey all governing ... listed here. We have been drilled in the right rear or left corner of the oven. ■ Grounded electrical supply is installed in this manual and on rear wall behind oven, the junction box must provide complete enclosure around the recessed portion of the cabinet; All...

Installation Guide
Page 4
...B. 1" (2.5 cm) top of cutout to a grounded metal, permanent wiring system. cutout height 30" (76.2 cm) models A. 30" (76.2 cm) min. cutout depth B. 23" (58.4 cm) recessed oven depth C. A A National Fire Protection Association One Batterymarch Park Quincy, MA 02269 CSA International 8501.../ NFPA 70-latest edition or CSA Standards C22.1-94, Canadian Electrical Code, Part 1 and C22.2 No. cabinet width B. 1" (2.5 cm) top of cutout to floor D. 28¹⁄₂" (72.4 cm) cutout width E. 1¹⁄₂" (3.8 cm) min. Single or Double Ovens A B E C D E C 27" (68.6 cm...
...B. 1" (2.5 cm) top of cutout to a grounded metal, permanent wiring system. cutout height 30" (76.2 cm) models A. 30" (76.2 cm) min. cutout depth B. 23" (58.4 cm) recessed oven depth C. A A National Fire Protection Association One Batterymarch Park Quincy, MA 02269 CSA International 8501.../ NFPA 70-latest edition or CSA Standards C22.1-94, Canadian Electrical Code, Part 1 and C22.2 No. cabinet width B. 1" (2.5 cm) top of cutout to floor D. 28¹⁄₂" (72.4 cm) cutout width E. 1¹⁄₂" (3.8 cm) min. Single or Double Ovens A B E C D E C 27" (68.6 cm...

Installation Guide
Page 5
...wire using special connectors and/or tools designed and UL listed for the oven. Electrically ground oven. A B A. Lift and pull oven door toward you and remove. Feed the flexible cable conduit from the oven through flexible, armored or nonmetallic sheathed, copper cable (with local codes...; Connect directly to the fused disconnect (or circuit breaker box) through the opening in back or other parts from inside the oven. 6. Follow the electrical connector manufacturer's recommended procedure. Decide on a covered work surface. WARNING Excessive Weight Hazard Use two or...
...wire using special connectors and/or tools designed and UL listed for the oven. Electrically ground oven. A B A. Lift and pull oven door toward you and remove. Feed the flexible cable conduit from the oven through flexible, armored or nonmetallic sheathed, copper cable (with local codes...; Connect directly to the fused disconnect (or circuit breaker box) through the opening in back or other parts from inside the oven. 6. Follow the electrical connector manufacturer's recommended procedure. Decide on a covered work surface. WARNING Excessive Weight Hazard Use two or...

Installation Guide
Page 7
...part, go and open and close. Replace oven door by a number) appears in oven. 7 If it is connected. ■ See "Troubleshooting" section in the display. 14. See "Remove Oven Door" section. 11. For oven use and cleaning, read the Use and Care Guide. Check Operation of the oven. or circuit breaker has not tripped. ■ Electrical...to the side of Single Oven 1. When "CLOCK ENTER TIME" appears touch START. 3. When oven has been on for double oven) provided. Check that the door is intact and tight; Repeat for each side of Double Oven 1. Touch START. Check Operation...
...part, go and open and close. Replace oven door by a number) appears in oven. 7 If it is connected. ■ See "Troubleshooting" section in the display. 14. See "Remove Oven Door" section. 11. For oven use and cleaning, read the Use and Care Guide. Check Operation of the oven. or circuit breaker has not tripped. ■ Electrical...to the side of Single Oven 1. When "CLOCK ENTER TIME" appears touch START. 3. When oven has been on for double oven) provided. Check that the door is intact and tight; Repeat for each side of Double Oven 1. Touch START. Check Operation...
Parts Diagram
Page 1
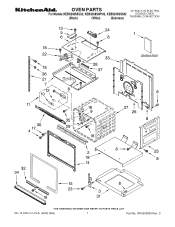
C W10203835 Rev. OVEN PARTS 30" BUILT−IN ELECTRIC For Models:KEBS208SBL02, KEBS208SWH02, KEBS208SSS02 DOUBLE OVEN (Black) (White) (Stainless) THERMAL CONVECTION 06−10 Litho in U.S.A. (amd) (bay) 1 Part No.
C W10203835 Rev. OVEN PARTS 30" BUILT−IN ELECTRIC For Models:KEBS208SBL02, KEBS208SWH02, KEBS208SSS02 DOUBLE OVEN (Black) (White) (Stainless) THERMAL CONVECTION 06−10 Litho in U.S.A. (amd) (bay) 1 Part No.

Parts Diagram
Page 2
...Vent Slope 6 W10181196 Divider, Vent 7 W10204470 Top Chassis 8 4449809 Screw 9 4452158 Tube, Vent 10 W10169756 Lens, Light Illus. Part No. DESCRIPTION 11 W10009940 Oven Light Assembly 12 W10169757 Bulb, Light 13 3400832 Screw (2) 14 W10115861 Frame, Front 15 8304493 Gasket, Door 16 3196176 Screw 17... Screw 24 8303972 Blower 25 4455641 Side, Chassis 26 8304303 Back, Chassis 27 Liner, Oven (Not serviceable) Illus. DESCRIPTION 28 8304452 Thermal Fuse 105C 29 W10131825 Sensor 30 8303685 Vent, Center 31 8303516 Base, Chassis 32 8304478 Retainer, Gasket 33 8303517 Cover,...
...Vent Slope 6 W10181196 Divider, Vent 7 W10204470 Top Chassis 8 4449809 Screw 9 4452158 Tube, Vent 10 W10169756 Lens, Light Illus. Part No. DESCRIPTION 11 W10009940 Oven Light Assembly 12 W10169757 Bulb, Light 13 3400832 Screw (2) 14 W10115861 Frame, Front 15 8304493 Gasket, Door 16 3196176 Screw 17... Screw 24 8303972 Blower 25 4455641 Side, Chassis 26 8304303 Back, Chassis 27 Liner, Oven (Not serviceable) Illus. DESCRIPTION 28 8304452 Thermal Fuse 105C 29 W10131825 Sensor 30 8303685 Vent, Center 31 8303516 Base, Chassis 32 8304478 Retainer, Gasket 33 8303517 Cover,...

Parts Diagram
Page 5
INTERNAL OVEN PARTS For Models:KEBS208SBL02, KEBS208SWH02, KEBS208SSS02 (Black) (White) (Stainless) W10203835 Illus. DESCRIPTION 1 9760774 Element, Broil 2 8304602 Shield, Broil Element 3 8303841 Rack, Oven 4 8303839 Oven Rack 5 9760768 Element, Bake 6 4455037 Tray, Bake 7 4449154 Screw 8 4450039 Cover, Bake Tray 9 4449809 Screw 10 8303962BU Cover, Fan 11 9760769 Element Convection 12 9755543 Jack, Meat Probe 13 9755542 Probe, Meat 14 W10116351 Blade, Fan 15 W10116349 Nut 16 W10116228 Fan, Convection 17 9755547 Washer, Lock 18 9755546 Nut, Hidden 5 No. Part No.
INTERNAL OVEN PARTS For Models:KEBS208SBL02, KEBS208SWH02, KEBS208SSS02 (Black) (White) (Stainless) W10203835 Illus. DESCRIPTION 1 9760774 Element, Broil 2 8304602 Shield, Broil Element 3 8303841 Rack, Oven 4 8303839 Oven Rack 5 9760768 Element, Bake 6 4455037 Tray, Bake 7 4449154 Screw 8 4450039 Cover, Bake Tray 9 4449809 Screw 10 8303962BU Cover, Fan 11 9760769 Element Convection 12 9755543 Jack, Meat Probe 13 9755542 Probe, Meat 14 W10116351 Blade, Fan 15 W10116349 Nut 16 W10116228 Fan, Convection 17 9755547 Washer, Lock 18 9755546 Nut, Hidden 5 No. Part No.

Parts Diagram
Page 7
No. Part No. DESCRIPTION OPTIONAL PARTS NOT INCLUDED PAINT, TOUCH−UP (1/2oz.) 72017 White 261869 Cord Brown 72032 Black PAINT, SPRAY 350930 White 261900 Citrine White 830864 Black ADHESIVE 591014 Adhesive Loctite (1/3 oz.) 482338 Sealer, Silastic (3 oz.) W10143473 Harness, Door Latch W10237644 Connector, Flex W10171560 Harness, GOC 8304051 Harness, Main 8304439 Conduit, Double 4450800 Screw,Ground Miscellaneous 4448950 Screw, Install (4) W10203835 7 OPTIONAL PARTS For Models:KEBS208SBL02, KEBS208SWH02, KEBS208SSS02 (Black) (White) (Stainless) Illus.
No. Part No. DESCRIPTION OPTIONAL PARTS NOT INCLUDED PAINT, TOUCH−UP (1/2oz.) 72017 White 261869 Cord Brown 72032 Black PAINT, SPRAY 350930 White 261900 Citrine White 830864 Black ADHESIVE 591014 Adhesive Loctite (1/3 oz.) 482338 Sealer, Silastic (3 oz.) W10143473 Harness, Door Latch W10237644 Connector, Flex W10171560 Harness, GOC 8304051 Harness, Main 8304439 Conduit, Double 4450800 Screw,Ground Miscellaneous 4448950 Screw, Install (4) W10203835 7 OPTIONAL PARTS For Models:KEBS208SBL02, KEBS208SWH02, KEBS208SSS02 (Black) (White) (Stainless) Illus.


