
Use & Care Guide
Page 1
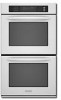
... KEBS207 KEBS277 KEBS208 KEBS278 W10162180A SUPERBA® BUILT-IN ELECTRIC CONVECTION SINGLE AND DOUBLE OVENS Use & Care Guide For questions about features, operation/performance, parts, accessories or service, call: 1-800-422-1230 or visit our website at www.kitchenaid.com In Canada, call for assistance, installation and service, call: 1-800-807-6777 or visit our...
... KEBS207 KEBS277 KEBS208 KEBS278 W10162180A SUPERBA® BUILT-IN ELECTRIC CONVECTION SINGLE AND DOUBLE OVENS Use & Care Guide For questions about features, operation/performance, parts, accessories or service, call: 1-800-422-1230 or visit our website at www.kitchenaid.com In Canada, call for assistance, installation and service, call: 1-800-807-6777 or visit our...

Use & Care Guide
Page 3
... IMPORTANT SAFETY INSTRUCTIONS WARNING: To reduce the risk of fire, electrical shock, injury to rub, damage, or move the gasket. ■ Do Not Use Oven Cleaners - Loose-fitting or hanging garments should never be moved while oven is hot, do not touch, or let clothing or other ...cause burns - Interior surfaces of pressure may result in Oven - Other surfaces of the oven may be allowed to reduce the chance of Oven Racks - The door gasket is properly installed and grounded by a qualified technician. ■ Never Use the Oven for a good seal. Care should never be hot...
... IMPORTANT SAFETY INSTRUCTIONS WARNING: To reduce the risk of fire, electrical shock, injury to rub, damage, or move the gasket. ■ Do Not Use Oven Cleaners - Loose-fitting or hanging garments should never be moved while oven is hot, do not touch, or let clothing or other ...cause burns - Interior surfaces of pressure may result in Oven - Other surfaces of the oven may be allowed to reduce the chance of Oven Racks - The door gasket is properly installed and grounded by a qualified technician. ■ Never Use the Oven for a good seal. Care should never be hot...

Use & Care Guide
Page 19
...work during the SelfCleaning cycle. Reconnect power. Open the oven door. Move the hinge levers back to remove the oven door. Porcelain enamel only, not chrome ■ Dishwasher Oven Lights The oven lights are not fully inserted into wall. 6. On double oven models, both upper and lower lights will come on ...open and close the oven door if the racks are 12-volt, 5-watt maximum halogen bulbs. The oven door is off and cool. 1. BROILER PAN AND GRID (on each side. 3. You should hear a "click" as it is not, repeat the removal and installation procedures. 19 To Replace...
...work during the SelfCleaning cycle. Reconnect power. Open the oven door. Move the hinge levers back to remove the oven door. Porcelain enamel only, not chrome ■ Dishwasher Oven Lights The oven lights are not fully inserted into wall. 6. On double oven models, both upper and lower lights will come on ...open and close the oven door if the racks are 12-volt, 5-watt maximum halogen bulbs. The oven door is off and cool. 1. BROILER PAN AND GRID (on each side. 3. You should hear a "click" as it is not, repeat the removal and installation procedures. 19 To Replace...

Use & Care Guide
Page 20
...Cleaning Cycle" section. ■ Has a delay start been set correctly? See "Oven Temperature Control" section. ■ Was the oven preheated? See "Bakeware" section. ■ Are the racks positioned properly? See Installation Instructions. Oven will not operate ■ Has a household fuse blown, or has a circuit ...batter evenly distributed in longer cooking times. ■ Are baked items too brown on . ■ On double oven models, has the correct oven been selected? Close the oven door all the way. ■ Has the function been entered? Replace the fuse or reset the circuit ...
...Cleaning Cycle" section. ■ Has a delay start been set correctly? See "Oven Temperature Control" section. ■ Was the oven preheated? See "Bakeware" section. ■ Are the racks positioned properly? See Installation Instructions. Oven will not operate ■ Has a household fuse blown, or has a circuit ...batter evenly distributed in longer cooking times. ■ Are baked items too brown on . ■ On double oven models, has the correct oven been selected? Close the oven door all the way. ■ Has the function been entered? Replace the fuse or reset the circuit ...

Use & Care Guide
Page 21
...Part Number 8212510 All-Purpose Appliance Cleaner Order Part Number 31682 In Canada Call the KitchenAid Canada Customer Interaction Centre toll free: 1-800-807-6777. KITCHENAID® BUILT-IN OVEN & MICROWAVE WARRANTY LIMITED WARRANTY For one year from the date of original purchase ... or workmanship. These factory specified parts will help , follow the menu prompts. To locate the KitchenAid designated service company in your area, you the cost of appliances. ■ Installation information. ■ Use and maintenance procedures. ■ Accessory and repair parts sales. ■...
...Part Number 8212510 All-Purpose Appliance Cleaner Order Part Number 31682 In Canada Call the KitchenAid Canada Customer Interaction Centre toll free: 1-800-807-6777. KITCHENAID® BUILT-IN OVEN & MICROWAVE WARRANTY LIMITED WARRANTY For one year from the date of original purchase ... or workmanship. These factory specified parts will help , follow the menu prompts. To locate the KitchenAid designated service company in your area, you the cost of appliances. ■ Installation information. ■ Use and maintenance procedures. ■ Accessory and repair parts sales. ■...

Use & Care Guide
Page 22
... workmanship: ■ Electric element ■ Solid state touch control system parts SECOND THROUGH TENTH YEAR LIMITED WARRANTY On microwave ovens only, in the second through due to defects in materials or workmanship and is reported to KitchenAid within 30 days from the date... does not cover: 1. Damage resulting from accident, alteration, misuse, abuse, fire, flood, acts of God, improper installation, installation not in accordance with electrical or plumbing codes, or use of consumables or cleaning products not approved by this warranty. 7. Cosmetic damage, including scratches...
... workmanship: ■ Electric element ■ Solid state touch control system parts SECOND THROUGH TENTH YEAR LIMITED WARRANTY On microwave ovens only, in the second through due to defects in materials or workmanship and is reported to KitchenAid within 30 days from the date... does not cover: 1. Damage resulting from accident, alteration, misuse, abuse, fire, flood, acts of God, improper installation, installation not in accordance with electrical or plumbing codes, or use of consumables or cleaning products not approved by this warranty. 7. Cosmetic damage, including scratches...

Installation Guide
Page 2
... codes and ordinances. ■ Cabinet opening . ■ Oven support surface must be solid, level and flush with oven. ■ Recessed installation area must provide complete enclosure around the recessed portion of the oven. ■ Grounded electrical supply is installed in a wall cabinet. single oven (2), double oven (4) ■ Bottom vent (supplied on rear wall behind oven, the junction box must be recessed and...
... codes and ordinances. ■ Cabinet opening . ■ Oven support surface must be solid, level and flush with oven. ■ Recessed installation area must provide complete enclosure around the recessed portion of the oven. ■ Grounded electrical supply is installed in a wall cabinet. single oven (2), double oven (4) ■ Bottom vent (supplied on rear wall behind oven, the junction box must be recessed and...

Installation Guide
Page 3
...(81.3 cm) bottom of cutout to floor D. 25¹⁄₂" (64.8 cm) cutout width E. 27³⁄₄" (70.5 cm) min. Double Ovens A B E E D C 27" (68.6 cm) models A. 27" (68.6 cm) min. top of cutout to underside of countertop C. 5¹⁄... E. 27¹⁄₂" (69.9 cm) recessed height 30" (76.2 cm) models A. 28 71.9 cm) max. Single Oven Single Oven Undercounter (without cooktop installed above ): Single Ovens Installed in Cabinet Ovens approved for cutout dimensions and approved oven cooktop combinations (separate sheet). recessed width B. 28³⁄...
...(81.3 cm) bottom of cutout to floor D. 25¹⁄₂" (64.8 cm) cutout width E. 27³⁄₄" (70.5 cm) min. Double Ovens A B E E D C 27" (68.6 cm) models A. 27" (68.6 cm) min. top of cutout to underside of countertop C. 5¹⁄... E. 27¹⁄₂" (69.9 cm) recessed height 30" (76.2 cm) models A. 28 71.9 cm) max. Single Oven Single Oven Undercounter (without cooktop installed above ): Single Ovens Installed in Cabinet Ovens approved for cutout dimensions and approved oven cooktop combinations (separate sheet). recessed width B. 28³⁄...

Installation Guide
Page 4
...;" (3.8 cm) min. This oven must be connected to floor D. 28¹⁄₂" (72.4 cm) cutout width E. 1¹⁄₂" (3.8 cm) min. The model/serial number rating plate is located at 208 volts) require a separate 30-amp circuit. ■ A ...adequate and in Cabinet A B F D Cabinet Side View - Model/serial number plate Double Oven A. Double Ovens Double Ovens Installed in conformance with the National Electrical Code, ANSI/ NFPA 70-latest edition or CSA Standards C22.1-94, Canadian Electrical Code, Part 1 and C22.2 No. Cabinet Dimensions - cabinet width B. 1" (2.5...
...;" (3.8 cm) min. This oven must be connected to floor D. 28¹⁄₂" (72.4 cm) cutout width E. 1¹⁄₂" (3.8 cm) min. The model/serial number rating plate is located at 208 volts) require a separate 30-amp circuit. ■ A ...adequate and in Cabinet A B F D Cabinet Side View - Model/serial number plate Double Oven A. Double Ovens Double Ovens Installed in conformance with the National Electrical Code, ANSI/ NFPA 70-latest edition or CSA Standards C22.1-94, Canadian Electrical Code, Part 1 and C22.2 No. Cabinet Dimensions - cabinet width B. 1" (2.5...

Installation Guide
Page 5
... manufacturer's recommended procedure. Remove the shipping materials and tape from inside the oven. 6. Remove Oven Door IMPORTANT: Use both hands to the pigtail leads. 2. Electrically ground oven. Oven door latch in unlocked position 3. Disconnect power. 2. Install a UL listed or CSA approved conduit connector to installation. To avoid floor damage, set aside racks and other injury. 2. Remove the...
... manufacturer's recommended procedure. Remove the shipping materials and tape from inside the oven. 6. Remove Oven Door IMPORTANT: Use both hands to the pigtail leads. 2. Electrically ground oven. Oven door latch in unlocked position 3. Disconnect power. 2. Install a UL listed or CSA approved conduit connector to installation. To avoid floor damage, set aside racks and other injury. 2. Remove the...
Installation Guide
Page 6
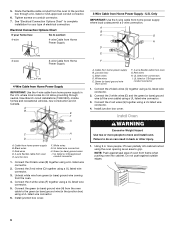
... connector. 6. Connect the green (or bare) ground wire (H) from the oven. 4. Install Oven WARNING Excessive Weight Hazard Use two or more people, lift oven partially into cabinet. Do not push against seal area of oven front frame when pushing oven into cabinet cutout using a UL listed wire connector. 2. Electrical Connection Options Chart If your type of the...
... connector. 6. Connect the green (or bare) ground wire (H) from the oven. 4. Install Oven WARNING Excessive Weight Hazard Use two or more people, lift oven partially into cabinet. Do not push against seal area of oven front frame when pushing oven into cabinet cutout using a UL listed wire connector. 2. Electrical Connection Options Chart If your type of the...

Installation Guide
Page 7
... will light briefly, and "PF" should feel the oven door drop into hinge slots in mounting rails. Complete Installation 1. Check that you have all packaging materials. 4. Check Operation of Double Oven 1. When "CLOCK ENTER TIME" appears touch START. 3. or circuit breaker has not tripped. ■ Electrical supply is intact and tight; If you need Assistance...
... will light briefly, and "PF" should feel the oven door drop into hinge slots in mounting rails. Complete Installation 1. Check that you have all packaging materials. 4. Check Operation of Double Oven 1. When "CLOCK ENTER TIME" appears touch START. 3. or circuit breaker has not tripped. ■ Electrical supply is intact and tight; If you need Assistance...
Parts Diagram
Page 2
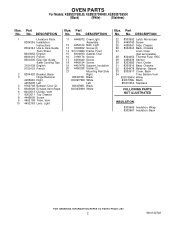
...(2) 21 Mounting Rail,Side Right 8303677BL Black 8303677WH White Left 8303678BL Black 8303678WH White Illus. DESCRIPTION 1 Literature Parts 8304336 Installation Instructions 8304324 Use & Care Guide Tech Sheet 8303952 English 8304416 French 8304335 Easy Set Guide Safer Cooking Tips 3191638 English 9759133..., Mortorized 23 4449743 Screw 25 4455641 Side, Chassis 26 8304303 Back, Chassis 27 Liner, Oven (Not serviceable) 28 8304452 Thermal Fuse 105C 29 4455636 Sensor 30 8303685 Vent, Center 31 8303516 Base, Chassis 32 8304478 Retainer, Gasket 33 8303517 Cover, Back...
...(2) 21 Mounting Rail,Side Right 8303677BL Black 8303677WH White Left 8303678BL Black 8303678WH White Illus. DESCRIPTION 1 Literature Parts 8304336 Installation Instructions 8304324 Use & Care Guide Tech Sheet 8303952 English 8304416 French 8304335 Easy Set Guide Safer Cooking Tips 3191638 English 9759133..., Mortorized 23 4449743 Screw 25 4455641 Side, Chassis 26 8304303 Back, Chassis 27 Liner, Oven (Not serviceable) 28 8304452 Thermal Fuse 105C 29 4455636 Sensor 30 8303685 Vent, Center 31 8303516 Base, Chassis 32 8304478 Retainer, Gasket 33 8303517 Cover, Back...
Parts Diagram
Page 7
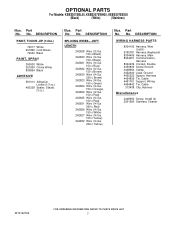
... (Latch) 9762781 Harness,(Keyboard) 8304406 Harness, Main 8304051 Communication, Harness 8304439 Conduit, Double 4450800 Screw,Ground 4448664 Clamp 4452400 Lead, Ground 4452222 Spacer, Harness 4454835 Tie, Cable 4451761 Support, Wiring 4454842 Tie, Cable 313438 Clip, Harness Miscellaneous 4448950 Screw, Install (4) 2261590 Stainless Cleaner W10122722 7 No. DESCRIPTION SPLICING WIRES−−25FT. No...
... (Latch) 9762781 Harness,(Keyboard) 8304406 Harness, Main 8304051 Communication, Harness 8304439 Conduit, Double 4450800 Screw,Ground 4448664 Clamp 4452400 Lead, Ground 4452222 Spacer, Harness 4454835 Tie, Cable 4451761 Support, Wiring 4454842 Tie, Cable 313438 Clip, Harness Miscellaneous 4448950 Screw, Install (4) 2261590 Stainless Cleaner W10122722 7 No. DESCRIPTION SPLICING WIRES−−25FT. No...


