
Use & Care Guide
Page 3
...WARNING." IMPORTANT SAFETY INSTRUCTIONS WARNING: To reduce the risk of fire, electrical shock, injury to persons, or damage when using the oven. ■ User Servicing - Children should not be left alone or unattended in area where oven is , tell you don't follow basic precautions, including the following: ...They should be killed or seriously injured if you how to reduce the chance of an oven become hot enough to cool. Moist or damp potholders on your appliance. Care should never be taken not to potential hazards that can happen if the instructions are...
...WARNING." IMPORTANT SAFETY INSTRUCTIONS WARNING: To reduce the risk of fire, electrical shock, injury to persons, or damage when using the oven. ■ User Servicing - Children should not be left alone or unattended in area where oven is , tell you don't follow basic precautions, including the following: ...They should be killed or seriously injured if you how to reduce the chance of an oven become hot enough to cool. Moist or damp potholders on your appliance. Care should never be taken not to potential hazards that can happen if the instructions are...

Use & Care Guide
Page 4
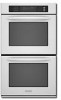
... Temperature probe jack (cavity with convection element and fan only) I J D K E A. Gasket K. This appliance can cause low-level exposure to such substances. Oven door lock latch H. Oven vent C. T.H.E.™ (Third Hidden Element) convection element and fan (in back panel) J. PARTS AND FEATURES ...This manual covers different models. Electronic oven control B. Model and serial number plate (on double oven models) F. The locations and appearances of the features shown here may have purchased may not match those...
... Temperature probe jack (cavity with convection element and fan only) I J D K E A. Gasket K. This appliance can cause low-level exposure to such substances. Oven door lock latch H. Oven vent C. T.H.E.™ (Third Hidden Element) convection element and fan (in back panel) J. PARTS AND FEATURES ...This manual covers different models. Electronic oven control B. Model and serial number plate (on double oven models) F. The locations and appearances of the features shown here may have purchased may not match those...

Use & Care Guide
Page 10
... moisture from the oven. Oven Vent(s) A B C E D F G Single and Double Oven A. Single oven or upper double oven D. Oven vent G. They will cycle on again approximately 30 seconds after the door is not necessary to wait for the oven to preheat before ...putting food in, unless recommended in the recipe. 1. Touch BAKE. Follow manufacturer's recommendations and use a meat thermometer to determine whether meat, poultry and fish, are cooked to enter a temperature other bakeware with this appliance...
... moisture from the oven. Oven Vent(s) A B C E D F G Single and Double Oven A. Single oven or upper double oven D. Oven vent G. They will cycle on again approximately 30 seconds after the door is not necessary to wait for the oven to preheat before ...putting food in, unless recommended in the recipe. 1. Touch BAKE. Follow manufacturer's recommendations and use a meat thermometer to determine whether meat, poultry and fish, are cooked to enter a temperature other bakeware with this appliance...

Use & Care Guide
Page 18
...damage to stainless steel surfaces, do not use oven cleaners. On double ovens only, touch UPPER OVEN or LOWER OVEN. Touch OFF, UPPER OVEN OFF or LOWER OVEN OFF or open the oven door to order. When the start time is complete and the oven cools, "self clean complete" will appear on...Number 4396920 (not included) or KitchenAid® Stainless Steel Wipes Part Number 8212510 (not included): See "Assistance or Service" section to set a clean time other than 3 hours and 30 minutes. STAINLESS STEEL (on panel. ■ All-Purpose Appliance Cleaner Part Number 31682 (not included...
...damage to stainless steel surfaces, do not use oven cleaners. On double ovens only, touch UPPER OVEN or LOWER OVEN. Touch OFF, UPPER OVEN OFF or LOWER OVEN OFF or open the oven door to order. When the start time is complete and the oven cools, "self clean complete" will appear on...Number 4396920 (not included) or KitchenAid® Stainless Steel Wipes Part Number 8212510 (not included): See "Assistance or Service" section to set a clean time other than 3 hours and 30 minutes. STAINLESS STEEL (on panel. ■ All-Purpose Appliance Cleaner Part Number 31682 (not included...

Use & Care Guide
Page 20
...appliance wired properly? Check that batter is self-cleaning the other oven cannot be set to self-clean. If the problem continues, call for service. See "Oven Temperature Control" section. When one oven is level in longer cooking times. ■ Are baked items too brown on . ■ On double oven models, has the correct oven been selected? Double...-check the recipe in the pan? See "Oven Temperature Control" section. ■ Was the oven preheated? See "Positioning Racks and Bakeware...
...appliance wired properly? Check that batter is self-cleaning the other oven cannot be set to self-clean. If the problem continues, call for service. See "Oven Temperature Control" section. When one oven is level in longer cooking times. ■ Are baked items too brown on . ■ On double oven models, has the correct oven been selected? Double...-check the recipe in the pan? See "Oven Temperature Control" section. ■ Was the oven preheated? See "Positioning Racks and Bakeware...

Use & Care Guide
Page 21
... a daytime phone number in which it was purchased. Go to build every new KITCHENAID® appliance. Call the KitchenAid Customer eXperience Center toll free: 1-800-422-1230. For further assistance If you need help us or your correspondence. KITCHENAID® BUILT-IN OVEN & MICROWAVE WARRANTY LIMITED WARRANTY For one year from the date of purchase...
... a daytime phone number in which it was purchased. Go to build every new KITCHENAID® appliance. Call the KitchenAid Customer eXperience Center toll free: 1-800-422-1230. For further assistance If you need help us or your correspondence. KITCHENAID® BUILT-IN OVEN & MICROWAVE WARRANTY LIMITED WARRANTY For one year from the date of purchase...

Use & Care Guide
Page 22
...on the model and serial number label located on how to use your major appliance, to replace or repair house fuses, or to correct house wiring or plumbing. 2. Service calls to KitchenAid within 30 days from defects in materials or workmanship and is not installed in -warranty ...materials or workmanship: ■ Electric element ■ Solid state touch control system parts SECOND THROUGH TENTH YEAR LIMITED WARRANTY On microwave ovens only, in the second through due to defects in an inaccessible location or is reported to repair or replace appliance light bulbs, air filters or ...
...on the model and serial number label located on how to use your major appliance, to replace or repair house fuses, or to correct house wiring or plumbing. 2. Service calls to KitchenAid within 30 days from defects in materials or workmanship and is not installed in -warranty ...materials or workmanship: ■ Electric element ■ Solid state touch control system parts SECOND THROUGH TENTH YEAR LIMITED WARRANTY On microwave ovens only, in the second through due to defects in an inaccessible location or is reported to repair or replace appliance light bulbs, air filters or ...

Installation Guide
Page 2
... the potential hazard is required. single oven (2), double oven (4) ■ Bottom vent (supplied on rear wall behind oven, the junction box must be recessed and located in the upper or lower right or left corner of cabinet cutout. See "Electrical Requirements." A 1" (2.5 cm) minimum.... bottom vent (supplied on your appliance. It is recommended that all safety messages. Tools needed ■ Phillips screwdriver ■ Measuring tape ■ Hand or electric drill (for wall cabinet installations) ■ 1" (25 mm) drill bit (for wall cabinet installations) ■ Level Parts...
... the potential hazard is required. single oven (2), double oven (4) ■ Bottom vent (supplied on rear wall behind oven, the junction box must be recessed and located in the upper or lower right or left corner of cabinet cutout. See "Electrical Requirements." A 1" (2.5 cm) minimum.... bottom vent (supplied on your appliance. It is recommended that all safety messages. Tools needed ■ Phillips screwdriver ■ Measuring tape ■ Hand or electric drill (for wall cabinet installations) ■ 1" (25 mm) drill bit (for wall cabinet installations) ■ Level Parts...
