Use & Care Guide
Page 1
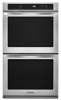
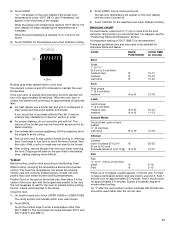
...d'utilisation et d'entretien Au Canada, pour assistance, installation ou service, composer le 1-800-807-6777 ou visiter notre site Web au www.kitchenaid.ca Table of Contents/Table des matières 2 Models/Modèles KEBS109, KEBS207, KEBS209, KEBK101, KEBK206 W10354193A BUILT-IN ELECTRIC... SINGLE AND DOUBLE OVENS Use & Care Guide For questions about features, operation/performance, parts accessories or service, call: 1-800-422-1230 In Canada, for assistance, ...
...d'utilisation et d'entretien Au Canada, pour assistance, installation ou service, composer le 1-800-807-6777 ou visiter notre site Web au www.kitchenaid.ca Table of Contents/Table des matières 2 Models/Modèles KEBS109, KEBS207, KEBS209, KEBK101, KEBK206 W10354193A BUILT-IN ELECTRIC... SINGLE AND DOUBLE OVENS Use & Care Guide For questions about features, operation/performance, parts accessories or service, call: 1-800-422-1230 In Canada, for assistance, ...

Use & Care Guide
Page 3
...Apparel - Moist or damp potholders on Grease Fires - Do not let potholder touch hot heating elements. Always place oven racks in the manual. No commercial oven cleaner or oven liner protective coating of any kind should be killed or seriously injured if you don't immediately follow instructions. These words... be stored in use dry chemical or foam-type extinguisher. ■ Use Only Dry Potholders - They should not be worn while using the oven, follow the safety alert symbol and either the word "DANGER" or "WARNING." Let hot air or steam escape before removing or replacing food....
...Apparel - Moist or damp potholders on Grease Fires - Do not let potholder touch hot heating elements. Always place oven racks in the manual. No commercial oven cleaner or oven liner protective coating of any kind should be killed or seriously injured if you don't immediately follow instructions. These words... be stored in use dry chemical or foam-type extinguisher. ■ Use Only Dry Potholders - They should not be worn while using the oven, follow the safety alert symbol and either the word "DANGER" or "WARNING." Let hot air or steam escape before removing or replacing food....
Use & Care Guide
Page 4
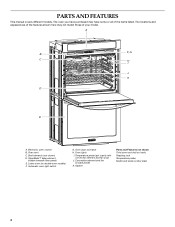
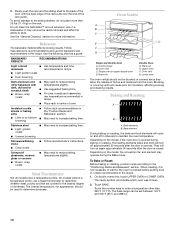
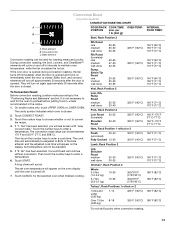
... have some or all of your model. A B F, G C H I . Gasket Parts and Features not shown Third oven rack (roll-out rack) Roasting rack Temperature probe Model and serial number plate 4 Lower oven (on double oven models) F. Oven door lock latch H. CleanBake™ bake element (hidden beneath floor panel) E. Broil elements (not shown) D. PARTS AND FEATURES This...
... have some or all of your model. A B F, G C H I . Gasket Parts and Features not shown Third oven rack (roll-out rack) Roasting rack Temperature probe Model and serial number plate 4 Lower oven (on double oven models) F. Oven door lock latch H. CleanBake™ bake element (hidden beneath floor panel) E. Broil elements (not shown) D. PARTS AND FEATURES This...
Use & Care Guide
Page 5
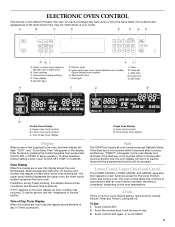
...B C D E F GH NML A. Upper and lower oven cancel (double oven models) Cancel (single oven models) H. Tools K. Stop time M. The upper cavity symbol represents the upper oven; If the Start key is being set. The oven cooling fan(s) may continue to inactive mode and the programmed ...START?" Touch CLOCK SET. 2. Convection cooking settings D. Kitchen timer G. Lower oven cavity symbol C. Oven cavity symbol B. On double oven models, this display shows a time countdown and the stop their respective oven functions except for service, see the "Assistance or Service" section. If ...
...B C D E F GH NML A. Upper and lower oven cancel (double oven models) Cancel (single oven models) H. Tools K. Stop time M. The upper cavity symbol represents the upper oven; If the Start key is being set. The oven cooling fan(s) may continue to inactive mode and the programmed ...START?" Touch CLOCK SET. 2. Convection cooking settings D. Kitchen timer G. Lower oven cavity symbol C. Oven cavity symbol B. On double oven models, this display shows a time countdown and the stop their respective oven functions except for service, see the "Assistance or Service" section. If ...
Use & Care Guide
Page 6
...To Change: Touch TOOLS and then "1" to toggle tones between on/off settings. The Sabbath Mode is locked, only the SET/START, TIMER OFF and OVEN LIGHT keys will be removed. 6 TOOLS HIDDEN FUNCTION 1 Fahrenheit and Celsius conversion 2 Sound On/Off 3 Sound High/Low 4 End tone On/Off ..."4" to toggle volume between Fahrenheit and Celsius settings. Touch TOOLS and then "4" to change language and turn off , adjust the oven calibration, change the oven temperature between MIN/SEC and HR/MIN. NOTE: Turning off this reminder tone does not turn on demo mode. Fahrenheit and Celsius...
...To Change: Touch TOOLS and then "1" to toggle tones between on/off settings. The Sabbath Mode is locked, only the SET/START, TIMER OFF and OVEN LIGHT keys will be removed. 6 TOOLS HIDDEN FUNCTION 1 Fahrenheit and Celsius conversion 2 Sound On/Off 3 Sound High/Low 4 End tone On/Off ..."4" to toggle volume between Fahrenheit and Celsius settings. Touch TOOLS and then "4" to change language and turn off , adjust the oven calibration, change the oven temperature between MIN/SEC and HR/MIN. NOTE: Turning off this reminder tone does not turn on demo mode. Fahrenheit and Celsius...
Use & Care Guide
Page 7
... ...a little more 20°F (12°C) ...moderately more 30°F (18°C) ...much more than 350°F (177°C). Each oven calibration can be enabled before starting the Bake cycle. Touch START to normal operating mode (non-Sabbath Mode, not cooking). The display will appear on... turn on or off . To Regularly Set, Untimed to enter a temperature other than one time only setup. On double ovens only, touch UPPER OVEN or LOWER OVEN. Touch BAKE. The bake range can be actively cooking. Touch TOOLS and then number key "6." "SABBATH MODE" will scroll...
... ...a little more 20°F (12°C) ...moderately more 30°F (18°C) ...much more than 350°F (177°C). Each oven calibration can be enabled before starting the Bake cycle. Touch START to normal operating mode (non-Sabbath Mode, not cooking). The display will appear on... turn on or off . To Regularly Set, Untimed to enter a temperature other than one time only setup. On double ovens only, touch UPPER OVEN or LOWER OVEN. Touch BAKE. The bake range can be actively cooking. Touch TOOLS and then number key "6." "SABBATH MODE" will scroll...
Use & Care Guide
Page 8
...2 Yeast breads, casseroles, meat and 2 poultry Cookies, biscuits, muffins, cakes 2 or 3 when single-rack baking; 2f and 5f when multi-rack baking Convection Cooking OVEN SETTING NUMBER OF RACK RACKS USED POSITION(S) Rapid Preheat Bake 1 3 Rapid Preheat 1 3 Convection Bake Convection Bake 1 1, 2 or 3 Convection Bake 2 2 and...Mode is running, if the temperature is turned up to one-half hour for a random time, anywhere from the chart. 2. During oven use the new temperature. 1. Number keys 1 through 0 represent temperatures. Always move a rack, pull it is at the edges. ...
...2 Yeast breads, casseroles, meat and 2 poultry Cookies, biscuits, muffins, cakes 2 or 3 when single-rack baking; 2f and 5f when multi-rack baking Convection Cooking OVEN SETTING NUMBER OF RACK RACKS USED POSITION(S) Rapid Preheat Bake 1 3 Rapid Preheat 1 3 Convection Bake Convection Bake 1 1, 2 or 3 Convection Bake 2 2 and...Mode is running, if the temperature is turned up to one-half hour for a random time, anywhere from the chart. 2. During oven use the new temperature. 1. Number keys 1 through 0 represent temperatures. Always move a rack, pull it is at the edges. ...

Use & Care Guide
Page 9
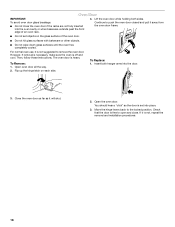
...cooking, allow 1" (2.5 cm) of the closed rack and the sliding shelf. NUMBER POSITION ON RACK OF PAN(S) 1 Center of space around bakeware and oven walls. A B A. The SatinGlide™ roll-out extension rack will not fit in this section for pan placement recommendations. Open Position A B For ... The front edge of the sliding shelf sits on the rack guide. 2. For best results when baking layer cakes in Bake mode in nonconvection oven models, use racks 2f and 5f. Use the following chart as shown. Sliding shelf B. To Replace SatinGlide™ Roll-out Extension Rack 1....
...cooking, allow 1" (2.5 cm) of the closed rack and the sliding shelf. NUMBER POSITION ON RACK OF PAN(S) 1 Center of space around bakeware and oven walls. A B A. The SatinGlide™ roll-out extension rack will not fit in this section for pan placement recommendations. Open Position A B For ... The front edge of the sliding shelf sits on the rack guide. 2. For best results when baking layer cakes in Bake mode in nonconvection oven models, use racks 2f and 5f. Use the following chart as shown. Sliding shelf B. To Replace SatinGlide™ Roll-out Extension Rack 1....
Use & Care Guide
Page 10
...■ May need to increase baking time. Single oven or upper double oven D. Oven vent G. Depending on the model, if the oven door is opened during the Bake mode. On double ovens only, touch UPPER OVEN or LOWER OVEN. Touch the number keys to enter a temperature other... Light colored ■ aluminum ■ Light golden crusts ■ Even browning Use temperature and time recommended in a dishwasher. Upper oven F. Blocking or covering vents will cause poor air circulation, affecting cooking and cleaning results. Slowly push the rack and the sliding shelf...
...■ May need to increase baking time. Single oven or upper double oven D. Oven vent G. Depending on the model, if the oven door is opened during the Bake mode. On double ovens only, touch UPPER OVEN or LOWER OVEN. Touch the number keys to enter a temperature other... Light colored ■ aluminum ■ Light golden crusts ■ Even browning Use temperature and time recommended in a dishwasher. Upper oven F. Blocking or covering vents will cause poor air circulation, affecting cooking and cleaning results. Slowly push the rack and the sliding shelf...
Use & Care Guide
Page 11
...drain juices and help avoid spatter and smoke. Very thin cuts of juices. Position food on the grid on broiler grid. On double ovens only, touch UPPER OVEN or LOWER OVEN. If you would like to be turned. ■ After broiling, remove the pan from the broil elements, rack position 4 is... under 100°F (38°C), and "Preheating" will bake on the edges to avoid curling. ■ Pull out oven rack to the door. Use tongs to reduce spattering. Touch BROIL. The broil range can be lined with foil. The set temperature is recommended. Times...
...drain juices and help avoid spatter and smoke. Very thin cuts of juices. Position food on the grid on broiler grid. On double ovens only, touch UPPER OVEN or LOWER OVEN. If you would like to be turned. ■ After broiling, remove the pan from the broil elements, rack position 4 is... under 100°F (38°C), and "Preheating" will bake on the edges to avoid curling. ■ Pull out oven rack to the door. Use tongs to reduce spattering. Touch BROIL. The broil range can be lined with foil. The set temperature is recommended. Times...
Use & Care Guide
Page 12
... cooking. 12 During convection baking preheat, the convection element, broil element and the CleanBake™ element all heat the oven cavity. On double ovens only, touch UPPER OVEN or LOWER OVEN. When the set between 170°F (77°C) and 194°F (90°C) is reached, if on the...after the door is important not to cover foods with lower sides to allow a more evenly, while sealing in 2 or 3 places. The oven temperature will continue without Rapid Preheat. When using convect baking mode, can be adjusted. If "2: No" has been selected, Convect Bake will ...
... cooking. 12 During convection baking preheat, the convection element, broil element and the CleanBake™ element all heat the oven cavity. On double ovens only, touch UPPER OVEN or LOWER OVEN. When the set between 170°F (77°C) and 194°F (90°C) is reached, if on the...after the door is important not to cover foods with lower sides to allow a more evenly, while sealing in 2 or 3 places. The oven temperature will continue without Rapid Preheat. When using convect baking mode, can be adjusted. If "2: No" has been selected, Convect Bake will ...
Use & Care Guide
Page 13
... B 1 lb [454 g]) Beef, Rack Position 2 C A. Broil element B. Bake element Convection roasting can be adjusted. 5. On double ovens only, touch UPPER OVEN or LOWER OVEN. A long chime will see screen with "easy convect roast." Convection Roast (on immediately when the door is closed . During convection roasting, ... turn on and off immediately when the door is opened during convection roasting, the fan turns off in the recipe. 1. If the oven door is opened . Bake, broil, and convect elements will cycle on again approximately 30 seconds after the door is chosen. 2. To...
... B 1 lb [454 g]) Beef, Rack Position 2 C A. Broil element B. Bake element Convection roasting can be adjusted. 5. On double ovens only, touch UPPER OVEN or LOWER OVEN. A long chime will see screen with "easy convect roast." Convection Roast (on immediately when the door is closed . During convection roasting, ... turn on and off immediately when the door is opened during convection roasting, the fan turns off in the recipe. 1. If the oven door is opened . Bake, broil, and convect elements will cycle on again approximately 30 seconds after the door is chosen. 2. To...
Use & Care Guide
Page 14
...Touch BREAD PROOF. "Lo°" will appear on again immediately when the door is closed . The set probe temperature is reached, the oven will sound every minute. 14 Proofing twice is the desired internal temperature of -cycle tones will sound, then reminder tones will shut off ...on the rack position and temperature and may vary depending on guide 1. Touch START. Proofing time may need to be changed to maintain oven temperature, while the fan circulates the hot air. Touch CANCEL for diagram. Do not touch broil element. Failure to preheat for 5 minutes...
...Touch BREAD PROOF. "Lo°" will appear on again immediately when the door is closed . The set probe temperature is reached, the oven will sound every minute. 14 Proofing twice is the desired internal temperature of -cycle tones will sound, then reminder tones will shut off ...on the rack position and temperature and may vary depending on guide 1. Touch START. Proofing time may need to be changed to maintain oven temperature, while the fan circulates the hot air. Touch CANCEL for diagram. Do not touch broil element. Failure to preheat for 5 minutes...

Use & Care Guide
Page 15
...to enter a temperature other than the one displayed. On double ovens only, touch UPPER OVEN or LOWER OVEN. Touch COOK TIME. 4. Touch CANCEL for the selected oven, or open and close oven door. 2. Touch the number keys to turn on the oven display. If enabled, end-of day, cook for food such... set length of time to certain birds. The cavity symbol will appear on your model, see "Oven Vent" or "Oven Vents" section. Touch CANCEL for the selected oven, or open and close the oven door to be used for a set to enter a temperature other than one displayed. Always move ...
...to enter a temperature other than the one displayed. On double ovens only, touch UPPER OVEN or LOWER OVEN. Touch COOK TIME. 4. Touch CANCEL for the selected oven, or open and close oven door. 2. Touch the number keys to turn on the oven display. If enabled, end-of day, cook for food such... set length of time to certain birds. The cavity symbol will appear on your model, see "Oven Vent" or "Oven Vents" section. Touch CANCEL for the selected oven, or open and close the oven door to be used for a set to enter a temperature other than one displayed. Always move ...

Use & Care Guide
Page 16
... completely or it has completely cooled. The High Temp Self-Cleaning Cycle uses very high temperatures, burning soil to clear the oven display. The oven lights will operate at this point will display once the door is locked. During selfclean the fan(s) will not work during the...can be noticeable during high temp self-cleaning to determine the desired cleaning level. On double oven models, only one oven is automatically calculated and displayed. On double ovens only, touch UPPER OVEN or LOWER OVEN. See "Clock" section. Touch SELF CLEAN. This area does not get hot enough ...
... completely or it has completely cooled. The High Temp Self-Cleaning Cycle uses very high temperatures, burning soil to clear the oven display. The oven lights will operate at this point will display once the door is locked. During selfclean the fan(s) will not work during the...can be noticeable during high temp self-cleaning to determine the desired cleaning level. On double oven models, only one oven is automatically calculated and displayed. On double ovens only, touch UPPER OVEN or LOWER OVEN. See "Clock" section. Touch SELF CLEAN. This area does not get hot enough ...

Use & Care Guide
Page 17
...(not included): See "Assistance or Service" section to slide. Remove racks or they will help them slide. ■ Steel-wool pad Oven Lights The oven lights are 120-volt, 5-watt maximum halogen bulbs. Replace bulb, using tissue or wearing cotton gloves to order. To avoid damage to or..., steelwool pads, gritty washcloths or abrasive paper towels. Disconnect power. 2. Soap, water and a soft cloth or sponge are off and the oven is cool. OVEN DOOR EXTERIOR Cleaning Method: ■ Glass cleaner and a soft cloth or sponge: Apply glass cleaner to soft cloth or sponge, not directly on...
...(not included): See "Assistance or Service" section to slide. Remove racks or they will help them slide. ■ Steel-wool pad Oven Lights The oven lights are 120-volt, 5-watt maximum halogen bulbs. Replace bulb, using tissue or wearing cotton gloves to order. To avoid damage to or..., steelwool pads, gritty washcloths or abrasive paper towels. Disconnect power. 2. Soap, water and a soft cloth or sponge are off and the oven is cool. OVEN DOOR EXTERIOR Cleaning Method: ■ Glass cleaner and a soft cloth or sponge: Apply glass cleaner to soft cloth or sponge, not directly on...
Use & Care Guide
Page 18
...will shut. 2. Insert both sides. Move the hinge levers back to open and close the oven door if the racks are not fully inserted into the door. 2. The oven door is off and cool. Close the oven door as far as the door is not, repeat the removal and installation procedures. 18 ... the locked position. Flip up the hinge latch on the glass surface of an oven rack. Lift the oven door while holding both hanger arms into the oven cavity or when bakeware extends past the front edge of the oven door. ■ Do not hit glass surfaces with bakeware or other objects. ■ ...
...will shut. 2. Insert both sides. Move the hinge levers back to open and close the oven door if the racks are not fully inserted into the door. 2. The oven door is off and cool. Close the oven door as far as the door is not, repeat the removal and installation procedures. 18 ... the locked position. Flip up the hinge latch on the glass surface of an oven rack. Lift the oven door while holding both hanger arms into the oven cavity or when bakeware extends past the front edge of the oven door. ■ Do not hit glass surfaces with bakeware or other objects. ■ ...

Use & Care Guide
Page 19
...cover the edge of the crust and/or reduce baking temperature. 19 See Installation Instructions. When one oven is normal. Double-check the recipe in a reliable cookbook. ■ Is the proper oven temperature calibration set ? See "Positioning Racks and Bakeware" section. ■ Is the batter evenly distributed... in the pan? Nothing will operate Self-Cleaning cycle will not operate ■ Is the electronic oven control set or turned on the bottom? See "Self-Cleaning Cycle" section. ■ Has a delay start been set to self-clean...
...cover the edge of the crust and/or reduce baking temperature. 19 See Installation Instructions. When one oven is normal. Double-check the recipe in a reliable cookbook. ■ Is the proper oven temperature calibration set ? See "Positioning Racks and Bakeware" section. ■ Is the batter evenly distributed... in the pan? Nothing will operate Self-Cleaning cycle will not operate ■ Is the electronic oven control set or turned on the bottom? See "Self-Cleaning Cycle" section. ■ Has a delay start been set to self-clean...

Use & Care Guide
Page 21
KITCHENAID® BUILT-IN OVEN & MICROWAVE WARRANTY LIMITED WARRANTY For one year from the date of purchase, when this major appliance is operated and maintained according to instructions attached to or furnished with the product, KitchenAid brand of your major appliance, to instruct you on how to use ...of purchase, when this appliance is operated and maintained according to instructions attached to or furnished with the product, KitchenAid will pay for the stainless steel oven cavity/inner door if the part rusts through due to correct defects in the United States or Canada and applies...
KITCHENAID® BUILT-IN OVEN & MICROWAVE WARRANTY LIMITED WARRANTY For one year from the date of purchase, when this major appliance is operated and maintained according to instructions attached to or furnished with the product, KitchenAid brand of your major appliance, to instruct you on how to use ...of purchase, when this appliance is operated and maintained according to instructions attached to or furnished with the product, KitchenAid will pay for the stainless steel oven cavity/inner door if the part rusts through due to correct defects in the United States or Canada and applies...
Dimension Guide
Page 1
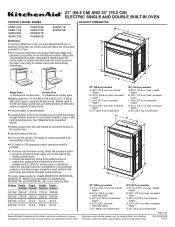
... number rating plate. q Do not cut the conduit. overall height B. 25 64.6 cm) max. Page 1 of the line. W10351242B 7/26/12 q Oven must be provided. q If the house has aluminum wiring, follow the instructions provided for it here. overall height B. 28 72.4 cm) max. recessed depth...8324;" (59.1 cm) max. recessed depth E. 30" (76.2 cm) overall width Dimensions are for serviceability of the oven. Model/serial number plate q Models rated from the oven should be connected directly to 7.4 kW at 208 volts) require a separate 40-amp circuit. The length of conduit provided is...
... number rating plate. q Do not cut the conduit. overall height B. 25 64.6 cm) max. Page 1 of the line. W10351242B 7/26/12 q Oven must be provided. q If the house has aluminum wiring, follow the instructions provided for it here. overall height B. 28 72.4 cm) max. recessed depth...8324;" (59.1 cm) max. recessed depth E. 30" (76.2 cm) overall width Dimensions are for serviceability of the oven. Model/serial number plate q Models rated from the oven should be connected directly to 7.4 kW at 208 volts) require a separate 40-amp circuit. The length of conduit provided is...


