
Use & Care Guide
Page 9
...racks 2f or 4f. A. Place the cakes on the rack guides. BAKEWARE To cook food evenly, hot air must be able to the back wall of the oven so that the front edge of the rack and the sliding shelf together. 9 Use the following chart as shown. SatinGlide™ Roll-out ... allow 2" (5 cm) of the closed rack and the sliding shelf on the rack as shown. A B C A. Using 2 hands, grasp the front of space around bakeware and oven walls. Place the cakes on the rack guide. 2. Open Position A B For best results when baking layer cakes on 2 racks in Convect Bake mode in convection...
...racks 2f or 4f. A. Place the cakes on the rack guides. BAKEWARE To cook food evenly, hot air must be able to the back wall of the oven so that the front edge of the rack and the sliding shelf together. 9 Use the following chart as shown. SatinGlide™ Roll-out ... allow 2" (5 cm) of the closed rack and the sliding shelf on the rack as shown. A B C A. Using 2 hands, grasp the front of space around bakeware and oven walls. Place the cakes on the rack guide. 2. Open Position A B For best results when baking layer cakes on 2 racks in Convect Bake mode in convection...

Use & Care Guide
Page 17
... bulb, make sure all -purpose cleaner: Rinse with clean water and dry with bare fingers. 5. General Cleaning IMPORTANT: Before cleaning, make sure the oven is off and cool. 1. Always follow label instructions on panel. ■ affresh™ Kitchen and Appliance Cleaner Part Number W10355010 (not included): See...Cleaning Method: ■ Glass cleaner and soft cloth or sponge: Apply glass cleaner to order. Remove glass light cover by snapping back into wall. 6. If this happens, a light coating of vegetable oil applied to the rack guides will come on some models) To avoid damage to handle ...
... bulb, make sure all -purpose cleaner: Rinse with clean water and dry with bare fingers. 5. General Cleaning IMPORTANT: Before cleaning, make sure the oven is off and cool. 1. Always follow label instructions on panel. ■ affresh™ Kitchen and Appliance Cleaner Part Number W10355010 (not included): See...Cleaning Method: ■ Glass cleaner and soft cloth or sponge: Apply glass cleaner to order. Remove glass light cover by snapping back into wall. 6. If this happens, a light coating of vegetable oil applied to the rack guides will come on some models) To avoid damage to handle ...

Installation Guide
Page 2
... 288 lbs (131 kg) for 30" models (76.2 cm). ■ Floor must be able to support a double oven weight of the oven. ■ Grounded electrical supply is installed in a wall cabinet. bottom vent trim ■ Four #8-18 x ³⁄₈" screws - Check existing electrical supply. See "...9632; Electrical supply junction box should have an approval label located on rear wall behind oven, it is recommended that the junction box be located 3" (7.6 cm) maximum below the support surface when the oven is required. IMPORTANT: To avoid damage to your builder or cabinet supplier ...
... 288 lbs (131 kg) for 30" models (76.2 cm). ■ Floor must be able to support a double oven weight of the oven. ■ Grounded electrical supply is installed in a wall cabinet. bottom vent trim ■ Four #8-18 x ³⁄₈" screws - Check existing electrical supply. See "...9632; Electrical supply junction box should have an approval label located on rear wall behind oven, it is recommended that the junction box be located 3" (7.6 cm) maximum below the support surface when the oven is required. IMPORTANT: To avoid damage to your builder or cabinet supplier ...
Installation Guide
Page 12
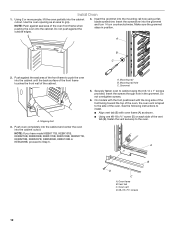
Insert the grommet into the cabinet until the back surface of the front frame touches the front wall of the cabinet. A. Shipping foot 3. A. Securely fasten oven to push the oven into the mounting rail hole using the # 8-14 x 1" screws provided. Insert the screwdriver into the cabinet ... ³⁄₈" screw (D) on each side of the vent tab (B), fasten the vent securely to the side of the oven, the oven vent is taped to the oven. Grommet 5. Oven frame B. Insert the screws through hole in position. A B C 2. Do not push against the outside edges. 4. Mounting rail...
Insert the grommet into the cabinet until the back surface of the front frame touches the front wall of the cabinet. A. Shipping foot 3. A. Securely fasten oven to push the oven into the mounting rail hole using the # 8-14 x 1" screws provided. Insert the screwdriver into the cabinet ... ³⁄₈" screw (D) on each side of the vent tab (B), fasten the vent securely to the side of the oven, the oven vent is taped to the oven. Grommet 5. Oven frame B. Insert the screws through hole in position. A B C 2. Do not push against the outside edges. 4. Mounting rail...


