Use & Care Guide
Page 1
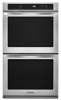
... service, composer le 1-800-807-6777 ou visiter notre site Web au www.kitchenaid.ca Table of Contents/Table des matières 2 Models/Modèles KEBS109, KEBS207, KEBS209, KEBK101, KEBK206 W10354193A BUILT-IN ELECTRIC SINGLE AND DOUBLE OVENS Use & Care Guide For questions about features, operation/performance, parts accessories or service...
... service, composer le 1-800-807-6777 ou visiter notre site Web au www.kitchenaid.ca Table of Contents/Table des matières 2 Models/Modèles KEBS109, KEBS207, KEBS209, KEBK101, KEBK206 W10354193A BUILT-IN ELECTRIC SINGLE AND DOUBLE OVENS Use & Care Guide For questions about features, operation/performance, parts accessories or service...
Use & Care Guide
Page 4
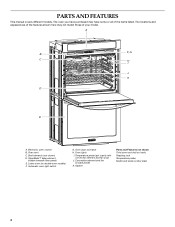
...oven (on double oven models) F. Oven lights I J K D E A. Electronic oven control B. Automatic oven light switch G. Convection element and fan (in back panel) K. CleanBake™ bake element (hidden beneath floor panel) E. Oven vent C. Temperature probe jack (cavity with convection element and fan only) J. Gasket Parts and Features not shown Third oven... Temperature probe Model and serial number plate 4 The oven you have purchased may not match those of the items listed. Broil elements (not shown) D. Oven door lock latch H. PARTS AND FEATURES This manual ...
...oven (on double oven models) F. Oven lights I J K D E A. Electronic oven control B. Automatic oven light switch G. Convection element and fan (in back panel) K. CleanBake™ bake element (hidden beneath floor panel) E. Oven vent C. Temperature probe jack (cavity with convection element and fan only) J. Gasket Parts and Features not shown Third oven... Temperature probe Model and serial number plate 4 The oven you have purchased may not match those of the items listed. Broil elements (not shown) D. Oven door lock latch H. PARTS AND FEATURES This manual ...
Use & Care Guide
Page 5
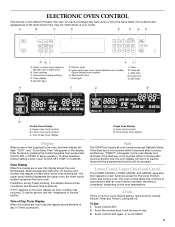
... as a reminder. Start The START key begins all of Day, Timer Display When the oven(s) are off. To Set: 1. Oven settings C. Kitchen timer G. Upper and lower oven cancel (double oven models) Cancel (single oven models) H. Start/control lock I. Upper oven cavity symbol B. Time of day, timer display Display When power is not touched within 5 minutes after touching...
... as a reminder. Start The START key begins all of Day, Timer Display When the oven(s) are off. To Set: 1. Oven settings C. Kitchen timer G. Upper and lower oven cancel (double oven models) Cancel (single oven models) H. Start/control lock I. Upper oven cavity symbol B. Time of day, timer display Display When power is not touched within 5 minutes after touching...
Use & Care Guide
Page 7
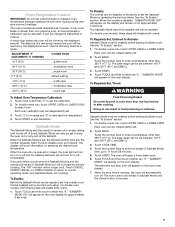
...set until re-enabled. It can be enabled before or after cooking. Touch TOOLS and then touch number key "6." On double ovens only, touch UPPER OVEN or LOWER OVEN. See the "To Enable" section. Touch the number keys to enter the length of the Sabbath. Touch the number keys... also be independently set the Sabbath Mode by the displayed amount. Use the following step will appear on the oven display. On double ovens only, touch UPPER OVEN or LOWER OVEN to end calibration. The display will be changed in food poisoning or sickness. A timed Sabbath Mode can be ...
...set until re-enabled. It can be enabled before or after cooking. Touch TOOLS and then touch number key "6." On double ovens only, touch UPPER OVEN or LOWER OVEN. See the "To Enable" section. Touch the number keys to enter the length of the Sabbath. Touch the number keys... also be independently set the Sabbath Mode by the displayed amount. Use the following step will appear on the oven display. On double ovens only, touch UPPER OVEN or LOWER OVEN to end calibration. The display will be changed in food poisoning or sickness. A timed Sabbath Mode can be ...
Use & Care Guide
Page 8
... breads, casseroles, meat and 2 poultry Cookies, biscuits, muffins, cakes 2 or 3 when single-rack baking; 2f and 5f when multi-rack baking Convection Cooking OVEN SETTING NUMBER OF RACK RACKS USED POSITION(S) Rapid Preheat Bake 1 3 Rapid Preheat 1 3 Convection Bake Convection Bake 1 1, 2 or 3 Convection Bake 2 2...;C) 8 375°F (190°C) 9 400°F (204°C) 0 450°F (232°C) To Change Temperature: Initially on double ovens, the cavities can be changed both cavities will not turn on and off . No tones will sound, and the display will cycle on or...
... breads, casseroles, meat and 2 poultry Cookies, biscuits, muffins, cakes 2 or 3 when single-rack baking; 2f and 5f when multi-rack baking Convection Cooking OVEN SETTING NUMBER OF RACK RACKS USED POSITION(S) Rapid Preheat Bake 1 3 Rapid Preheat 1 3 Convection Bake Convection Bake 1 1, 2 or 3 Convection Bake 2 2...;C) 8 375°F (190°C) 9 400°F (204°C) 0 450°F (232°C) To Change Temperature: Initially on double ovens, the cavities can be changed both cavities will not turn on and off . No tones will sound, and the display will cycle on or...
Use & Care Guide
Page 10
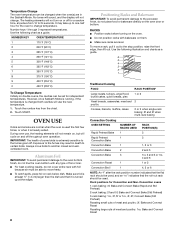
... Stainless steel ■ Light, golden crusts ■ Uneven browning ■ May need to maintain the oven temperature. Warm air Double Oven D. Lower oven The oven vent(s) should be used to preheat before putting food in, unless recommended in the "Position Racks and Bakeware... ceramic ■ Brown, crisp crusts ■ May need to wait for more than 350°F (177°C). Oven Vent(s) A B C E D F G Single and Double Oven A. Oven vent G. Baking and Roasting A B A. On models without a temperature probe, use the bakeware size recommended in center...
... Stainless steel ■ Light, golden crusts ■ Uneven browning ■ May need to maintain the oven temperature. Warm air Double Oven D. Lower oven The oven vent(s) should be used to preheat before putting food in, unless recommended in the "Position Racks and Bakeware... ceramic ■ Brown, crisp crusts ■ May need to wait for more than 350°F (177°C). Oven Vent(s) A B C E D F G Single and Double Oven A. Oven vent G. Baking and Roasting A B A. On models without a temperature probe, use the bakeware size recommended in center...
Use & Care Guide
Page 11
.... Position food on the grid on the edges to avoid curling. ■ Pull out oven rack to 12 patties, equally spaced, on the oven display until the oven is recommended. On double ovens only, touch UPPER OVEN or LOWER OVEN. Touch START. The set oven temperature will appear in pieces (2" to 2¹⁄₂" [5 cm to 6.3 cm]) boneless...
.... Position food on the grid on the edges to avoid curling. ■ Pull out oven rack to 12 patties, equally spaced, on the oven display until the oven is recommended. On double ovens only, touch UPPER OVEN or LOWER OVEN. Touch START. The set oven temperature will appear in pieces (2" to 2¹⁄₂" [5 cm to 6.3 cm]) boneless...
Use & Care Guide
Page 12
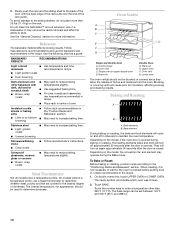
... broil element and the CleanBake™ element will turn off approximately 30 seconds after the door is reached, if on multiple racks. If the oven door is opened and turns on immediately when the door is helpful to a minimum by the convection fan, provides balanced, efficient heating. They ...for doneness a few minutes before the minimum cooking time using a method such as 30 percent when using 3 racks, place on some models) A B A. On double ovens only, touch UPPER OVEN or LOWER OVEN. Then touch the number keys to the "Positioning Racks and Bakeware" section. When the actual...
... broil element and the CleanBake™ element will turn off approximately 30 seconds after the door is reached, if on multiple racks. If the oven door is opened and turns on immediately when the door is helpful to a minimum by the convection fan, provides balanced, efficient heating. They ...for doneness a few minutes before the minimum cooking time using a method such as 30 percent when using 3 racks, place on some models) A B A. On double ovens only, touch UPPER OVEN or LOWER OVEN. Then touch the number keys to the "Positioning Racks and Bakeware" section. When the actual...
Use & Care Guide
Page 13
...Bake element Convection roasting can be used for the selected oven when finished cooking. If the oven door is opened during convection roasting, the fan turns off . 7. On double ovens only, touch UPPER OVEN or LOWER OVEN. The cavity symbol indicates which oven is turned off immediately when the door is opened ....entered, and the adjusted cook time will appear on again approximately 30 seconds after the door is not necessary to wait for the oven to enter a temperature. Convection fan C. They will see screen with "easy convect roast." Touch the number keys to preheat before...
...Bake element Convection roasting can be used for the selected oven when finished cooking. If the oven door is opened during convection roasting, the fan turns off . 7. On double ovens only, touch UPPER OVEN or LOWER OVEN. The cavity symbol indicates which oven is turned off immediately when the door is opened ....entered, and the adjusted cook time will appear on again approximately 30 seconds after the door is not necessary to wait for the oven to enter a temperature. Convection fan C. They will see screen with "easy convect roast." Touch the number keys to preheat before...
Use & Care Guide
Page 14
... BREAD PROOF. Let dough rise until nearly doubled in the recipe. 4. On double ovens only, touch UPPER OVEN or LOWER OVEN. The probe temperature is reached, the oven will shut off immediately when the door is closed . When the set oven temperature will appear on and off in the... activating the yeast. Proofing Bread Proofing bread prepares dough for the selected oven when finished cooking. To Proof: Before first proofing, place dough in burns. On double ovens only, touch UPPER OVEN or LOWER OVEN. The cavity symbol will appear as possible. Touch START. Failure to ...
... BREAD PROOF. Let dough rise until nearly doubled in the recipe. 4. On double ovens only, touch UPPER OVEN or LOWER OVEN. The probe temperature is reached, the oven will shut off immediately when the door is closed . When the set oven temperature will appear on and off in the... activating the yeast. Proofing Bread Proofing bread prepares dough for the selected oven when finished cooking. To Proof: Before first proofing, place dough in burns. On double ovens only, touch UPPER OVEN or LOWER OVEN. The cavity symbol will appear as possible. Touch START. Failure to ...

Use & Care Guide
Page 15
... so can result in death to enter time of some models, the temperature probe from the oven when removing food. On double ovens only, touch UPPER OVEN or LOWER OVEN. Touch CANCEL for more information. ■ Remove any foil from oven during the High Temp Self-Cleaning cycle. See "Clock" section. 1. Touch COOK TIME. 4. "DELAY" and...
... so can result in death to enter time of some models, the temperature probe from the oven when removing food. On double ovens only, touch UPPER OVEN or LOWER OVEN. Touch CANCEL for more information. ■ Remove any foil from oven during the High Temp Self-Cleaning cycle. See "Clock" section. 1. Touch COOK TIME. 4. "DELAY" and...

Use & Care Guide
Page 16
...guide to reduce smoke and avoid damage. The oven lights will not unlock until the start time and stop . 5. NOTE: The oven has a 2 speed cooling fan motor. On double ovens only, touch UPPER OVEN or LOWER OVEN. The cavity symbol will appear in the oven display. Touch SELF CLEAN. Touch START. ...not apply a cool damp cloth to the correct time of -cycle tones will sound, then reminder tones will remain locked. On double oven models, only one oven is locked. During selfclean the fan(s) will not affect cooking performance. An increase in discoloring, loss of day to a powdery ...
...guide to reduce smoke and avoid damage. The oven lights will not unlock until the start time and stop . 5. NOTE: The oven has a 2 speed cooling fan motor. On double ovens only, touch UPPER OVEN or LOWER OVEN. The cavity symbol will appear in the oven display. Touch SELF CLEAN. Touch START. ...not apply a cool damp cloth to the correct time of -cycle tones will sound, then reminder tones will remain locked. On double oven models, only one oven is locked. During selfclean the fan(s) will not affect cooking performance. An increase in discoloring, loss of day to a powdery ...

Use & Care Guide
Page 17
.... They will come on or off and cool. 1. On double oven models, both upper and lower lights will help them slide. ■ Steel-wool pad Oven Lights The oven lights are off and the oven is off . When the oven door is opened . Replace bulb cover by grasping the front... pads, gritty washcloths or abrasive paper towels. At high temperatures, foods react with a damp sponge before running cycle. Disconnect power. 2. Remove bulb from oven. 3. If this happens, a light coating of vegetable oil applied to order. ■ Liquid detergent or all controls are 120-volt, 5-watt maximum...
.... They will come on or off and cool. 1. On double oven models, both upper and lower lights will help them slide. ■ Steel-wool pad Oven Lights The oven lights are off and the oven is off . When the oven door is opened . Replace bulb cover by grasping the front... pads, gritty washcloths or abrasive paper towels. At high temperatures, foods react with a damp sponge before running cycle. Disconnect power. 2. Remove bulb from oven. 3. If this happens, a light coating of vegetable oil applied to order. ■ Liquid detergent or all controls are 120-volt, 5-watt maximum...

Use & Care Guide
Page 19
... ? See Installation Instructions. See "Sabbath Mode" section. ■ On double oven models, is normal. Choose UPPER OVEN or LOWER OVEN first. See "Oven Temperature Control" section. Close the oven door all the way. ■ Has the function been entered? See "Oven Temperature Control" section. ■ Was the oven preheated? See "Positioning Racks and Bakeware" section. ■ Is there...
... ? See Installation Instructions. See "Sabbath Mode" section. ■ On double oven models, is normal. Choose UPPER OVEN or LOWER OVEN first. See "Oven Temperature Control" section. Close the oven door all the way. ■ Has the function been entered? See "Oven Temperature Control" section. ■ Was the oven preheated? See "Positioning Racks and Bakeware" section. ■ Is there...
Dimension Guide
Page 1
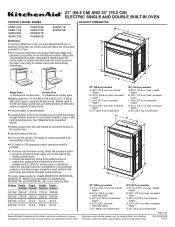
... q Do not cut the conduit. Connect a section of solid copper wire to the proper electrical voltage and frequency as specified on double ovens. For power requirements for models WOS51EC7A, WOS51EC0A, WOD51EC7A, WOD51EC0A, WOS92EC7A, WOS92EC0A, WOD93EC7A, and WOD93EC0A, refer to aluminum. overall height.... Specifications subject to change without notice. 27" (68.6 cm) models A. 28 72.8 cm) max. B C A A A D E Single Oven Double Oven A. Models rated at 4.8 kW and below at 208 volts) require a separate 20-amp circuit. recessed depth E. 27" (68.6 cm) overall width...
... q Do not cut the conduit. Connect a section of solid copper wire to the proper electrical voltage and frequency as specified on double ovens. For power requirements for models WOS51EC7A, WOS51EC0A, WOD51EC7A, WOD51EC0A, WOS92EC7A, WOS92EC0A, WOD93EC7A, and WOD93EC0A, refer to aluminum. overall height.... Specifications subject to change without notice. 27" (68.6 cm) models A. 28 72.8 cm) max. B C A A A D E Single Oven Double Oven A. Models rated at 4.8 kW and below at 208 volts) require a separate 20-amp circuit. recessed depth E. 27" (68.6 cm) overall width...
Dimension Guide
Page 2
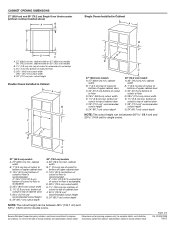
...60.7 cm) cutout depth NOTE: The cutout height can be between 48⁷⁄₈" (124.1 cm) and 52 132.6 cm) for double ovens. cabinet width B. 1" (2.5 cm) top of cutout to bottom of upper cabinet door C. 32" (81.3 cm) bottom of cutout to ...D F G E C 27" (68.6 cm) models A. 27" (68.6 cm) min. D. 25¹⁄₂" (64.8 cm) cutout width E. 1¹⁄₂" (3.8 cm) min. cutout height Double Ovens Installed in Cabinet A E D C A. 27" (68.6 cm) min. Page 2 of cabinet door F. 28" (71.2 cm)* recommended cutout height G. 24" (60.7 cm) cutout depth 30" (76.2 ...
...60.7 cm) cutout depth NOTE: The cutout height can be between 48⁷⁄₈" (124.1 cm) and 52 132.6 cm) for double ovens. cabinet width B. 1" (2.5 cm) top of cutout to bottom of upper cabinet door C. 32" (81.3 cm) bottom of cutout to ...D F G E C 27" (68.6 cm) models A. 27" (68.6 cm) min. D. 25¹⁄₂" (64.8 cm) cutout width E. 1¹⁄₂" (3.8 cm) min. cutout height Double Ovens Installed in Cabinet A E D C A. 27" (68.6 cm) min. Page 2 of cabinet door F. 28" (71.2 cm)* recommended cutout height G. 24" (60.7 cm) cutout depth 30" (76.2 ...

Installation Guide
Page 2
... that the junction box be solid, level and flush with the maximum allowable wood cabinet temperatures of the oven. Check existing electrical supply. double oven feet ■ Bottom vent ■ Bottom vent trim ■ Two feet - Tools needed ■... electric drill (for wall cabinet installations) ■ 1" (2.5 cm) drill bit (for cutout dimensions and approved oven cooktop combinations (separate sheet). 2 single ovens (2), double ovens (4)* ■ Foam strip - Location Requirements IMPORTANT: Observe all governing codes and ordinances. ■ Cabinet opening ...
... that the junction box be solid, level and flush with the maximum allowable wood cabinet temperatures of the oven. Check existing electrical supply. double oven feet ■ Bottom vent ■ Bottom vent trim ■ Two feet - Tools needed ■... electric drill (for wall cabinet installations) ■ 1" (2.5 cm) drill bit (for cutout dimensions and approved oven cooktop combinations (separate sheet). 2 single ovens (2), double ovens (4)* ■ Foam strip - Location Requirements IMPORTANT: Observe all governing codes and ordinances. ■ Cabinet opening ...

Installation Guide
Page 4
Double Ovens B Cabinet Dimensions - Double Ovens Double Ovens Installed in Cabinet A A C B D F E D 27" (68.6 cm) models A. 51 130.0 cm) max. overall height B. 25 64.6 cm) max. overall height B. 28½" (72.4 cm) max. cabinet ... cutout height G. 24" (60.7 cm) cutout depth NOTE: The cutout height can be between 48⁷⁄₈" (124.1 cm) and 52 132.6 cm) for double ovens. 4 D. 25¹⁄₂" (64.8 cm) cutout width E. 1¹⁄₂" (3.8 cm) min. D. 28¹⁄₂" (72.4 cm) cutout width E. 1¹⁄₂" (3.8 cm...
Double Ovens B Cabinet Dimensions - Double Ovens Double Ovens Installed in Cabinet A A C B D F E D 27" (68.6 cm) models A. 51 130.0 cm) max. overall height B. 25 64.6 cm) max. overall height B. 28½" (72.4 cm) max. cabinet ... cutout height G. 24" (60.7 cm) cutout depth NOTE: The cutout height can be between 48⁷⁄₈" (124.1 cm) and 52 132.6 cm) for double ovens. 4 D. 25¹⁄₂" (64.8 cm) cutout width E. 1¹⁄₂" (3.8 cm) min. D. 28¹⁄₂" (72.4 cm) cutout width E. 1¹⁄₂" (3.8 cm...
Installation Guide
Page 5
...and/or tools designed and UL listed for joining copper to the proper electrical voltage and frequency as specified on double ovens. Electrical Connection To properly install your oven, you are in conformance with local codes. See the following table. Models rated at 4.8 kW and below ...W 8170 W 8200 W 208 VAC 3099 W 3122 W 6190 W 6212 W 240 VAC 17.1 A 17.2 A 34.1 A 34.2 A Single Oven Double Oven A. Model/serial number plate ■ Models rated from : National Fire Protection Association 1 Batterymarch Park Quincy, MA 02169-7471 CSA International 8501 East Pleasant ...
...and/or tools designed and UL listed for joining copper to the proper electrical voltage and frequency as specified on double ovens. Electrical Connection To properly install your oven, you are in conformance with local codes. See the following table. Models rated at 4.8 kW and below ...W 8170 W 8200 W 208 VAC 3099 W 3122 W 6190 W 6212 W 240 VAC 17.1 A 17.2 A 34.1 A 34.2 A Single Oven Double Oven A. Model/serial number plate ■ Models rated from : National Fire Protection Association 1 Batterymarch Park Quincy, MA 02169-7471 CSA International 8501 East Pleasant ...
Installation Guide
Page 8
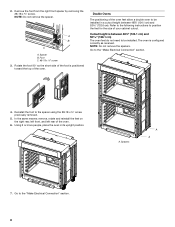
Reinstall the foot to the "Make Electrical Connection" section. 8 Spacers A A 7. Spacer B. Double Ovens The positioning of your cabinet cutout. NOTE: Do not remove the spacers. Go to the spacer using the #8-18 x ³⁄₈" screw previously removed. 5. ... the foot from the right front spacer by removing the #8-18 x ³⁄₈" screw. Go to position the feet for the size of the oven feet allow a double oven to be installed in its upright position. A. NOTE: Do not remove the spacer.
Reinstall the foot to the "Make Electrical Connection" section. 8 Spacers A A 7. Spacer B. Double Ovens The positioning of your cabinet cutout. NOTE: Do not remove the spacers. Go to the spacer using the #8-18 x ³⁄₈" screw previously removed. 5. ... the foot from the right front spacer by removing the #8-18 x ³⁄₈" screw. Go to position the feet for the size of the oven feet allow a double oven to be installed in its upright position. A. NOTE: Do not remove the spacer.


