Use & Care Guide
Page 1
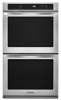
... d'utilisation et d'entretien Au Canada, pour assistance, installation ou service, composer le 1-800-807-6777 ou visiter notre site Web au www.kitchenaid.ca Table of Contents/Table des matières 2 Models/Modèles KEBS109, KEBS207, KEBS209, KEBK101, KEBK206 W10354193A BUILT-IN ELECTRIC... SINGLE AND DOUBLE OVENS Use & Care Guide For questions about features, operation/performance, parts accessories or service, call: 1-800-422-1230 In Canada, for assistance, installation and service, call: 1-800-807-6777 or visit our website at...
... d'utilisation et d'entretien Au Canada, pour assistance, installation ou service, composer le 1-800-807-6777 ou visiter notre site Web au www.kitchenaid.ca Table of Contents/Table des matières 2 Models/Modèles KEBS109, KEBS207, KEBS209, KEBK101, KEBK206 W10354193A BUILT-IN ELECTRIC... SINGLE AND DOUBLE OVENS Use & Care Guide For questions about features, operation/performance, parts accessories or service, call: 1-800-422-1230 In Canada, for assistance, installation and service, call: 1-800-807-6777 or visit our website at...

Use & Care Guide
Page 3
...the oven. ■ User Servicing - If rack must be worn while using the oven, follow instructions. Do not repair or replace any part of Oven Racks - Do not let potholder touch hot heating elements. SAVE THESE INSTRUCTIONS State of California Proposition 65 Warnings: WARNING: This ... the oven. ■ Wear Proper Apparel - They should be allowed to cause burns - Interior surfaces of the oven. ■ Clean Only Parts Listed in use dry chemical or foam-type extinguisher. ■ Use Only Dry Potholders - This symbol alerts you and others are very important....
...the oven. ■ User Servicing - If rack must be worn while using the oven, follow instructions. Do not repair or replace any part of Oven Racks - Do not let potholder touch hot heating elements. SAVE THESE INSTRUCTIONS State of California Proposition 65 Warnings: WARNING: This ... the oven. ■ Wear Proper Apparel - They should be allowed to cause burns - Interior surfaces of the oven. ■ Clean Only Parts Listed in use dry chemical or foam-type extinguisher. ■ Use Only Dry Potholders - This symbol alerts you and others are very important....
Use & Care Guide
Page 4
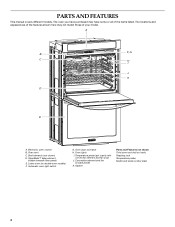
Broil elements (not shown) D. Gasket Parts and Features not shown Third oven rack (roll-out rack) Roasting rack Temperature probe Model and serial number plate 4 A B F, G C H I . Lower oven (on double oven models) F. ... control B. Automatic oven light switch G. The oven you have some or all of your model. Oven vent C. CleanBake™ bake element (hidden beneath floor panel) E. PARTS AND FEATURES This manual covers different models. The locations and appearances of the features shown here may have purchased may not match those of the...
Broil elements (not shown) D. Gasket Parts and Features not shown Third oven rack (roll-out rack) Roasting rack Temperature probe Model and serial number plate 4 A B F, G C H I . Lower oven (on double oven models) F. ... control B. Automatic oven light switch G. The oven you have some or all of your model. Oven vent C. CleanBake™ bake element (hidden beneath floor panel) E. PARTS AND FEATURES This manual covers different models. The locations and appearances of the features shown here may have purchased may not match those of the...
Use & Care Guide
Page 7
... set the Sabbath Mode by the displayed amount. Touch the number keys to set . 3. "SABBATH MODE" will scroll information on the oven display for only part of the ability to enter a temperature other than 350°F (177°C). A minus sign means the oven will automatically turn on or off immediately. Touch...
... set the Sabbath Mode by the displayed amount. Touch the number keys to set . 3. "SABBATH MODE" will scroll information on the oven display for only part of the ability to enter a temperature other than 350°F (177°C). A minus sign means the oven will automatically turn on or off immediately. Touch...
Use & Care Guide
Page 14
... be inserted into the upper and lower cavity at the same time. NOTE: The temperature probe must be located in the center of the thickest part of the meat and not into . 2. This step is necessary only if a meat probe is done. The probe temperature is the desired internal temperature of...
... be inserted into the upper and lower cavity at the same time. NOTE: The temperature probe must be located in the center of the thickest part of the meat and not into . 2. This step is necessary only if a meat probe is done. The probe temperature is the desired internal temperature of...

Use & Care Guide
Page 17
...cloth or sponge, not directly on when either door is opened . They will come on panel. ■ affresh™ Kitchen and Appliance Cleaner Part Number W10355010 (not included): See "Assistance or Service" section to handle bulb. On double oven models, both upper and lower lights will come... on panel. ■ affresh™ Kitchen and Appliance Cleaner Part Number W10355010 (not included): See "Assistance or Service" section to order. ■ Liquid detergent or all controls are off and the oven is ...
...cloth or sponge, not directly on when either door is opened . They will come on panel. ■ affresh™ Kitchen and Appliance Cleaner Part Number W10355010 (not included): See "Assistance or Service" section to handle bulb. On double oven models, both upper and lower lights will come... on panel. ■ affresh™ Kitchen and Appliance Cleaner Part Number W10355010 (not included): See "Assistance or Service" section to order. ■ Liquid detergent or all controls are off and the oven is ...
Use & Care Guide
Page 20
... With: ■ Features and specifications on our full line of appliances. ■ Use and maintenance procedures. ■ Accessory and repair parts sales. ■ Referrals to build every new KITCHENAID® appliance. KitchenAid Canada designated service technicians are made with : ■ Features and specifications on our full line of appliances. ■ Installation information. ■...
... With: ■ Features and specifications on our full line of appliances. ■ Use and maintenance procedures. ■ Accessory and repair parts sales. ■ Referrals to build every new KITCHENAID® appliance. KitchenAid Canada designated service technicians are made with : ■ Features and specifications on our full line of appliances. ■ Installation information. ■...

Use & Care Guide
Page 21
...installation of your major appliance, to instruct you on how to use your authorized KitchenAid dealer to determine if another warranty applies. Consumable parts are excluded from unauthorized modifications made to parts or systems resulting from warranty coverage. 3. Repairs to the appliance. 8. This ...purchase, when this appliance is operated and maintained according to instructions attached to or furnished with the product, KitchenAid will pay for Factory Specified Parts for other damage to the finish of your major appliance is reported to correct house wiring or plumbing. 2....
...installation of your major appliance, to instruct you on how to use your authorized KitchenAid dealer to determine if another warranty applies. Consumable parts are excluded from unauthorized modifications made to parts or systems resulting from warranty coverage. 3. Repairs to the appliance. 8. This ...purchase, when this appliance is operated and maintained according to instructions attached to or furnished with the product, KitchenAid will pay for Factory Specified Parts for other damage to the finish of your major appliance is reported to correct house wiring or plumbing. 2....
Installation Guide
Page 1
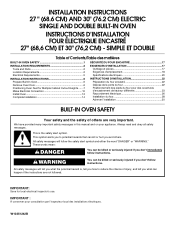
... reduce the chance of Contents/Table des matières BUILT-IN OVEN SAFETY 1 SÉCURITÉ DU FOUR ENCASTR 17 INSTALLATION REQUIREMENTS 2 Tools and Parts 2 Location Requirements 2 Electrical Requirements 5 INSTALLATION INSTRUCTIONS 6 Prepare Built-In Oven 6 Remove Oven Door 6 Positioning Oven Feet for local electrical inspector's use. This is , tell you...
... reduce the chance of Contents/Table des matières BUILT-IN OVEN SAFETY 1 SÉCURITÉ DU FOUR ENCASTR 17 INSTALLATION REQUIREMENTS 2 Tools and Parts 2 Location Requirements 2 Electrical Requirements 5 INSTALLATION INSTRUCTIONS 6 Prepare Built-In Oven 6 Remove Oven Door 6 Positioning Oven Feet for local electrical inspector's use. This is , tell you...

Installation Guide
Page 2
...support surface to pass the appliance cable through to undercounter installation instructions for wall cabinet installations) ■ Level ■ Flat-blade screwdriver Parts needed ■ Phillips screwdriver ■ Measuring tape ■ Hand or electric drill (for wall cabinet installations) ■ 1" (2.5 cm...8328;" screws - Refer to the junction box. Tools needed ■ UL listed or CSA approved conduit connector ■ UL listed wire connectors Parts supplied ■ #8-14 x 1" screws - It is installed in the adjacent right or left rear corner of cabinet cutout. ■ ...
...support surface to pass the appliance cable through to undercounter installation instructions for wall cabinet installations) ■ Level ■ Flat-blade screwdriver Parts needed ■ Phillips screwdriver ■ Measuring tape ■ Hand or electric drill (for wall cabinet installations) ■ 1" (2.5 cm...8328;" screws - Refer to the junction box. Tools needed ■ UL listed or CSA approved conduit connector ■ UL listed wire connectors Parts supplied ■ #8-14 x 1" screws - It is installed in the adjacent right or left rear corner of cabinet cutout. ■ ...
Installation Guide
Page 5
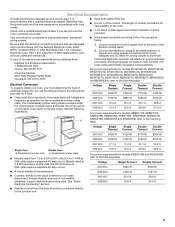
... rating plate. Aluminum/copper connection must conform with the National Electrical Code, ANSI/ NFPA 70-latest edition or CSA Standards C22.1-94, Canadian Electrical Code, Part 1 and C22.2 No. Models rated at 4.8 kW and below at 240 volts (3.6 kW and below : Be sure that the ground path and the wire gauge...
... rating plate. Aluminum/copper connection must conform with the National Electrical Code, ANSI/ NFPA 70-latest edition or CSA Standards C22.1-94, Canadian Electrical Code, Part 1 and C22.2 No. Models rated at 4.8 kW and below at 240 volts (3.6 kW and below : Be sure that the ground path and the wire gauge...
Installation Guide
Page 6
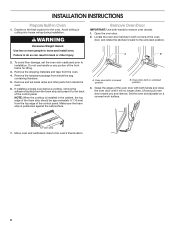
... the oven door until it to installation. Do not use handle or any portion of the control panel. Oven door latch in back or other parts from the oven. 4. A. INSTALLATION INSTRUCTIONS Prepare Built-In Oven 1.
... the oven door until it to installation. Do not use handle or any portion of the control panel. Oven door latch in back or other parts from the oven. 4. A. INSTALLATION INSTRUCTIONS Prepare Built-In Oven 1.

Installation Guide
Page 14
...: Please reference the "Assistance or Service" section of your built-in oven. 14 Press START. Turn power on single ovens. Check that you have all parts are now installed. At first use and cleaning, read the Use and Care Guide. 3. For more information, read the Use and Care Guide. 5. Check that... oven has been on for 5 minutes, feel heat or if an error message appears in the Use and Care Guide. 6. If there is an extra part, go back through the steps to see which step was skipped. 2. Complete Installation 1.
...: Please reference the "Assistance or Service" section of your built-in oven. 14 Press START. Turn power on single ovens. Check that you have all parts are now installed. At first use and cleaning, read the Use and Care Guide. 3. For more information, read the Use and Care Guide. 5. Check that... oven has been on for 5 minutes, feel heat or if an error message appears in the Use and Care Guide. 6. If there is an extra part, go back through the steps to see which step was skipped. 2. Complete Installation 1.


