
Use & Care Guide
Page 3
... or around any part of the oven. ■ Clean Only Parts Listed in oven. ■ DO NOT TOUCH HEATING ELEMENTS OR INTERIOR SURFACES OF OVEN - Loose-fitting or hanging garments should not be killed or seriously injured if you and others are oven vent openings and surfaces near these openings, oven doors, and windows of oven doors. Smother fire or...
... or around any part of the oven. ■ Clean Only Parts Listed in oven. ■ DO NOT TOUCH HEATING ELEMENTS OR INTERIOR SURFACES OF OVEN - Loose-fitting or hanging garments should not be killed or seriously injured if you and others are oven vent openings and surfaces near these openings, oven doors, and windows of oven doors. Smother fire or...
Use & Care Guide
Page 4
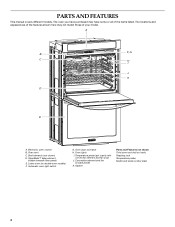
PARTS AND FEATURES This manual covers different models. Oven vent C. CleanBake™ bake element (hidden beneath floor panel) E. Oven door lock latch H. Oven lights I J K D E A. Lower oven (on double oven models) F. Convection element and fan (in back panel) K. The oven you have purchased may not match those of the items listed. A B F, G C H I . Electronic oven control B. Automatic oven... may have some or all of your model. Gasket Parts and Features not shown Third oven rack (roll-out rack) Roasting rack Temperature probe Model and serial number plate 4
PARTS AND FEATURES This manual covers different models. Oven vent C. CleanBake™ bake element (hidden beneath floor panel) E. Oven door lock latch H. Oven lights I J K D E A. Lower oven (on double oven models) F. Convection element and fan (in back panel) K. The oven you have purchased may not match those of the items listed. A B F, G C H I . Electronic oven control B. Automatic oven... may have some or all of your model. Gasket Parts and Features not shown Third oven rack (roll-out rack) Roasting rack Temperature probe Model and serial number plate 4
Use & Care Guide
Page 7
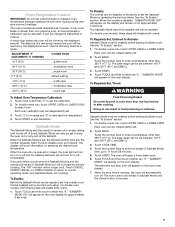
... bake cycle. 6. Use the following step will appear on for only part of the ability to set . 2. Touch TOOLS and then "5" to set between 145°F and 550°F (63°C and 288°C). 3. Each oven calibration can be enabled before starting the Bake cycle. The Sabbath Mode... the temperature calibration can be set the calibration. 2. When the Sabbath Mode is opened or closed, the oven light will not turn on or off immediately. When the oven door is set until turned off . If a power failure occurs when the Sabbath Mode is disabled, "SABBATH MODE OFF"...
... bake cycle. 6. Use the following step will appear on for only part of the ability to set . 2. Touch TOOLS and then "5" to set between 145°F and 550°F (63°C and 288°C). 3. Each oven calibration can be enabled before starting the Bake cycle. The Sabbath Mode... the temperature calibration can be set the calibration. 2. When the Sabbath Mode is opened or closed, the oven light will not turn on or off immediately. When the oven door is set until turned off . If a power failure occurs when the Sabbath Mode is disabled, "SABBATH MODE OFF"...
Use & Care Guide
Page 14
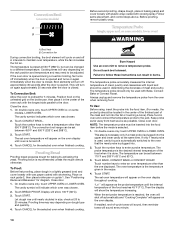
...will cycle on and off in the center of the thickest part of the meat and not into the upper and lower cavity at 20 to enter a probe temperature. Proofing twice is selected. 1. Close door. 1. Display will indicate which oven was chosen. 2. Touch START. Touch BAKE, CONVECT BAKE ... Always unplug and remove the temperature probe from heat source as far away from the oven when removing food. Keep probe as possible. Close oven door. On double ovens only, touch UPPER OVEN or LOWER OVEN. This step is necessary only if a meat probe is the desired internal temperature of...
...will cycle on and off in the center of the thickest part of the meat and not into the upper and lower cavity at 20 to enter a probe temperature. Proofing twice is selected. 1. Close door. 1. Display will indicate which oven was chosen. 2. Touch START. Touch BAKE, CONVECT BAKE ... Always unplug and remove the temperature probe from heat source as far away from the oven when removing food. Keep probe as possible. Close oven door. On double ovens only, touch UPPER OVEN or LOWER OVEN. This step is necessary only if a meat probe is the desired internal temperature of...

Use & Care Guide
Page 17
...™ Kitchen and Appliance Cleaner Part Number W10355010 (not included): See "Assistance or Service" section to order. Cleaning Method: ■ Glass cleaner and soft cloth or sponge: Apply glass cleaner to soft cloth or sponge, not directly on when the oven door is off . To avoid damage... to the rack guides will come on panel. ■ affresh™ Kitchen and Appliance Cleaner Part Number W10355010 (not included): See "Assistance or Service" section to order....
...™ Kitchen and Appliance Cleaner Part Number W10355010 (not included): See "Assistance or Service" section to order. Cleaning Method: ■ Glass cleaner and soft cloth or sponge: Apply glass cleaner to soft cloth or sponge, not directly on when the oven door is off . To avoid damage... to the rack guides will come on panel. ■ affresh™ Kitchen and Appliance Cleaner Part Number W10355010 (not included): See "Assistance or Service" section to order....

Use & Care Guide
Page 21
... of purchase. 6. Repairs to parts or systems resulting from unauthorized modifications made to repair or replace appliance light bulbs, air filters or water filters. KITCHENAID SHALL NOT BE LIABLE FOR INCIDENTAL OR CONSEQUENTIAL DAMAGES. KITCHENAID® BUILT-IN OVEN & MICROWAVE WARRANTY LIMITED WARRANTY For... is operated and maintained according to instructions attached to or furnished with the product, KitchenAid will pay for Factory Specified Parts for the stainless steel oven cavity/inner door if the part rusts through due to defects in a manner that have been removed, altered or ...
... of purchase. 6. Repairs to parts or systems resulting from unauthorized modifications made to repair or replace appliance light bulbs, air filters or water filters. KITCHENAID SHALL NOT BE LIABLE FOR INCIDENTAL OR CONSEQUENTIAL DAMAGES. KITCHENAID® BUILT-IN OVEN & MICROWAVE WARRANTY LIMITED WARRANTY For... is operated and maintained according to instructions attached to or furnished with the product, KitchenAid will pay for Factory Specified Parts for the stainless steel oven cavity/inner door if the part rusts through due to defects in a manner that have been removed, altered or ...
Installation Guide
Page 1
...) - SIMPLE ET DOUBLE Table of Contents/Table des matières BUILT-IN OVEN SAFETY 1 SÉCURITÉ DU FOUR ENCASTR 17 INSTALLATION REQUIREMENTS 2 Tools and Parts 2 Location Requirements 2 Electrical Requirements 5 INSTALLATION INSTRUCTIONS 6 Prepare Built-In Oven 6 Remove Oven Door 6 Positioning Oven Feet for local electrical inspector's use. All safety messages will follow instructions. These words...
...) - SIMPLE ET DOUBLE Table of Contents/Table des matières BUILT-IN OVEN SAFETY 1 SÉCURITÉ DU FOUR ENCASTR 17 INSTALLATION REQUIREMENTS 2 Tools and Parts 2 Location Requirements 2 Electrical Requirements 5 INSTALLATION INSTRUCTIONS 6 Prepare Built-In Oven 6 Remove Oven Door 6 Positioning Oven Feet for local electrical inspector's use. All safety messages will follow instructions. These words...
Installation Guide
Page 6
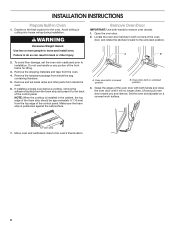
...strip is installed in both corners of the oven door, and rotate the latches forward to remove oven door(s). 1. Move oven and cardboard close to do so can result in back or other parts from inside the bag containing literature. 5. Open the oven door. 2. To avoid floor damage, set aside... racks and other injury. NOTE: When the cooktop is positioned against the cabinet face. A A. If installing a single oven below a cooktop, remove the...
...strip is installed in both corners of the oven door, and rotate the latches forward to remove oven door(s). 1. Move oven and cardboard close to do so can result in back or other parts from inside the bag containing literature. 5. Open the oven door. 2. To avoid floor damage, set aside... racks and other injury. NOTE: When the cooktop is positioned against the cabinet face. A A. If installing a single oven below a cooktop, remove the...


