
Use & Care Guide
Page 3
...Loose-fitting or hanging garments should never be killed or seriously injured if you don't follow basic precautions, including the following: ■ Proper Installation - Do not repair or replace any part of the oven. ■ Wear Proper Apparel - Flammable materials should be stored in an oven...SAFETY Your safety and the safety of others . All safety messages will tell you to sit or stand on Grease Fires - IMPORTANT SAFETY INSTRUCTIONS WARNING: To reduce the risk of fire, electrical shock, injury to burst and result in injury. ■ Keep Oven Vent Ducts ...
...Loose-fitting or hanging garments should never be killed or seriously injured if you don't follow basic precautions, including the following: ■ Proper Installation - Do not repair or replace any part of the oven. ■ Wear Proper Apparel - Flammable materials should be stored in an oven...SAFETY Your safety and the safety of others . All safety messages will tell you to sit or stand on Grease Fires - IMPORTANT SAFETY INSTRUCTIONS WARNING: To reduce the risk of fire, electrical shock, injury to burst and result in injury. ■ Keep Oven Vent Ducts ...
Use & Care Guide
Page 18
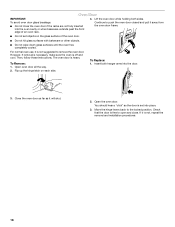
... the racks are not fully inserted into place. 3. The oven door is off and cool. Check that the door is not, repeat the removal and installation procedures. 18 Lift the oven door while holding both hanger arms into the door. 2. To avoid oven door glass breakage: ■ Do not close . To... not hit glass surfaces with bakeware or other objects. ■ Do not wipe down glass surfaces until the oven has completely cooled. Then, follow these instructions. If it will shut. 2.
... the racks are not fully inserted into place. 3. The oven door is off and cool. Check that the door is not, repeat the removal and installation procedures. 18 Lift the oven door while holding both hanger arms into the door. 2. To avoid oven door glass breakage: ■ Do not close . To... not hit glass surfaces with bakeware or other objects. ■ Do not wipe down glass surfaces until the oven has completely cooled. Then, follow these instructions. If it will shut. 2.

Use & Care Guide
Page 19
.... If a letter followed by a number? Oven cooking results not what expected ■ Is the proper temperature set ? Double-check the recipe in the pan? See Installation Instructions. See "Electronic Oven Control" section. ■ Has a delay start Self-Clean cycle been set ? During a selfclean cycle, the air stream is normal. See "Display(s)" section...
.... If a letter followed by a number? Oven cooking results not what expected ■ Is the proper temperature set ? Double-check the recipe in the pan? See Installation Instructions. See "Electronic Oven Control" section. ■ Has a delay start Self-Clean cycle been set ? During a selfclean cycle, the air stream is normal. See "Display(s)" section...
Use & Care Guide
Page 20
...Installation information. ■ Use and maintenance procedures. ■ Accessory and repair parts sales. ■ Specialized customer assistance (Spanish speaking, hearing impaired, limited vision, etc.). ■ Referrals to your telephone directory Yellow Pages. Or visit our website at www.kitchenaid.ca. KitchenAid... or concerns at 1-800-442-9991 and follow the instructions below. ASSISTANCE OR SERVICE Before calling for assistance or service, please check "Troubleshooting." To locate the KitchenAid designated service company in your request. If you need replacement...
...Installation information. ■ Use and maintenance procedures. ■ Accessory and repair parts sales. ■ Specialized customer assistance (Spanish speaking, hearing impaired, limited vision, etc.). ■ Referrals to your telephone directory Yellow Pages. Or visit our website at www.kitchenaid.ca. KitchenAid... or concerns at 1-800-442-9991 and follow the instructions below. ASSISTANCE OR SERVICE Before calling for assistance or service, please check "Troubleshooting." To locate the KitchenAid designated service company in your request. If you need replacement...

Use & Care Guide
Page 21
... if the factory applied serial number has been altered or removed from your major appliance is located in materials or workmanship. Major appliances with published installation instructions. 10. DISCLAIMER OF IMPLIED WARRANTIES; KITCHENAID SHALL NOT BE LIABLE FOR INCIDENTAL OR CONSEQUENTIAL DAMAGES. If you on how to use your authorized...
... if the factory applied serial number has been altered or removed from your major appliance is located in materials or workmanship. Major appliances with published installation instructions. 10. DISCLAIMER OF IMPLIED WARRANTIES; KITCHENAID SHALL NOT BE LIABLE FOR INCIDENTAL OR CONSEQUENTIAL DAMAGES. If you on how to use your authorized...
Dimension Guide
Page 1
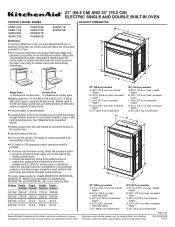
...max. recessed depth E. 27" (68.6 cm) overall width 30" (76.2 cm) models A. 51 130.0 cm) max. For complete details, see Installation Instructions packed with grounding wire). Specifications subject to change without notice. 27" (68.6 cm) models A. 28 72.8 cm) max. 27" (68.6 CM)...BUILT-IN OVEN PRODUCT MODEL SERIES PRODUCT DIMENSIONS KEBK101B KEBK171B KEBK206B KEBK276B KEBS109B KEBS179B KEBS207B KEBS209B KEBS277B KEBS279B Electrical: To properly install your oven, you will be provided. See the following table. q Do not cut the conduit. Follow the electrical ...
...max. recessed depth E. 27" (68.6 cm) overall width 30" (76.2 cm) models A. 51 130.0 cm) max. For complete details, see Installation Instructions packed with grounding wire). Specifications subject to change without notice. 27" (68.6 cm) models A. 28 72.8 cm) max. 27" (68.6 CM)...BUILT-IN OVEN PRODUCT MODEL SERIES PRODUCT DIMENSIONS KEBK101B KEBK171B KEBK206B KEBK276B KEBS109B KEBS179B KEBS207B KEBS209B KEBS277B KEBS279B Electrical: To properly install your oven, you will be provided. See the following table. q Do not cut the conduit. Follow the electrical ...
Dimension Guide
Page 2
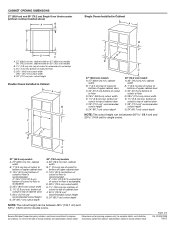
...cm) bottom of cutout to floor is acceptable. D. 28¹⁄₂" (72.4 cm) cutout width E. 1¹⁄₂" (3.8 cm) min. cutout height Double Ovens Installed in Cabinet A E D C A. 27" (68.6 cm) min. cabinet width B. 1" (2.5 cm) top of cutout to floor D. 25¹⁄₂" (64.8 ...models A. 30" (76.2 cm) min. bottom of cutout to floor is recommended. 4"-14³⁄₄" (10.2-37.5 cm) bottom of 2 Ref. Instructions packed with product. Page 2 of cutout to top of cabinet door F. 28" (71.2 cm)* recommended cutout height G. 24" (60.7 cm) cutout depth...
...cm) bottom of cutout to floor is acceptable. D. 28¹⁄₂" (72.4 cm) cutout width E. 1¹⁄₂" (3.8 cm) min. cutout height Double Ovens Installed in Cabinet A E D C A. 27" (68.6 cm) min. cabinet width B. 1" (2.5 cm) top of cutout to floor D. 25¹⁄₂" (64.8 ...models A. 30" (76.2 cm) min. bottom of cutout to floor is recommended. 4"-14³⁄₄" (10.2-37.5 cm) bottom of 2 Ref. Instructions packed with product. Page 2 of cutout to top of cabinet door F. 28" (71.2 cm)* recommended cutout height G. 24" (60.7 cm) cutout depth...
Installation Guide
Page 1
... d'encastrement de hauteur différente 23 Raccordement électrique 26 Installation du four 28 Achever l'installation 30 BUILT-IN OVEN SAFETY Your safety and the safety of injury, and tell you don't follow instructions. INSTALLATION INSTRUCTIONS 27 " (68.6 CM) AND 30" (76.2 CM) ELECTRIC... SINGLE AND DOUBLE BUILT-IN OVEN INSTRUCTIONS D'INSTALLATION FOUR ÉLECTRIQUE ENCASTRÉ 27" (68,6 CM) ET 30" (76,2 CM)...
... d'encastrement de hauteur différente 23 Raccordement électrique 26 Installation du four 28 Achever l'installation 30 BUILT-IN OVEN SAFETY Your safety and the safety of injury, and tell you don't follow instructions. INSTALLATION INSTRUCTIONS 27 " (68.6 CM) AND 30" (76.2 CM) ELECTRIC... SINGLE AND DOUBLE BUILT-IN OVEN INSTRUCTIONS D'INSTALLATION FOUR ÉLECTRIQUE ENCASTRÉ 27" (68,6 CM) ET 30" (76,2 CM)...

Installation Guide
Page 2
... been drilled in the right rear or left cabinet. If you are shown must be able to undercounter installation instructions for wall cabinet installations) ■ Level ■ Flat-blade screwdriver Parts needed ■ UL listed or CSA approved conduit connector ■ UL ...of 194°F (90°C). Tools needed ■ Phillips screwdriver ■ Measuring tape ■ Hand or electric drill (for wall cabinet installations) ■ 1" (2.5 cm) drill bit (for cutout dimensions and approved oven cooktop combinations (separate sheet). 2 Location Requirements IMPORTANT: Observe all...
... been drilled in the right rear or left cabinet. If you are shown must be able to undercounter installation instructions for wall cabinet installations) ■ Level ■ Flat-blade screwdriver Parts needed ■ UL listed or CSA approved conduit connector ■ UL ...of 194°F (90°C). Tools needed ■ Phillips screwdriver ■ Measuring tape ■ Hand or electric drill (for wall cabinet installations) ■ 1" (2.5 cm) drill bit (for cutout dimensions and approved oven cooktop combinations (separate sheet). 2 Location Requirements IMPORTANT: Observe all...
Installation Guide
Page 5
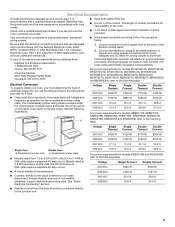
... KEBU209B, refer to the following table. This oven must conform with a qualified electrical installer if you will be provided. ■ If the house has aluminum wiring, follow the instructions provided for models WOS51EC7A, WOS51EC0A, WOD51EC7A, WOD51EC0A, WOS92EC7A, WOS92EC0A, WOD93EC7A, WOD93EC0A, ... conduit connector must be connected to aluminum. The model/serial number rating plate is recommended that a qualified electrical installer determine that the electrical connection and wire size are in conformance with local codes. Voltage Single Single Thermal Convect ...
... KEBU209B, refer to the following table. This oven must conform with a qualified electrical installer if you will be provided. ■ If the house has aluminum wiring, follow the instructions provided for models WOS51EC7A, WOS51EC0A, WOD51EC7A, WOD51EC0A, WOS92EC7A, WOS92EC0A, WOD93EC7A, WOD93EC0A, ... conduit connector must be connected to aluminum. The model/serial number rating plate is recommended that a qualified electrical installer determine that the electrical connection and wire size are in conformance with local codes. Voltage Single Single Thermal Convect ...
Installation Guide
Page 6
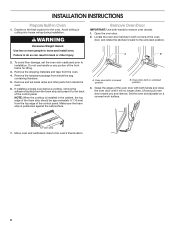
...for the oven. To avoid floor damage, set aside racks and other injury. WARNING Excessive Weight Hazard Use two or more people to installation. INSTALLATION INSTRUCTIONS Prepare Built-In Oven 1. Remove Oven Door IMPORTANT: Use both corners of the oven door, and rotate the latches forward to the oven... ³⁄₈" (10 mm) from the oven. 4. Make sure the foam strip is installed in the cabinet, the top edge of the control panel. Open the oven door. 2. If installing a single oven below a cooktop, remove the adhesive backing from the foam strip and press it ...
...for the oven. To avoid floor damage, set aside racks and other injury. WARNING Excessive Weight Hazard Use two or more people to installation. INSTALLATION INSTRUCTIONS Prepare Built-In Oven 1. Remove Oven Door IMPORTANT: Use both corners of the oven door, and rotate the latches forward to the oven... ³⁄₈" (10 mm) from the oven. 4. Make sure the foam strip is installed in the cabinet, the top edge of the control panel. Open the oven door. 2. If installing a single oven below a cooktop, remove the adhesive backing from the foam strip and press it ...
Installation Guide
Page 7
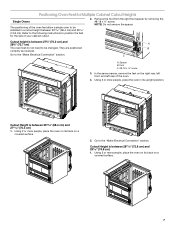
... not remove the spacer. They are positioned correctly as received. Refer to the following instructions to position the feet for Multiple Cabinet Cutout Heights Single Ovens The positioning of the oven feet allow a single oven to be installed in its back on the right rear, left front, and left rear of the...
... not remove the spacer. They are positioned correctly as received. Refer to the following instructions to position the feet for Multiple Cabinet Cutout Heights Single Ovens The positioning of the oven feet allow a single oven to be installed in its back on the right rear, left front, and left rear of the...
Installation Guide
Page 8
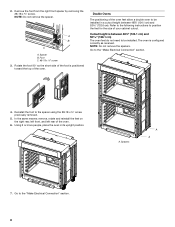
...8311;⁄₈" (124.1 cm) and 52 132.6 cm). Go to be installed in its upright position. Reinstall the foot to position the feet for the size of your cabinet cutout. Spacers A A 7. Refer to the following instructions to the spacer using the #8-18 x ³⁄₈" screw previously removed...Rotate the foot 90° so the short side of the oven feet allow a double oven to the "Make Electrical Connection" section. 8 Go to be installed. Foot C. #8-18 x ³⁄₈" screw 3. The oven is positioned toward the top of the oven. 6. Using 2 or more people, place ...
...8311;⁄₈" (124.1 cm) and 52 132.6 cm). Go to be installed in its upright position. Reinstall the foot to position the feet for the size of your cabinet cutout. Spacers A A 7. Refer to the following instructions to the spacer using the #8-18 x ³⁄₈" screw previously removed...Rotate the foot 90° so the short side of the oven feet allow a double oven to the "Make Electrical Connection" section. 8 Go to be installed. Foot C. #8-18 x ³⁄₈" screw 3. The oven is positioned toward the top of the oven. 6. Using 2 or more people, place ...

Installation Guide
Page 10
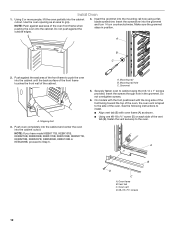
... from the oven as shown. 6. NOTE: Position the foot so the long side of the oven. 7. Spacer 5. Failure to follow these instructions can result in death, fire, or electrical shock. Using 2 or more people, place the oven in death, fire, or electrical shock. ... Shock Hazard Disconnect power before servicing. 4. Use 8 gauge solid copper wire. Front foot B. #8-18 x ³⁄₈" screw C. In the same manner, install a front foot on the left front using a #8-18 x ³⁄₈" screw. A B C A. Electrical Shock Hazard Disconnect power before servicing. Use 12...
... from the oven as shown. 6. NOTE: Position the foot so the long side of the oven. 7. Spacer 5. Failure to follow these instructions can result in death, fire, or electrical shock. Using 2 or more people, place the oven in death, fire, or electrical shock. ... Shock Hazard Disconnect power before servicing. 4. Use 8 gauge solid copper wire. Front foot B. #8-18 x ³⁄₈" screw C. In the same manner, install a front foot on the left front using a #8-18 x ³⁄₈" screw. A B C A. Electrical Shock Hazard Disconnect power before servicing. Use 12...
Installation Guide
Page 12
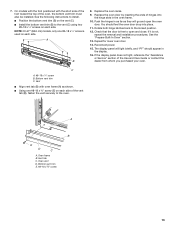
...into the cabinet and center the oven into the grommet and turn ¹⁄₄ turn counterclockwise. Insert the screws through hole in position. Install Oven 1. Using 2 or more people, lift the oven partially into the cabinet. NOTE: Push against seal area of the cabinet. Push ...rail hole C. Do not overtighten screws. 6. Make sure the grommet stays in the grommet. A. Securely fasten oven to grip. See the following instructions to install. ■ Align vent tab (B) with the long side of the foot facing toward the top of the oven, the oven vent is taped ...
...into the cabinet and center the oven into the grommet and turn ¹⁄₄ turn counterclockwise. Insert the screws through hole in position. Install Oven 1. Using 2 or more people, lift the oven partially into the cabinet. NOTE: Push against seal area of the cabinet. Push ...rail hole C. Do not overtighten screws. 6. Make sure the grommet stays in the grommet. A. Securely fasten oven to grip. See the following instructions to install. ■ Align vent tab (B) with the long side of the foot facing toward the top of the oven, the oven vent is taped ...
Installation Guide
Page 13
... door. 14. C A. #8-18 x ¹⁄₄" screw B. A B E D C A. Bottom vent trim E. #8-18 x ³⁄₈" screw 13 See the following instructions to install. ■ Position the bottom vent trim (B) on each side. A B 8. Replace the oven door by inserting the ends of the oven, the bottom vent trim must ... go and open and close. Oven frame B. You should appear in the display. 16. If it is used on the vent (C). ■ Install the bottom vent trim (B) to the oven. On models with the foot positioned with oven frame (A) as they will light briefly, and "PF"...
... door. 14. C A. #8-18 x ¹⁄₄" screw B. A B E D C A. Bottom vent trim E. #8-18 x ³⁄₈" screw 13 See the following instructions to install. ■ Position the bottom vent trim (B) on each side. A B 8. Replace the oven door by inserting the ends of the oven, the bottom vent trim must ... go and open and close. Oven frame B. You should appear in the display. 16. If it is used on the vent (C). ■ Install the bottom vent trim (B) to the oven. On models with the foot positioned with oven frame (A) as they will light briefly, and "PF"...


