Use & Care Guide
Page 1
... FOURS ÉLECTRIQUES ENCASTRÉS SIMPLE ET DOUBLE Guide d'utilisation et d'entretien Au Canada, pour assistance, installation ou service, composer le 1-800-807-6777 ou visiter notre site Web au www.kitchenaid.ca Table of Contents/Table des matières 2 Models/Modèles KEBS109, KEBS207, KEBS209, KEBK101, KEBK206 W10354193A BUILT-IN...
... FOURS ÉLECTRIQUES ENCASTRÉS SIMPLE ET DOUBLE Guide d'utilisation et d'entretien Au Canada, pour assistance, installation ou service, composer le 1-800-807-6777 ou visiter notre site Web au www.kitchenaid.ca Table of Contents/Table des matières 2 Models/Modèles KEBS109, KEBS207, KEBS209, KEBK101, KEBK206 W10354193A BUILT-IN...

Use & Care Guide
Page 21
... or repair house fuses, or to the finish of the Use & Care Guide. KITCHENAID SHALL NOT BE LIABLE FOR INCIDENTAL OR CONSEQUENTIAL DAMAGES. Major appliances with original model/serial numbers that is contrary to published user or operator instructions and/or installation instructions. 4. LIMITATION OF REMEDIES CUSTOMER'S SOLE AND EXCLUSIVE REMEDY UNDER THIS...
... or repair house fuses, or to the finish of the Use & Care Guide. KITCHENAID SHALL NOT BE LIABLE FOR INCIDENTAL OR CONSEQUENTIAL DAMAGES. Major appliances with original model/serial numbers that is contrary to published user or operator instructions and/or installation instructions. 4. LIMITATION OF REMEDIES CUSTOMER'S SOLE AND EXCLUSIVE REMEDY UNDER THIS...
Installation Guide
Page 13
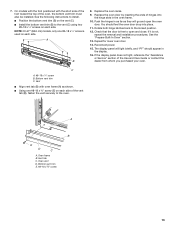
...the "Prepare Built-In Oven" section. 13. See the following instructions to install. ■ Position the bottom vent trim (B) on the vent (C). ■ Install the bottom vent trim (B) to the oven. NOTE: On 27" (68...185;⁄₄" screws on each side of the oven, the bottom vent trim must also be installed. 7. Repeat for lower oven door. 14. Bottom vent trim C. Rotate both hinge latches back...12. Reconnect power. 15. Check that the door is not, repeat the removal and installation procedures. The display panel will go and open and close. A B E D C A. Replace the...
...the "Prepare Built-In Oven" section. 13. See the following instructions to install. ■ Position the bottom vent trim (B) on the vent (C). ■ Install the bottom vent trim (B) to the oven. NOTE: On 27" (68...185;⁄₄" screws on each side of the oven, the bottom vent trim must also be installed. 7. Repeat for lower oven door. 14. Bottom vent trim C. Rotate both hinge latches back...12. Reconnect power. 15. Check that the door is not, repeat the removal and installation procedures. The display panel will go and open and close. A B E D C A. Replace the...

Installation Guide
Page 14
...information, read the Use and Care Guide. 5. Press BROIL on single ovens. Set the temperature. ■ See "Troubleshooting" section in oven. 14 If you purchased your tools. 3. Turn power on double oven models. 4. If you have all of Single and Double Ovens 1. Complete Installation 1. Check that you need Assistance... or Service: Please reference the "Assistance or Service" section of /recycle all parts are now installed. If there is an extra part, go back through the steps to see which step was skipped. 2. Check that all packaging materials. 4. ...
...information, read the Use and Care Guide. 5. Press BROIL on single ovens. Set the temperature. ■ See "Troubleshooting" section in oven. 14 If you purchased your tools. 3. Turn power on double oven models. 4. If you have all of Single and Double Ovens 1. Complete Installation 1. Check that you need Assistance... or Service: Please reference the "Assistance or Service" section of /recycle all parts are now installed. If there is an extra part, go back through the steps to see which step was skipped. 2. Check that all packaging materials. 4. ...


